Engine: Service and Repair
NOTE: When performing engine removal and installation procedures, check and record the distance between the crankshaft pulley and the frame rail, and the distance between the transmission and frame rail. Models with manual transaxle (MTX), check distance at transaxle case. Models with automatic transaxle (ATX), check distance at the oil pump housing. This check should be done before the engine is removed and after the engine is installed. If necessary, loosen the motor mount-to-engine bolts to shift the engine to obtain proper engine/transaxle to frame rail clearances. Proper clearances are necessary to ensure half-shaft alignment. Crankshaft pulley-to-frame rail clearance should be .62 inch plus or minus .15 inch. Transaxle to frame rail clearance should be .98 inch plus or minus .19 inch.
REMOVE
1. Mark position of hood hinges, then remove hood.
2. Disconnect battery ground cable, then remove air cleaner, intake duct and heat tube.
3. Remove alternator air intake tube, then drain engine coolant.
4. Remove secondary coil wire, then the alternator drive belt.
5. Remove alternator mount bolts, then position alternator aside.
6. Disconnect thermactor air supply hose at pump, then remove pump.
7. On models with automatic transaxle, disconnect cooler lines at radiator.
8. On all models, disconnect the engine coolant hoses at radiator, then the heater hoses at engine block.
9. Disconnect electric cooling fan, then remove fan and shroud as an assembly.
10. On models with automatic transaxle, remove transaxle coolant line routing clip at radiator.
11. On all models, remove radiator.
12. Disconnect heater at metal tube, then the necessary engine electrical connectors.
13. Disconnect vacuum hoses, then the fuel pump supply and return lines.
14. On models with power assist brakes, disconnect brake booster vacuum hose at engine.
15. On models with automatic transaxle, disconnect kickdown rod at carburetor.
16. On all models, disconnect vacuum hose at thermactor valve.
17. Disconnect accelerator cable at carburetor, then remove cable routing bracket attaching screws.
18. Disconnect vapor hose at carbon canister, then raise and support vehicle.
19. Remove clamp from heater supply and return tubes, then disconnect starter battery cable.
20. Remove knee brace from front of starter motor, then pull starter from vehicle.
21. Disconnect exhaust pipe, then remove support bracket.
22. Remove converter cover on automatic transaxle models or inspection cover on manual transaxle models, then the crankshaft pulley.
23. On models with automatic transaxle, remove torque converter to flywheel attaching bolts, then the converter housing lower attaching bolts.
24. On models with manual transaxle, remove timing belt cover lower attaching bolts, then the flywheel attaching bolts.
25. On all models, loosen coolant bypass hose clamp, then disconnect hose from intake manifold.
26. Remove battery ground cable to engine block attaching bolt, then the No. 3A casting bracket to engine bracket attaching nut and bolt.
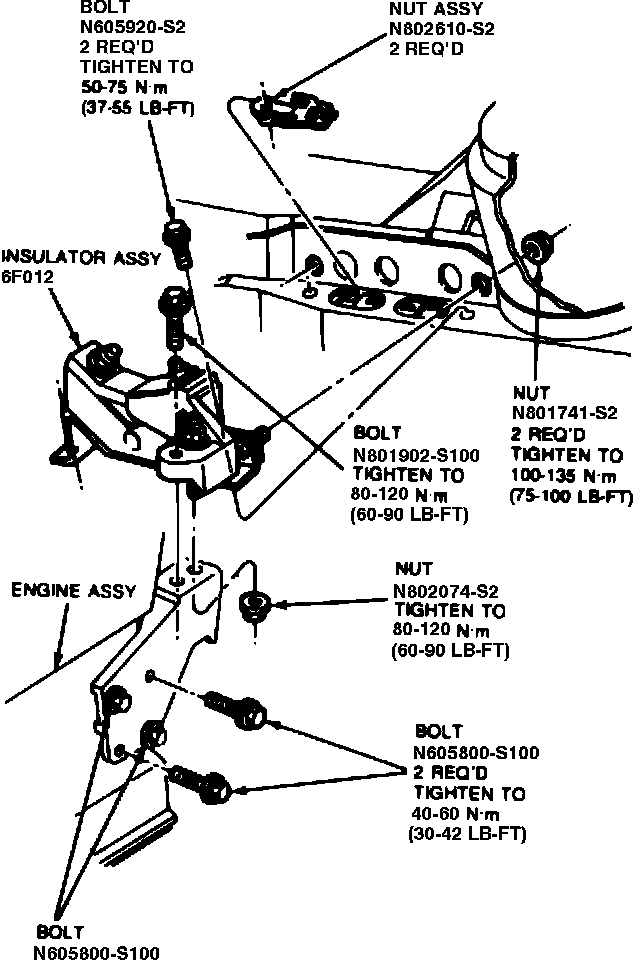
Fig. 1 Righthand No. 3A Insulator:
27. Lower vehicle, then attach suitable lifting brackets to engine, then attach lifting device to engine brackets.
28. Remove No. 3A casting to insulator retaining nut, then the casting.
29. On models with manual transaxle, remove remaining timing belt cover attaching bolts, then the cover.
30. On all models, remove insulator attaching bracket from engine, then support transaxle with a suitable jack.
31. Remove upper attaching bolts from converter housing on models with automatic transaxle or flywheel housing on models with manual transaxle.
32. On all models, remove engine from vehicle.
INSTALL
1. Carefully lower engine into the vehicle using a suitable lifting device.
2. Join the engine to the transaxle.
a. If the vehicle is equipped with MTX, make sure the transaxle input shaft engages the clutch disc.
b. If the vehicle is.equipped with ATX, make sure the torque converter studs engage the flywheel.
c. In either case. make sure the alignment dowels on the back of the engine engage the transaxle housing.
3. Install the converter housing (ATX), flywheel housing (MTX) upper attaching bolts.
4. Install two oil pan-to-transmission attaching bolts and tighten to 40-54 Nm (30-40 ft lb). Then loosen bolts one-half turn.
5. Remove jack from under the transaxle.
6. Position No. 3A insulator attaching casting on the engine and install the attaching bolt and nut.
7. Attach the nuts to the No. 3A insulator to casting.
8. Remove lifting device and the lifting brackets.
9. Connect the necessary electrical connectors.
10. Connect the kickdown rod (ATX).
11. Connect vacuum hoses and carbon canister vapor hose.
12. Connect heater hoses.
13. Connect supply and return lines at the fuel pump.
14. If equipped with power assist brakes, connect the vacuum hose to the power booster.
15. Position the accelerator cable routing bracket and install the attaching bolts.
16. Connect the accelerator cable to the carburetor.
17. Connect the coolant bypass hose (MTX).
18. Install radiator.
19. Install battery negative cable to cylinder block attaching bolt.
20. Attach the lower cooler line (ATX).
21. Connect radiator lower hose.
22. Attach the lower cooler line (ATX).
23. Install radiator cooling fan and shroud assembly.
24. Connect radiator upper hose.
25. Connect radiator cooling fan electrical connector.
26. Raise vehicle.
27. Tighten No. 3A casting to insulator attaching nuts.
28. Install the torque converter to flywheel attaching nuts (ATX).
29. Install crankshaft damper.
30. Install converter housing (ATX), flywheel housing (MTX) lower attaching bolts.
31. Install converter cover (ATX), inspection cover (MTX).
32. Install support bracket.
33. Install starter motor and connect battery cable.
34. Install starter brace at the front of the starter motor.
35. Connect the exhaust inlet pipe.
36. Install the cooler line routing bracket (ATX).
37. Lower vehicle.
38. Install the timing belt cover (MTX).
39. Install alternator and drive belt. Tighten the drive belt to specification.
40. Connect negative battery ground cable.
41. Install alternator air intake tube.
42. Fill cooling system, overflow bottle and bleed the cooling system. Fill the crankcase to the proper level with the specified oil.
43. Install hood.
44. Start engine and check for coolant, oil and fuel leaks.
45. Install air cleaner assembly with the intake duct and heat tube and connect vacuum hoses.
46. Check and if necessary, adjust the curb idle speed.