 |
dbr411zwb040
REAR BRAKE (DRUM) REMOVAL/INSTALLATION
id041100810100
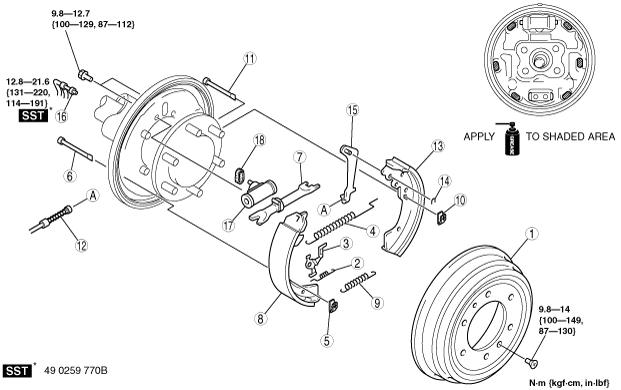
1. Remove in the order indicated in the table.
2. Install in the reverse order of removal.
3. After installation, pump the brake pedal a few times and inspect the following:
dbr411zwb040
|
|
1
|
Brake drum
(See Brake Drum Installation Note.)
|
|
2
|
Pawl spring
|
|
3
|
Pawl lever
|
|
4
|
Upper return spring
|
|
5
|
Hold spring (leading shoe side)
|
|
6
|
Hold pin (leading shoe side)
|
|
7
|
Adjust strut
|
|
8
|
Brake shoe (leading shoe)
|
|
9
|
Lower return spring
|
|
10
|
Hold spring (trailing shoe side)
|
|
11
|
Hold pin (trailing shoe side)
|
|
12
|
Parking brake cable
|
|
13
|
Brake shoe (trailing shoe)
|
|
14
|
U-ring
|
|
15
|
Operating lever
|
|
16
|
Brake pipe
|
|
17
|
Wheel cylinder
|
|
18
|
Gasket
|
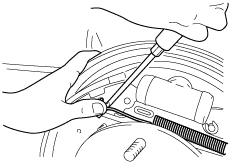
Upper Return Spring Removal Note
1. Remove the return spring using a flathead screwdriver while supporting it with the hand, as shown in the figure, to prevent it from flying off.
dbr411zwb046
|
Upper Return Spring Installation Note
1. Install the return spring using a flathead screwdriver while supporting it with the hand, as shown in the figure, to prevent it from flying off.
dbr411zwb046
|
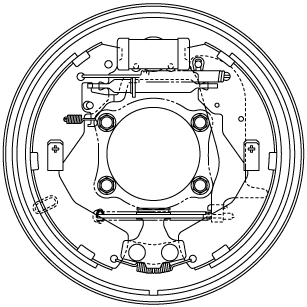
Brake Drum Installation Note
1. Verify that each component part of the rear brake (drum) is properly installed as shown in the figure.
dbr411zwb056
|
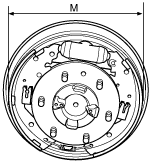
2. Turn the adjuster on the adjustment strut to adjust the brake shoe until the outer diameter (M) of the brake shoe is as specified below.
dbr411zwb051
|
3. Install the brake drum.
4. Depress the brake pedal five times and operate the auto adjuster.
5. Verify there is no brake drag.