 |
dcf912zwb034
WINDSHIELD INSTALLATION
id091200801400
1. Remove the sealant along the perimeter of the glass using a cutting a razor. (When reusing the glass)
2. Clean and degrease an approximately. 50 mm {1.97 in} wide strip along the perimeter of the windshield.
3. Inspect the glass for cracks. If it is cracked, chamfer it using sandpaper.
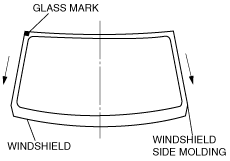
4. Install the windshield upper molding from the center toward both sides.
dcf912zwb034
|
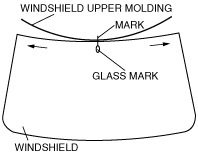
5. Align the upper edge of the windshield side molding with the glass mark.
6. Install the windshield side molding from the upper part towards the lower part.
dcf912zwb035
|
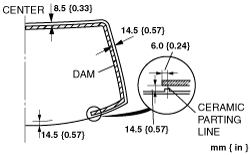
7. Securely bond a dam along the circumference of the glass 8.5 mm {0.33 in} from the upper edge and 14.5 mm {0.57in} from the lower and side edge.
dcf912zwb036
|
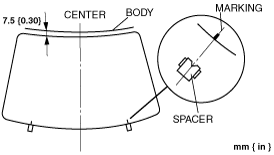
8. Temporarily install the glass onto the body and adjust the glass to body clearance.
9. Make a mark on the glass directly above the V-notch of spacers.
10. Verify that the gap along the upper edge is 7.5 mm {0.30 in}.
dcf912zwb037
|
11. Remove the windshield.
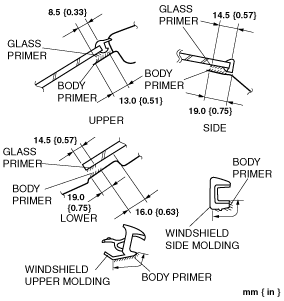
12. Use a brush to apply primer to the bonding area of the glass and body within the region shown. Use only glass primer on the glass and body primer on the body and molding. Allow it to dry for approximately 30 minutes.
dcf912zwb038
|
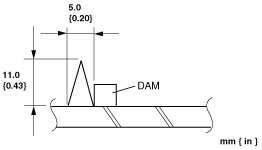
13. Once the primer is dry, apply a 11.0 mm {0.43in}high, 5.0 mm {0.20in} wide bead of sealant along the dam around the entire circumference to fill the gap between the dam and the edge of the windshield.
dcf912zwb039
|
14. Align the glass marks with the V-notches in spacers and install the glass onto the body.
15. Press firmly inward on the glass to compress the sealant.
16. Verify that the gap along the upper and side edge is 7.5 mm {0.30 in}.
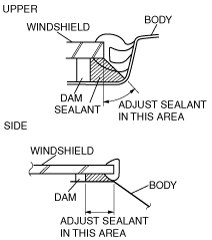
17. Adjust the sealant as indicated in the figure.
dcf912zwb040
|
Hardening time of sealant
|
Temperature |
Surface hardening time |
Time required until car can be put into service |
|---|---|---|
|
5 °C {41 °F}
|
Approx. 1.5 h
|
Approx. 12 h
|
|
20 °C {68 °F}
|
Approx. 1 h
|
Approx. 4 h
|
|
35 °C {95 °F}
|
Approx. 10 min
|
Approx. 2 h
|
18. Use white gasoline to remove any sealant that oozes out.
19. Install the following parts:
20. Allow the sealant to harden completely.