 |
bwl1ge00000151
TIMING BELT DISASSEMBLY [WL-C, WE-C]
id0110b6500300
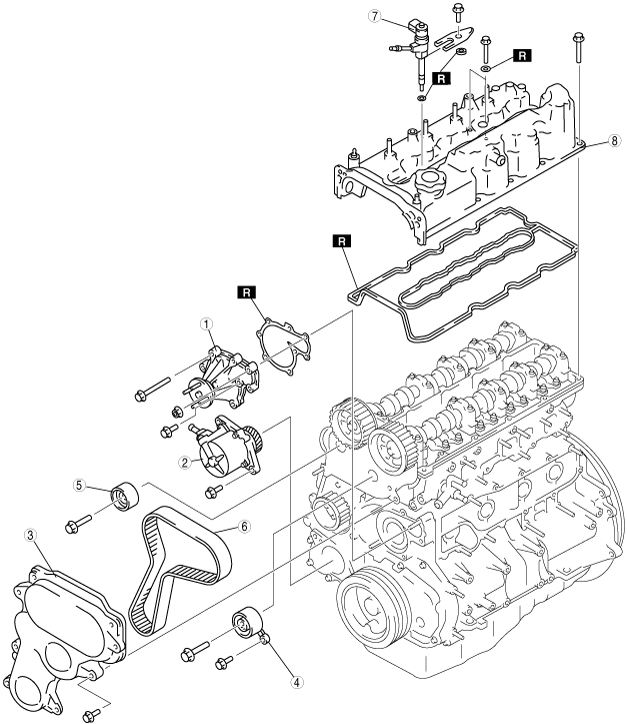
1. Disassemble in the order shown in the figure.
bwl1ge00000151
|
|
1
|
Water pump
|
|
2
|
Vacuum pump
|
|
3
|
Timing belt cover
|
|
4
|
Tensioner
(See Tensioner Disassembly Note.)
|
|
5
|
Idler
|
|
6
|
Timing belt
(See Timing Belt Disassembly Note.)
|
|
7
|
Fuel injector
|
|
8
|
Cylinder head cover
|
Tensioner Disassembly Note
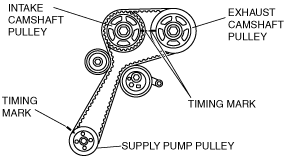
1. Turn the crankshaft clockwise and align the timing marks as shown in the figure.
bwl1ge00000152
|
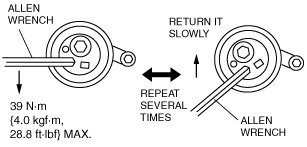
2. Turn the auto tensioner counterclockwise using an Allen wrench. (Rotate the auto tensioner with a force of 39 N·m {4.0 kgf·m, 28.8 ft·lbf} or less.)
bwl1ge00000153
|
3. Insert a fixing pin of approx. 6 mm {0.24 in} diameter into hole A to secure the auto tensioner.
4. Remove the bolts in the order of B and C, then remove the auto tensioner.
5. Assemble the auto tensioner to the engine.
6. Turn the auto tensioner with a force of 39 N·m {4.0 kgf·m, 28.8 ft·lbf} or less using an Allen wrench, then turn it back slowly. Repeat this procedure several times.
bwl1ge00000154
|
7. Verify that the rod has resistance when it is in the most projected position. If there is no resistance, repeat the above procedure.
Timing Belt Disassembly Note
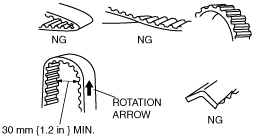
1. Mark the timing belt rotation on the belt for proper reinstallation.
bwl1ge00000155
|
Fuel Injector Disassembly Note
1. When removing the fuel injector, pull it up straight so as not to damage the camshaft cap lower oil seal.