 |
absggw00001595
TIMING BELT REMOVAL/INSTALLATION [WL-3]
id0110b5804000
1. Disconnect the negative battery cable.
2. Remove the following parts to turn the crankshaft.
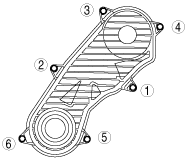
3. Remove in the order indicated in the table.
4. Install in the reverse order of removal.
absggw00001595
|
|
1
|
Timing belt cover
|
|
2
|
Pulley plate
|
|
3
|
Tensioner, Tensioner spring
|
|
4
|
Timing belt
(See Timing Belt Removal Note.)
|
Tensioner, Tensioner Spring Removal Note
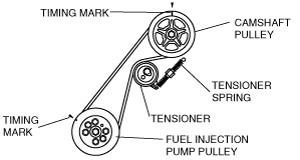
1. Turn the crankshaft clockwise and align the timing marks as shown.
absggw00001596
|
Timing Belt Removal Note
1. Mark the timing belt rotation on the belt for proper reinstallation.
absggw00001597
|
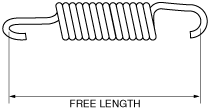
Timing Belt Installation Note
1. Measure the free length of the tensioner spring.
absggw00001598
|
2. Align the timing marks as shown.
absggw00001596
|
3. Verify that the fuel injection pump attaching bolts and nuts are tightened to the specified torque. This must be done to prevent overtensioning of the timing belt after it has been installed.
4. Install the timing belt.
5. Install the tensioner, tensioner spring, and the lock bolt.
6. Tighten the tensioner lock bolt.
7. Turn the crankshaft clockwise twice, and align the timing marks. If they are not aligned, remove the timing belt and repeat from Step 1.
8. Loosen the tensioner lock bolt to apply tension to the belt. Do not apply tension other than that of the tensioner spring.
9. Tighten the tensioner lock bolt. Be sure the tensioner does not move together with the bolt rotation.
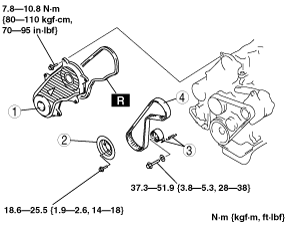
Timing Belt Cover Installation Note
1. Tighten the timing belt cover bolts in the order shown.
absggw00001599
|