|
dbg113awb303
GLOW PLUG REMOVAL/INSTALLATION [WL-3]
id0113a9804400
1. Disconnect the negative battery cable.
2. Remove in the order indicated in the table.
dbg113awb303
|
|
1
|
Glow plug cord
|
|
2
|
Glow plug
(See Glow plug removal note.)
(See Glow plug installation note.)
|
3. Install in the reverse order of removal.
Glow plug removal note
1. When removing the glow plug, first loosen it at least one pitch using a tool, then loosen by hand.
Glow plug installation note
1. Tighten the glow plug it at least one pitch by hand, and continue tightening with a tool.
Glow plug cleaning before installation note
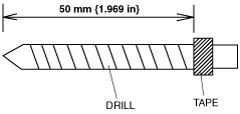
1. Wrap tape on both 5.5 mm {0.217 in} and a 5.7 mm{0.224 in} drills, starting from the tip to a point 50 mm {1.969 in} from the tip.
ebg113awr011
|
2. Push in the 5.5 mm{0.217 in} drill until the section covered with tape is fully inserted.
3. Turn the drill by hand to remove the carbon on the fitting holes.
4. Repeat steps 2. and 3. for the 5.7 mm{0.224 in}drill.