 |
absggw00000259
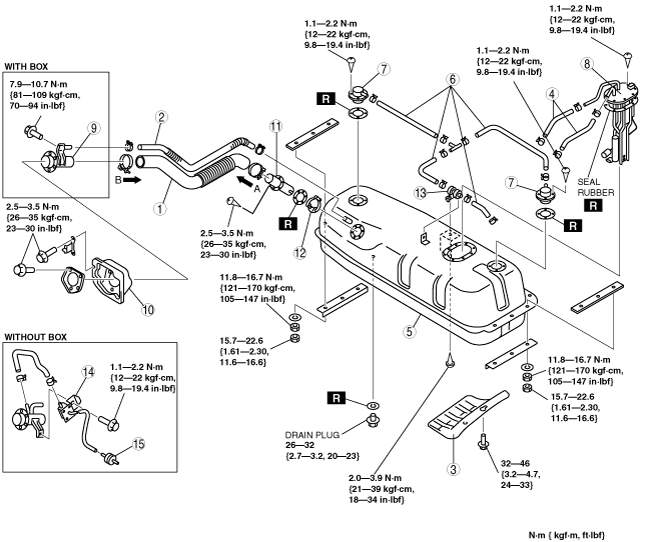
FUEL TANK REMOVAL/INSTALLATION [F2]
id011494801600
1. Level the vehicle.
2. Complete the “BEFORE REPAIR PROCEDURE”. (See BEFORE REPAIR PROCEDURE [F2].)
3. Disconnect the negative battery cable.
4. Drain the fuel from the drain plug.
5. Remove in the order indicated in the table.
6. Install in the reverse order of removal.
7. Complete the “AFTER REPAIR PROCEDURE”. (See AFTER REPAIR PROCEDURE [F2].)
absggw00000259
|
|
1
|
Joint hose
(See Joint Hose Installation.)
|
|
2
|
Breather hose
|
|
3
|
Under guard
|
|
4
|
Fuel hose
|
|
5
|
Fuel tank
|
|
6
|
Evaporative hose
|
|
7
|
Rollover valve
|
|
8
|
Fuel pump unit
|
|
9
|
Fuel-filler pipe
|
|
10
|
Dust cover
|
|
11
|
Fuel inlet pipe
|
|
12
|
Nonreturn valve
|
|
13
|
Evaporative gas check valve (two-way)
|
|
14
|
Check valve (two-way)
|
|
15
|
Evaporative chamber
|
Evaporative Gas Check Valve (Two-way) Installation Note
1. Install the arrow mark of the evaporative gas check valve (two-way) facing the charcoal canister.
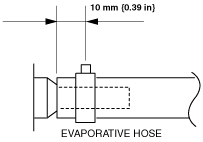
Evaporative Hose Installation Note
1. Fit each hose onto the respective fittings within the specification, and install clamps as shown.
absggw00000206
|
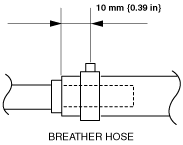
Breather Hose Installation Note
1. Fit each hose onto the respective fittings within the specification, and install clamp as shown.
absggw00000207
|
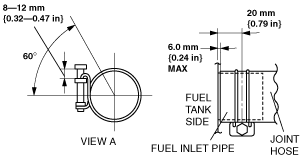
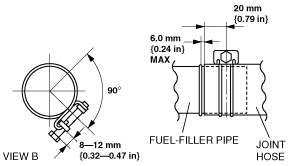
Joint Hose Installation
1. Fit the joint hose onto the respective fittings within the specification, and install clamps as shown.
absggw00000176
|
absggw00000177
|