|
absggw00000297
FUEL TANK REMOVAL/INSTALLATION [WLT-1, WLT-2]
id011496801600
1. Disconnect the negative battery cable.
2. Complete the “BEFORE REPAIR PROCEDURE” (See BEFORE REPAIR PROCEDURE [WLT-1, WLT-2].)
3. Remove the drain plug and drain the fuel from the fuel tank.
4. Remove the rear flap.
5. Remove in the reverse order indicated in the table.
6. Install in the reverse order indicated of removal.
7. Complete the “AFTER REPAIR PROCEDURE”. (See AFTER REPAIR PROCEDURE [WLT-1, WLT-2].)
Double cab 4x2, Freestyle cab 4x2
absggw00000297
|
Regular cab, Double cab 4x4, Freestyle cab 4x4
absggw00000393
|
|
1
|
Joint hose (See Joint Hose Installation Note.)
|
|
2
|
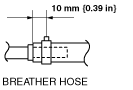
Breather hose (See Breather Hose Installation Note.)
|
|
3
|
Under guard
|
|
4
|
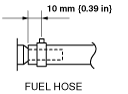
Fuel hose
(See Fuel Hose Installation Note.)
|
|
5
|
Fuel tank
|
|
6
|
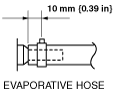
Evaporative hose (See Evaporative Hose Installation Note.)
|
|
7
|
Fuel gauge sender unit
|
|
8
|
Rollover valve
|
|
9
|
Fuel-filler pipe
|
|
10
|
Dust cover
|
|
11
|
Fuel inlet pipe
|
|
12
|
Evaporative chamber
|
|
13
|
Check valve (two-way)
|
Evaporative Hose Installation Note
absggw00000299
|
Fuel Hose Installation Note
absggw00000300
|
Breather Hose Installation Note
absggw00000301
|
Joint Hose Installation Note
absggw00000302
|