Note
• Adding/subtracting 0.02 mm {0.0008 in} thickness shim increases/decreases the starting pressure approx. 470 kPa {4.8 kgf/cm2, 68 psi}.
absggw00000403
|
INJECTION NOZZLE INSPECTION [WLT-1, WLT-2]
id011496806200
Injection Starting Pressure
1. Connect the injection nozzle to a nozzle tester.
2. Bleed the air by pumping the nozzle tester handle several times.
3. Slowly lower the nozzle truster handle and note the pressure when injection starts/
4. If the injection starting pressure is not within the specification, adjust by installing the correct shim.
absggw00000403
|
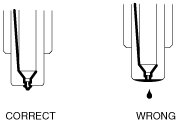
Atomization
1. Connect the injection nozzle to the nozzle tester.
2. Bleed the air by pumping the nozzle tester handle several times.
3. Lower the handle several times as quickly as possible so that a pulsating whistling sound is heard, and note the atomization pattern.
absggw00000404
|
4. If necessary, disassemble and clean or replace the injection nozzle.
Nozzle Leakage
1. Connect the injection nozzle to the nozzle tester.
2. Bleed the air by pumping the nozzle tester handle several times.
3. Apply 8.8 MPa {90 kgf/cm2, 1,280 psi} pressure to the injection nozzle, and inspect for fuel leakage from the nozzle spray port.
absggw00000405
|
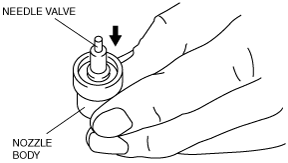
Operating Inspection
1. Verify that the needle valve and nozzle body are not damaged.
2. Verify that the nozzle body is not damaged. Hold the nozzle body upright and insert approximately two thirds of the needle valve; then see if the needle valve drops to the valve seat by its own weight when released.
absggw00000406
|
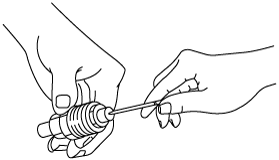
Injection Nozzle Cleaning
1. Inspection the outer and inner surfaces of the injection nozzle for carbon accumulation.
2. If carbon is observed on the outer surface, remove it by using a hard wood chip.
3. If carbon is observed inside of the nozzle, remove it by using a toothpick.
absggw00000407
|
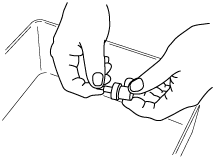
4. Remove the needle valve from the nozzle body.
5. Clean the needle valve and the nozzle body with clean light oil.
6. Verify that the needle valve moves smoothly in the nozzle body.
7. If not, replace the nozzle assembly.
absggw00000408
|