PCM CONFIGURATION [WL-C, WE-C]


id0140b7802600


When the M-MDS can communicate with the original PCM

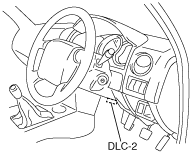
1.  Connect the M-MDS to the DLC-2.

absggw00001995

2.  After the vehicle is identified, select the following items from the initial screen of the M-MDS.

•  When using the IDS (notebook PC)
1.  Select the “Module Programming”.
•  When using the PDS (pocket PC)
1.  Select “Programming”.
2.  Select “Module Programming”.
―  If vehicle identification is not possible, perform the “When the M-MDS fails to communicate with the original PCM” procedure. (See When the M-MDS can communicate with the original PCM.)

3.  Then, select the “Programmable Module Installation”, “PCM” and perform procedures according to directions on the M-MDS screen.

Note
•  If the PCM is replaced with a new one, the PCM stores DTCs P0602 and P1675, illuminates the MIL even though no malfunction is detected. When the configuration is completed, DTCs P0602 and P1675 are cleared.

4.  Retrieve DTC’s using the M-MDS, then verify if DTCs are present.

•  If a DTC is present, perform the applicable DTC inspection.


When the M-MDS fails to communicate with the original PCM

1.  Obtain As-Built data sheet for the vehicle.

2.  Install the service PCM to the vehicle.

3.  Connect the M-MDS to the DLC-2 and start new session to identify the vehicle.

absggw00001995

Note
•  The As-Built data sheet shows the PCM Part Number (Prefix-Suffix) or the equivalent data (7F0-01-01). Enter the prefix in the left entry-field, and suffix in the right entry-field. If the equivalent data is shown on the As-Built Data Sheet instead of a PCM Part Number, you may transform the 12-digit 7F0-01-01 data into a PCM Part Number by following the steps below.
1. Transform the first two digits into an alphabet or numeric character according to the table below and continue to do so for the second, third and fourth 2-digit unmerals. Now the first 8 digits are a PCM Part Number Prefix.
2. Transform the next two digits (the ninth and tenth digit) in the same way. These are now a PCM Part Number Suffix.
3. The last 2 digits arel not used.

Equivalent data
(7F0-01-01)
30
31
32
33
34
35
36
37
38
39
41
42
43
44
45
46
47
48
Transformed Character
0
1
2
3
4
5
6
7
8
9
A
B
C
D
E
F
G
H
Equivalent data
(7F0-01-01)
49
4A
4B
4C
4D
4E
4F
50
51
52
53
54
55
56
57
58
59
5A
Transformed Character
I
J
K
L
M
N
O
P
Q
R
S
T
U
V
W
X
Y
Z

4.  Enter prefix to the left entry field and suffix to the right entry field according to the M-MDS display.

5.  After the vehicle is identified, select the following items from the initial screen of the M-MDS.

•  When using the IDS (notebook PC)
1.  Select the “Module Programming”.
•  When using the PDS (pocket PC)
1.  Select “Programming”.
2.  Select “Module Programming”.

6.  Then, select the “Programmable Module Installation”, “PCM” and perform procedures according to directions on the M-MDS screen.

Note
•  If the PCM is replaced with a new one, the PCM stores DTCs P0602 and P1675, illuminates the MIL even though no malfunction is detected. When the configuration is completed, DTCs P0602 and P1675 are cleared.

7.  Retrieve DTC’s using the M-MDS, then verify if DTCs are present.

•  If a DTC is present, perform the applicable DTC inspection.