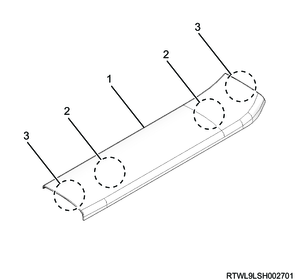
1. Component views
front tongue side seat belt (crew cab)
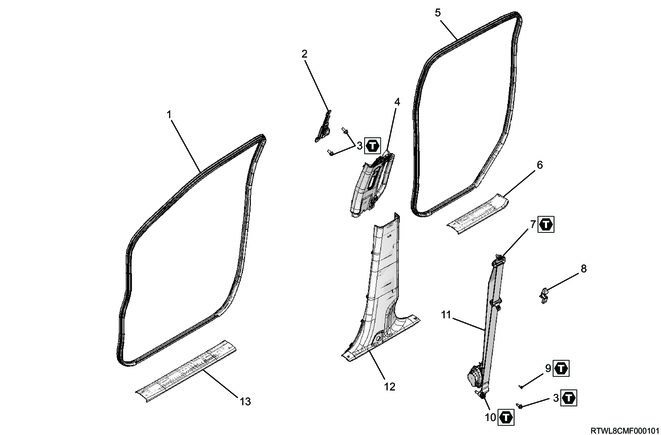
Part name
- Front door finisher
- Adjuster
- Bolt
- Center pillar upper trim cover
- Rear door finisher
- Rear sill plate
- Seat belt upper anchor bolt
- Adjuster cover
- Bolt
- Seat belt lower anchor bolt
- Front tongue side seat belt
- Center pillar lower trim cover
- Front sill plate
Tightening torque
3: 46 N・m { 4.7 kgf・m / 34 lb・ft }
7: 46 N・m { 4.7 kgf・m / 34 lb・ft }
9: 8.2 N・m { 0.8 kgf・m / 73 lb・in }
10: 46 N・m { 4.7 kgf・m / 34 lb・ft }
2. Front tongue side seat belt installation
1) Connect the connector to the pretensioner.
2) Install the front tongue side seat belt to the center pillar.
Tightening torque: 8.2 N・m { 0.8 kgf・m / 73 lb・in } Upper side bolt
Tightening torque: 46 N・m { 4.7 kgf・m / 34 lb・ft } Lower side bolt
3) Install the belt guide to the center pillar.
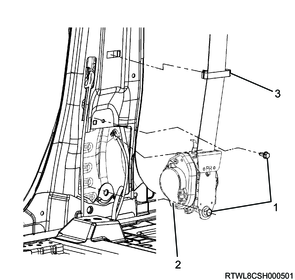
Legend
- Bolt
- Front tongue side seat belt
- Belt guide
4) Install the seat belt upper anchor bolt to the seat belt adjuster.
5) Install the adjuster cover to the seat belt adjuster.

Legend
- Seat belt upper anchor bolt
- Adjuster cover
3. Center pillar lower trim cover installation
1) Install the center pillar lower trim cover to the center pillar.
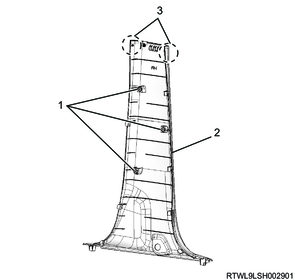
Legend
- Clip
- Center pillar lower trim cover
- Claw section
2) Install the seat belt lower anchor bolt to the center pillar.
Tightening torque: 46 N・m { 4.7 kgf・m / 34 lb・ft }
Legend
- Seat belt lower anchor bolt
4. Rear door finisher installation
1) Install the rear door finisher to the body.
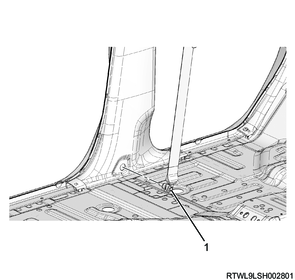
5. Rear sill plate installation
1) Install the rear sill plate to the floor.
Legend
- Rear sill plate
- Clip
- Claw section
6. Front door finisher installation
1) Install the front door finisher to the body.
7. Front sill plate installation
1) Install the front sill plate to the floor.
Regular cab, crew cab

Legend
- Front sill plate
- Clip
- Claw section
8. SRS airbag setting
1. SRS reactivation
Warning
- Never use SRS parts from other vehicles or models.
- Make sure to check the part numbers and use the SRS components intended for the target vehicle.
1) Set the ignition switch to LOCK and remove the key.
Note
- For models with the passive entry and start system, turn the power mode OFF.
2) Make sure that the connectors of the SRS components (SRS airbag, SRS control unit, seat belt with pretensioner, SRS coil, etc.) are fully connected.
3) Install the SRS fuse to the fuse relay box, and connect the battery cable to the negative terminal of the battery.
4) Turn ON the ignition switch and verify that the SRS airbag warning light turns OFF after illuminating for 6 seconds.
Caution
- If the SRS airbag warning light does not operate properly, perform Diagnostic system check - SRS controls.
5) Referring to the following, perform the setting of the front door power window switch with AUTO UP/AUTO DOWN function.
Refer to "9.Body, Cab, Accessories 9T.Glass, Windows, Mirrors front door power window switch setting".