1. Component views
EHCU
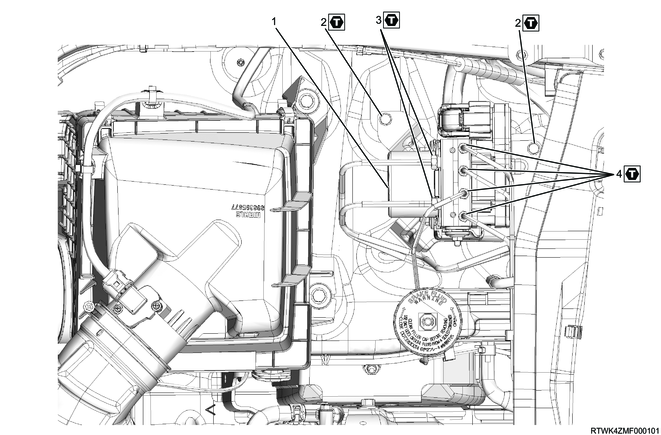
Part name
- EHCU
- Bolt
- Flare nut
- Flare nut
Tightening torque
2: 8.2 N・m { 0.8 kgf・m / 73 lb・in }
3: 13 to 19 N・m { 1.3 to 1.9 kgf・m / 10 to 14 lb・ft } Except ESC specifications
3: 16 to 24 N・m { 1.6 to 2.4 kgf・m / 12 to 18 lb・ft } ESC specifications
4: 13 to 19 N・m { 1.3 to 1.9 kgf・m / 10 to 14 lb・ft }
2. EHCU safety information
Caution
- When welding the vehicle using an electrical arc welder, remove the EHCU from the vehicle.
- If removing the EHCU from the vehicle, disconnect the battery cable, and then remove the connectors.
- Installation is the reverse order of the removal procedure.
- Do not hold the pipe on top of the EHCU when carrying.
- Do not install devices that emit powerful radio waves near the EHCU such as wireless devices.
- Handle with due attention to static electricity.
- Do not allow water or paint to come in contact with the EHCU.
- Never loosen the EHCU bolts and nuts. Do not reuse the EHCU if loosened.
- Do not allow the connector pin terminals to come directly in contact with metal parts such as screwdrivers or tester probe.
- Do not directly apply external voltage to the terminals.
When replacing the EHCU, it is needed to write the vehicle information to a new EHCU.
When replacing the EHCU, upload the data in the EHCU before replacement to a scan tool, and then remove the EHCU.
When communication with a scan tool is not possible, remove as-is.
Use the same scan tool for the replacement procedure from beginning until end. If the scan tool is changed during the procedure, the correct information cannot be written.
3. EHCU upload
1. Precautions
If communication with the old EHCU cannot be established, do not perform the vehicle information upload.
2. Vehicle information upload (ESC specifications)
1) Turn ON the ignition switch.
2) Select "Upload Vehicle Configuration Data" on the scan tool.
- Diagnostics > Chassis > ABS/ESC > Programming > Upload Vehicle Configuration Data
3) Upload the vehicle data to a scan tool by following the on-screen instructions.
4) After completing the upload, turn off the scan tool.
5) Turn OFF the ignition switch.
4. Preliminary and post procedures
1. Preliminary procedures
1) Open the engine hood.
2) Disconnect the battery cable from the battery negative terminal.
Caution
- After turning OFF the ignition switch (power mode for models with passive entry and start system), do not disconnect the battery cable within 3 minutes.
- If the battery cable is disconnected within 3 minutes, the vehicle electronic control system may malfunction.
- If the battery cable is disconnected, perform the setting of the front door power window switch with AUTO UP/AUTO DOWN function after connecting the battery negative terminal.
5. EHCU removal
1) Disconnect the brake pipe from the EHCU.
2) Prevent foreign material from entering the opening of the brake pipe port using a plug, tape, etc.
3) Remove the EHCU from the frame.
Note
- Bracket fixing bolt: 3 bolts