1. Component views
Piston
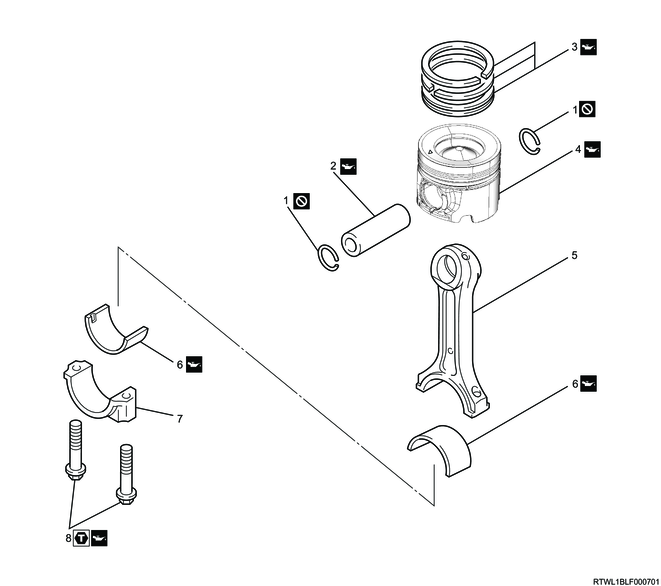
Part name
- Snap ring
- Piston pin
- Piston ring
- Piston
- Connecting rod
- Connecting rod bearing
- Connecting rod cap
- Connecting rod bolt
Tightening torque
8-1: 29.4 N・m { 3.0 kgf・m / 22 lb・ft }
8-2: 45 to 60 °
2. Piston reassembly
1) Sufficiently apply engine oil to the piston pin.
2) Install the snap ring for one side to the piston.
Caution
- Do not reuse the snap ring.
3) Align the piston to the connecting rod.
Caution
- Install so that the piston head front mark and the connecting rod convex mark face the same direction.
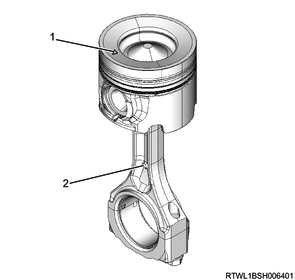
Legend
- Front mark
- Convex mark
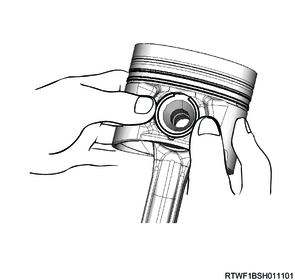
4) Install the piston pin to the piston and connecting rod.
5) Install the snap ring to the piston.
Caution
- Do not reuse the snap ring.
- Make sure that the snap ring opening is facing upward.
- Confirm that the snap ring securely fits into the piston groove and that both the piston and connecting rod move smoothly.
6) Install the oil ring to the piston.
Note
- There is no top or bottom direction for the oil ring.
Caution
- The oil ring joint and coil expander joint should be 180° opposite from each other.
- Install so that there is no opening at the coil expander joint section.
7) Install the 2nd ring to the piston using ring pliers.
Note
- Install the 2nd ring with the N2TB laser mark facing upward.
Caution
- Check that it is installed with the laser mark facing up.
- Do not damage the piston skirt.
8) Install the top ring to the piston using ring pliers.
Note
- Install the top ring with the 1NT laser mark facing upward.
Caution
- Check that it is installed with the laser mark facing up.
- Do not damage the piston skirt.
9) Check that there is the marking on the upper surface of the piston ring.
| Piston ring |
Upper face marking |
| Top ring |
1NT |
| 2nd ring |
N2TB |
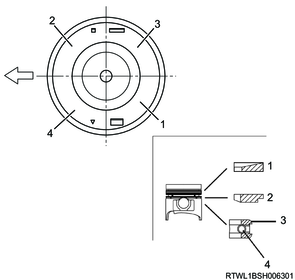
Legend
- Top ring joint
- 2nd ring joint
- Oil ring joint
- Coil expander joint