1. A/C compressor drive belt installation
1. M/T models (Euro 5 or above)
1) Install the A/C compressor drive belt to the following parts.
- Tension pulley
- A/C compressor
- Crankshaft pulley
- Idle pulley
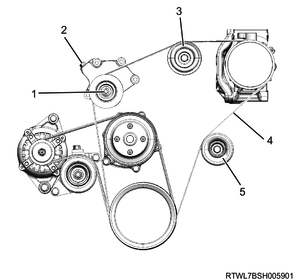
Legend
- Lock nut
- Adjust bolt
- Idle pulley
- A/C compressor drive belt
- Idle pulley
2. Except M/T models (Euro 5 or above)
1) Install the A/C compressor drive belt to the following parts.
- Tension pulley
- A/C compressor
- Crankshaft pulley
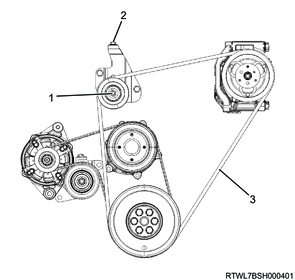
Legend
- Lock nut
- Adjust bolt
- A/C compressor drive belt
2. A/C compressor drive belt adjustment
1. M/T models (Euro 5 or above)
When installing a new belt, initial stretching of the belt occurs.
In addition, when reusing the belt, the belt needs to be fitted to the pulley groove.
After fitting the A/C compressor drive belt, adjust the tension of the A/C compressor drive belt again.
1) Loosen the tension pulley lock nut.
2) Turn the tension pulley adjust bolt to adjust the tension.
Note
- The standard deflection shown is the value obtained when the specified load is applied to the measurement point of the A/C compressor drive belt.
98 N { 10.0 kg / 22 lb } Load
Caution
- Accurately adjust the tension as there is a possibility the service life of the belt may be shortened or belt squeal may be generated if the tension is not within the appropriate range.
- Use a sonic tension meter to verify accurate tension adjustment.
| Adjustment conditions |
Deflection |
Vibration frequency |
| When new |
10.2 to 11.2 mm { 0.40 to 0.44 in } |
163 to 179 Hz |
| Reused |
12.1 to 13.3 mm { 0.48 to 0.52 in } |
131 to 147 Hz |
| Adjustment conditions |
Deflection |
Vibration frequency |
| When new |
6.8 to 7.4 mm { 0.27 to 0.29 in } |
249 to 273 Hz |
| Reused |
7.9 to 8.7 mm { 0.31 to 0.34 in } |
201 to 225 Hz |
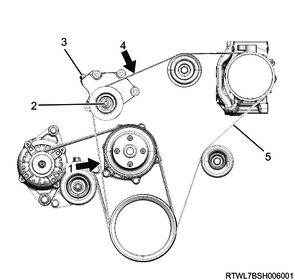
Legend
- Measurement point 1
- Lock nut
- Adjust bolt
- Measurement point 4
- A/C compressor drive belt
3) Tighten the tension pulley lock nut to the specified torque.
Tightening torque: 51 N・m { 5.2 kgf・m / 38 lb・ft }
2. Except M/T models (Euro 5 or above)
When installing a new belt, initial stretching of the belt occurs.
In addition, when reusing the belt, the belt needs to be fitted to the pulley groove.
After fitting the A/C compressor drive belt, adjust the tension of the A/C compressor drive belt again.
1) Loosen the tension pulley lock nut.
2) Turn the tension pulley adjust bolt to adjust the tension.
Note
- The standard deflection shown is the value obtained when the specified load is applied to the measurement point of the A/C compressor drive belt.
98 N { 10.0 kg / 22 lb } Load
Caution
- Accurately adjust the tension as there is a possibility the service life of the belt may be shortened or belt squeal may be generated if the tension is not within the appropriate range.
- Use a sonic tension meter to verify accurate tension adjustment.
| Adjustment conditions |
Deflection |
Vibration frequency |
| When new |
12.5 to 16.5 mm { 0.49 to 0.65 in } |
92 to 112 Hz |
| Reused |
16.5 to 19.1 mm { 0.65 to 0.75 in } |
79 to 91 Hz |
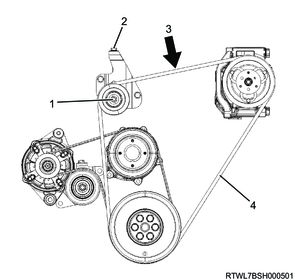
Legend
- Lock nut
- Adjust bolt
- Measurement point
- A/C compressor drive belt
3) Tighten the tension pulley lock nut to the specified torque.
Tightening torque: 51 N・m { 5.2 kgf・m / 38 lb・ft }
3. Engine cover installation
1) Install the engine cover to the engine.

Legend
- Engine cover
4. Preliminary and post procedures
1. Post procedures
1) Connect the battery cable to the battery negative terminal.
2) Referring to the following, perform the setting of the front door power window switch with AUTO UP/AUTO DOWN function.
Refer to "9.Body, Cab, Accessories 9T.Glass, Windows, Mirrors front door power window switch setting".
3) Close the engine hood.