1. Component views
Manual control seat (Without height control, separate headrest type)
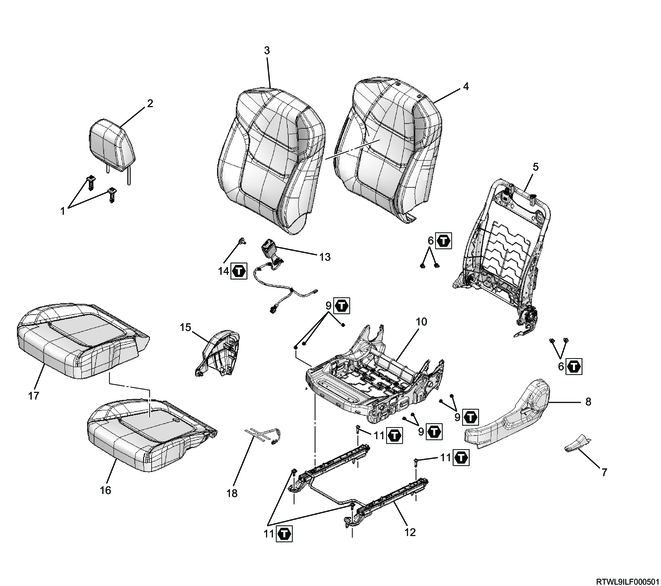
Part name
- Headrest holder
- Front seat headrest
- Front seat back cover
- Front seat back pad
- Front seat back frame
- Bolt
- Reclining lever
- Reclining cover
- Nut
- Front seat cushion frame
- Bolt
- Seat slide adjuster
- Front buckle side seat belt
- Bolt
- Side cover
- Front seat cushion pad
- Front seat cushion cover
- Seat belt reminder sensor
Tightening torque
6: 46 N・m { 4.7 kgf・m / 34 lb・ft }
9: 21 N・m { 2.1 kgf・m / 15 lb・ft }
11: 46 N・m { 4.7 kgf・m / 34 lb・ft }
14: 40 N・m { 4.1 kgf・m / 30 lb・ft }
Bench seat
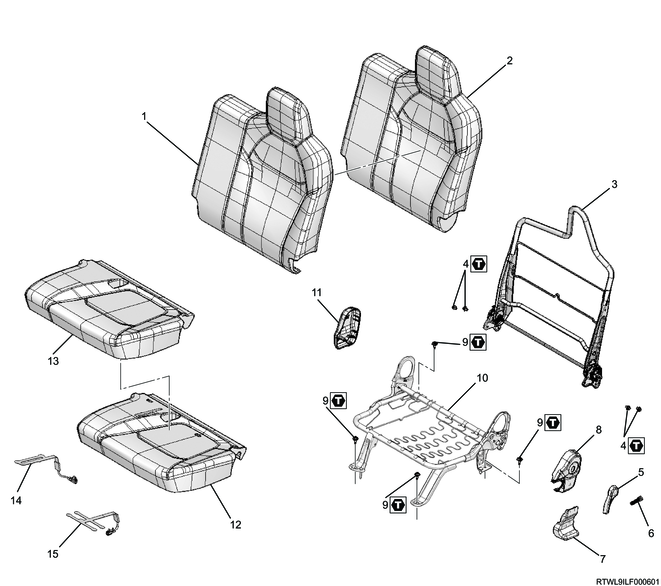
Part name
- Front seat back cover
- Front seat back pad
- Front seat back frame
- Bolt
- Reclining lever
- Screw
- Leg cover
- Reclining cover
- Bolt
- Front seat cushion frame
- Side cover
- Front seat cushion pad
- Front seat cushion cover
- Seat belt reminder sensor (center)
- Seat belt reminder sensor (LH)
Tightening torque
4: 46 N・m { 4.7 kgf・m / 34 lb・ft }
9: 46 N・m { 4.7 kgf・m / 34 lb・ft }
2. Passenger seat installation
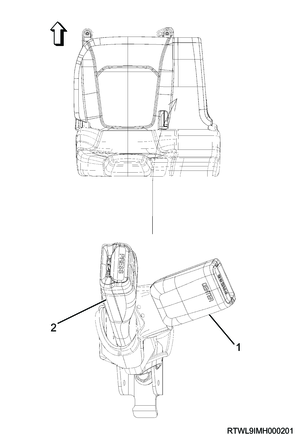
1. Bucket seat
1) Connect the connector to the seat belt switch.
2) Install the passenger seat to the floor.
Tightening torque: 46 N・m { 4.7 kgf・m / 34 lb・ft }
2. Bench seat
1) Install the bench seat to the floor.
Tightening torque: 46 N・m { 4.7 kgf・m / 34 lb・ft }
2) Cross the center seat belt buckle from the back side of the passenger seat buckle.
3) Pass the front buckle side center seat belt through the seat hole of the seat cushion.
4) Completely pull out each seat belt buckle of the front buckle side center seat belt from the cushion surface.
Legend
- Center seat belt buckle
- Passenger seat belt buckle
5) Pass the front tongue side center seat belt through the seat band of the bench seat, and attach the webbing loop to the seat band.
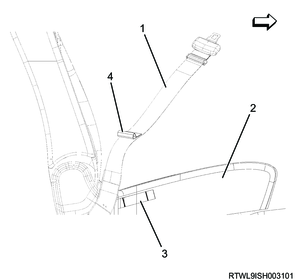
Legend
- Front tongue side center seat belt
- Bench seat
- Seat band
- Webbing loop
3. SRS airbag setting
1. SRS reactivation
Warning
- Never use SRS parts from other vehicles or models.
- Make sure to check the part numbers and use the SRS components intended for the target vehicle.
1) Set the ignition switch to LOCK and remove the key.
Note
- For models with the passive entry and start system, turn the power mode OFF.
2) Make sure that the connectors of the SRS components (SRS airbag, SRS control unit, seat belt with pretensioner, SRS coil, etc.) are fully connected.
3) Install the SRS fuse to the fuse relay box, and connect the battery cable to the negative terminal of the battery.
4) Turn ON the ignition switch and verify that the SRS airbag warning light turns OFF after illuminating for 6 seconds.
Caution
- If the SRS airbag warning light does not operate properly, perform Diagnostic system check - SRS controls.
5) Referring to the following, perform the setting of the front door power window switch with AUTO UP/AUTO DOWN function.
Refer to "9.Body, Cab, Accessories 9T.Glass, Windows, Mirrors front door power window switch setting".