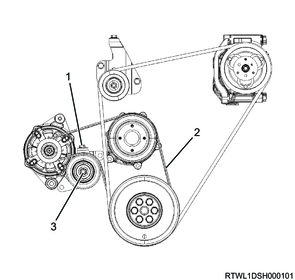
1. Component views
Cooling fan belt

Part name
- Tension pulley lock nut
- Tension pulley
- Tension pulley adjust bolt
- A/C compressor drive belt
- A/C compressor
- Crankshaft pulley
- Tension pulley adjust bolt
- Tension pulley mounting bolt
- Tension pulley lock nut
- Tension pulley
- Through bolt
- Generator
- Generator mounting bolt
Tightening torque
1: 51 N・m { 5.2 kgf・m / 38 lb・ft }
9: 41 N・m { 4.2 kgf・m / 30 lb・ft }
11: 40 N・m { 4.1 kgf・m / 30 lb・ft }
13: 25 N・m { 2.5 kgf・m / 18 lb・ft }
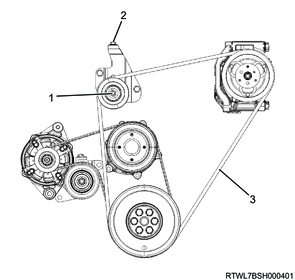
2. Cooling fan belt installation
1) Install the cooling fan belt to the following parts.
- Fan pulley
- Generator
- Crankshaft pulley
Legend
- Adjust bolt
- Cooling fan belt
- Lock nut
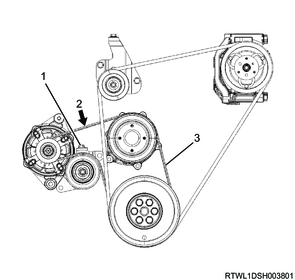
3. A/C compressor drive belt installation
1) Install the A/C compressor drive belt to the following parts.
- Tension pulley
- A/C compressor
- Crankshaft pulley
Legend
- Lock nut
- Adjust bolt
- A/C compressor drive belt
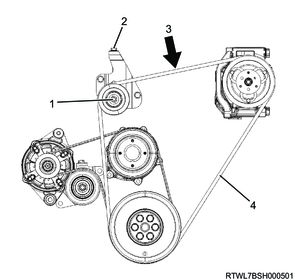
4. Cooling fan belt adjustment
When installing a new belt, initial stretching of the belt occurs.
In addition, when reusing the belt, the belt needs to be fitted to the pulley groove.
After fitting the cooling fan belt, readjust the cooling fan belt tension.
1) Loosen the tension pulley lock nut using a wrench.
2) Adjust the cooling fan belt tension by turning the adjust bolt.
Note
- The standard amount of deflection shown is the value obtained when the standard pressure is applied to the midpoint of the fan pulley and generator.
Standard: 98 N { 10.0 kg / 22 lb }
Caution
- Accurately adjust the tension as there is a possibility the service life of the belt may be shortened or belt squeal may be generated if the tension is not within the appropriate range.
- Use a sonic tension meter to verify accurate tension adjustment.
| Adjustment conditions |
Deflection |
Vibration frequency |
| When new |
5.0 to 6.0 mm { 0.20 to 0.24 in } |
207 to 231 Hz |
| Reused |
7.0 to 7.8 mm { 0.28 to 0.31 in } |
176 to 190 Hz |
Legend
- Tension pulley adjust bolt
- Measurement point
- Cooling fan belt
3) Tighten the tension pulley lock nut to the specified torque.
Tightening torque: 41 N・m { 4.2 kgf・m / 30 lb・ft }
5. A/C compressor drive belt adjustment
When installing a new belt, initial stretching of the belt occurs.
In addition, when reusing the belt, the belt needs to be fitted to the pulley groove.
After fitting the A/C compressor drive belt, adjust the tension of the A/C compressor drive belt again.
1) Loosen the tension pulley lock nut.
2) Turn the tension pulley adjust bolt to adjust the tension.
Note
- The standard deflection shown is the value obtained when the specified load is applied to the measurement point of the A/C compressor drive belt.
98 N { 10.0 kg / 22 lb } Load
Caution
- Accurately adjust the tension as there is a possibility the service life of the belt may be shortened or belt squeal may be generated if the tension is not within the appropriate range.
- Use a sonic tension meter to verify accurate tension adjustment.
| Adjustment conditions |
Deflection |
Vibration frequency |
| When new |
12.5 to 16.5 mm { 0.49 to 0.65 in } |
92 to 112 Hz |
| Reused |
16.5 to 19.1 mm { 0.65 to 0.75 in } |
79 to 91 Hz |
Legend
- Lock nut
- Adjust bolt
- Measurement point
- A/C compressor drive belt
3) Tighten the tension pulley lock nut to the specified torque.
Tightening torque: 51 N・m { 5.2 kgf・m / 38 lb・ft }
6. Air duct installation
1) Align the air duct with the air cleaner and turbocharger.
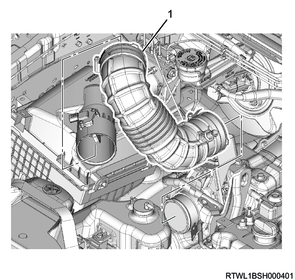
Legend
- Air duct
2) Referring to the diagram, align the alignment mark positions and connect the air duct to the turbocharger.
Tightening torque: 4.0 N・m { 0.4 kgf・m / 35 lb・in }
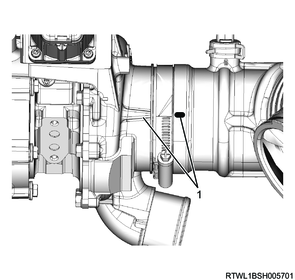
Legend
- Alignment mark
3) Install the PCV hose to the cylinder head cover and air duct.
Caution
- Align the marks on the pipe side and hose side.

Legend
- PCV hose
- Clamp
4) Install the intake air duct to the air cleaner and radiator core support.
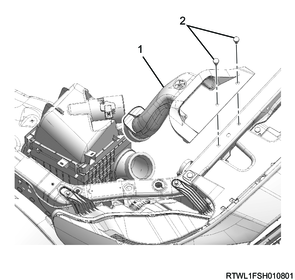
Legend
- Intake air duct
- Clip
7. Engine cover installation
1) Install the engine cover to the engine.

Legend
- Engine cover
8. Preliminary and post procedures
1. Post procedures
1) Close the engine hood.