1. ATF safety information
1. Regarding ATF level
If ATF is insufficient
Caution
- The oil pump absorbs air and the line pressure is decreased, and this causes malfunctions such as clutch slipping and burnout.
If ATF is excessive
Caution
- Gears in the A/T stir the ATF, and cause oil foaming and deterioration, which leads to a malfunction.
- The ATF level increases when the vehicle is running, and the ATF leaks out from the breather.
2. Regarding ATF refill and adjustment
Caution
- When filling the ATF, be sure to use only specified ATF.
Specified oil
ISUZU ATF WSI
Caution
- The illumination check needs to be performed in the N range, because the automatic transmission fluid warning light turns OFF when the range is shifted to a range other than N, even if the oil level adjustment control is operated.
- When warming up the ATF in D range, so that the ATF temperature does not go over the oil level adjustment temperature due to rapid heating, do not raise the engine speed over 1,000 rpm. Also do not perform this operation for more than 5 seconds continuously.
- Perform oil level adjustment at idle speed in the N range because the ATF temperature and oil level should be stable when adjusting the oil level.
Standard: 700 rpm Idling speed (4JJ3 equipped models)
Standard: 750 rpm Idling speed (RZ4E-TC equipped models)
Note
- The oil level is not stable at engine stopping or high engine speed.
Caution
- If the adjustment is performed at an ATF temperature lower than the oil level adjustment temperature, the ATF will exceed the proper oil amount, and then the ATF will gush out.
Also, if the adjustment is performed at an ATF temperature higher than the oil level adjustment temperature, the ATF becomes less than the proper oil amount, then abnormal noise such as continuous beep, acceleration or shifting malfunction occurs. - Always apply the parking brake so that the vehicle does not begin to move unexpectedly.
2. ATF drain
1. ATF draining (1st time)
1) Keep the vehicle horizontal and jack up.
Caution
- The correct replacement or adjustment cannot be performed if the vehicle is at an angle. Perform work within ±1° inclination of the vehicle front and rear.
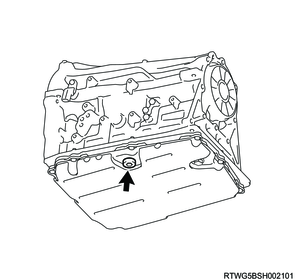
2) Remove the drain plug and gasket from the oil pan, and drain the ATF.
3) Temporarily tighten the drain plug to the oil pan.

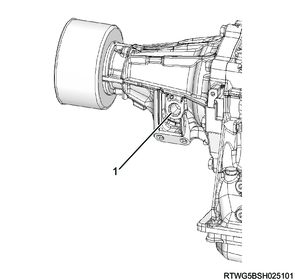
4) Remove the filler plug and O-ring from the transmission.
4WD models

2WD models

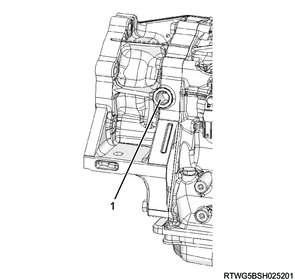
5) Remove the overflow plug and gasket from the transmission.
6) Add ATF through the filler hole until ATF comes out of the overflow hole.
Caution
- Use ISUZU ATF WSI for the ATF to be added.
- Add ATF slowly. If added fast, the oil hits the internal parts and splashes back, which may result in spilling out of the filler hole.
4WD models
Legend
- Filler hole
2WD models
Legend
- Filler hole
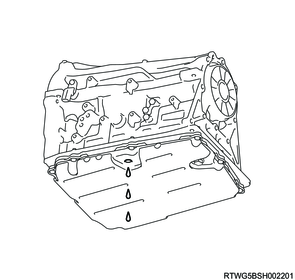
7) Wait until the ATF flow stops and falls in drops.
8) Temporarily tighten the overflow plug to the oil pan.
2. ATF refill (for draining)
1) Add ATF to the specified amount through the filler hole.
1.0 L { 0.26 US gal / 0.22 Imp.gal } [Reference value]
Note
- If all the ATF does not go in when adding the specified amount of ATF, perform the ATF circulation (for draining) procedure.
4WD models
Legend
- Filler hole
2WD models
Legend
- Filler hole
2) Temporarily tighten the filler plug to the transmission.
3. ATF circulation (for draining)
1) Lower the vehicle.
2) Depress and hold the brake pedal.
3) Start the engine.
Caution
- Turn OFF the electrical parts such as A/C, audio, and lighting device.
4) Move the select lever through each gear range, pausing for more than 2 seconds in each range to fill the hydraulic circuit. Repeat the same manner 2 times, and then move the select lever in P range.
5) Warm up while idling for 30 seconds.
6) Turn OFF the ignition switch.
Note
- If the specified amount of ATF did not all go in when refilling the ATF (for draining), add the remaining ATF, and then perform the ATF circulation (for draining) procedure again.
4. ATF draining (2nd time)
1) Repeat the procedures from ATF draining (1st time) to ATF circulation (for draining).
5. ATF draining (3rd time)
1) Keep the vehicle horizontal and jack up.
Caution
- The correct replacement or adjustment cannot be performed if the vehicle is at an angle. Perform work within ±1° inclination of the vehicle front and rear.
2) Remove the drain plug and gasket from the oil pan, and drain the ATF.
3) Install the drain plug and gasket to the oil pan.
Caution
- Do not reuse the gasket.
Tightening torque: 20 N・m { 2.0 kgf・m / 15 lb・ft }
3. ATF filling
1) Remove the filler plug and O-ring from the transmission.
4WD models
2WD models
2) Remove the overflow plug and gasket from the transmission.
3) Add ATF through the filler hole until ATF comes out of the overflow hole.
Caution
- Use ISUZU ATF WSI for the ATF to be added.
- Add ATF slowly. If added fast, the oil hits the internal parts and splashes back, which may result in spilling out of the filler hole.
4WD models
Legend
- Filler hole
2WD models
Legend
- Filler hole
4) Wait until the ATF flow stops and falls in drops.
5) Temporarily tighten the overflow plug to the oil pan.
6) Add ATF to the specified amount through the filler hole.
1.0 L { 0.26 US gal / 0.22 Imp.gal } [Reference value]
Note
- If all the ATF does not go in when adding the specified amount of ATF, perform the ATF circulation (for refilling) procedure.
4WD models
Legend
- Filler hole
2WD models
Legend
- Filler hole
7) Temporarily tighten the filler plug to the transmission.
1. ATF circulation (for refilling)
1) Lower the vehicle.
2) Depress and hold the brake pedal.
3) Start the engine.
Caution
- Turn OFF the electrical parts such as A/C, audio, and lighting device.
4) Move the select lever through each gear range, pausing for more than 2 seconds in each range to fill the hydraulic circuit. Repeat the same manner 2 times, and then move the select lever in P range.
5) Warm up while idling for 30 seconds.
6) Turn OFF the ignition switch.
Note
- Add the remaining ATF.
4. ATF adjustment
1. ATF adjustment
1) Connect a jumper between the terminals No.12 and No.4 (or No.5) of the DLC to short the TCM.
Note
- Check whether the check trans warning light flashes when the DLC is short-circuited.
2) Start the engine.
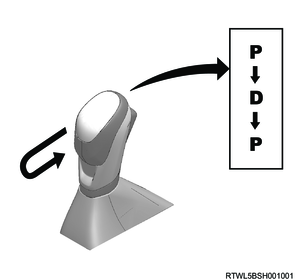
3) Move the select lever through each gear range, pausing for more than 2 seconds in each range to fill the hydraulic circuit. Repeat the same manner 2 times, and then move the select lever in P range.
Hold 2 sec. on each range (2 times).
4) Operate the oil level adjustment control in order to switch the illumination temperature of the automatic transmission fluid warning light.
Note
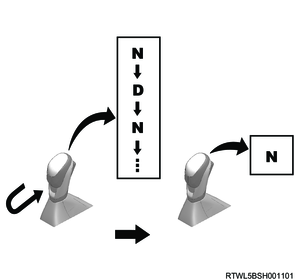
- Move the select lever back and forth between N range and D range within 1.5 seconds. Repeat it for at least 6 seconds until the automatic transmission fluid warning light turns ON in N range.
5) When the oil level adjustment control is activated, the automatic transmission fluid warning light will be illuminated for 2 seconds in N range. Keep the select lever in N range.
After activating the oil level adjustment control, the automatic transmission fluid warning light will operate according to the ATF temperature condition.
Caution
- Perform the temperature up from low temperature condition to assure the steady oil temperature and oil level in the transmission.
- Verify that the automatic transmission fluid warning light turns OFF.
| OFF |
40 ℃ { 104 °F } or less |
| Illuminated |
41 to 50 ℃ { 106 to 122 °F } |
| Flashing |
51 ℃ { 124 °F } or more |
Caution
- If the automatic transmission fluid warning light flashes, the ATF temperature exceeds the oil level adjustment temperature. After the ATF is cooled, perform the procedure again from the beginning.
- Also, the level cannot be adjusted with the stable oil level if it continues to illuminate after illuminating for 2 seconds. Therefore, perform the procedures from the beginning after the ATF is cooled.
6) Raise temperature until the automatic transmission fluid warning light illuminates in order to adjust the ATF temperature to the oil level adjustment temperature.
Note
- Change to D range to raise the temperature up to the oil level adjustment temperature, depress the accelerator, and keep at 1000 rpm for 5 seconds. Then immediately return to idling, change to the N range, and check the automatic transmission fluid warning light.
7) Retain idling in the N range after the automatic transmission fluid warning light illuminates, and check that it continues to illuminate for 1 minute or more.
Standard: 700 rpm Idling speed (4JJ3 equipped models)
Standard: 750 rpm Idling speed (RZ4E-TC equipped models)
Note
- If the automatic transmission fluid warning light does not illuminate or if it turns OFF within 1 minute, temperature rise is insufficient, so repeat the temperature raising operation.
Caution
- Operating the selector lever with the overflow plug removed changes the oil level and the ATF may drip, so perform with the overflow plug tightened.
8) Remove the overflow plug and verify that the ATF overflow through the overflow hole.
Note
- If the ATF drips, wait until the ATF falls in drops with the automatic transmission fluid warning light illuminated.
Note
- If the ATF does not drip, pour ATF into the filler hole until the ATF drips with the automatic transmission fluid warning light illuminated, and wait until the ATF falls in drops.
Caution
- The engine speed should be stable at idle speed when checking.
9) Tighten the overflow plug to the specified torque.
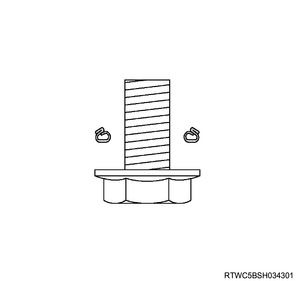
Caution
- Do not reuse the gasket.
- Be sure to install the gasket in the correct direction as shown in the figure.
- After tightening the overflow plug, thoroughly wipe the dribbled ATF with a clean rag.
Tightening torque: 20 N・m { 2.0 kgf・m / 15 lb・ft }
10) Tighten the filler plug to the specified torque.
Note
- Coat a new O-ring with ATF, and install it to the filler plug.
Caution
- O-ring must not be reused. Always use a new one.
Tightening torque: 40 N・m { 4.1 kgf・m / 30 lb・ft }
4WD models
2WD models
11) Shift to the P range, and stop the engine.
12) Remove the short circuit in the DLC and restart the engine.
13) Check that the automatic transmission fluid warning light and check trans warning light turn OFF, and stop the engine.