1. Component views
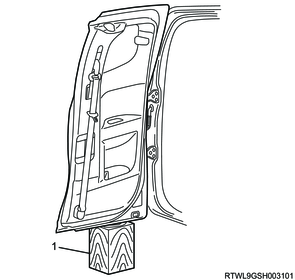
Side access panel
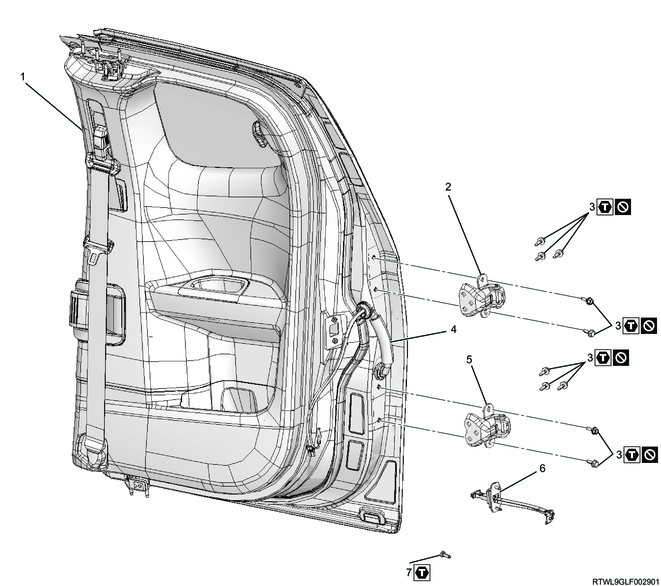
Part name
- Side access panel
- Upper hinge
- Bolt
- Door harness
- Lower hinge
- Check arm
- Screw
Tightening torque
3: 34 N・m { 3.5 kgf・m / 25 lb・ft }
7: 24 N・m { 2.4 kgf・m / 18 lb・ft }
2. SRS airbag safety information
1. Handling deployed airbag
Warning
- When handling the airbag, the safety precautions must be observed.
- The surface of the deployed airbag may contain a small amount of sodium hydroxide.
This is a byproduct of the deployment reaction, and may cause irritation if it comes in contact with the skin or eyes. - Be sure to wear gloves and safety glasses when handling an airbag after deployment.
- Wash hands with soap after handling.
Caution
- After the airbag is deployed, inspect for burning or melting caused by excessive heat, or any other problems.
- If the SRS coil is damaged, replace it.
2. Handling undeployed airbag assembly
Warning
- When transporting an undeployed airbag, make sure that the trim cover is facing away from your body.
- Never carry an airbag with pretensioner by holding the connector or harness.
- When placing an undeployed airbag, make sure to face the trim cover upward.
- Do not put any object on the steering wheel with the airbag surface facing downward.
- Not following this procedure may result in fire or injuries.
3. SRS airbag preparation
1. SRS deactivation
1) Set the ignition switch to LOCK and remove the key.
Note
- For models with the passive entry and start system, turn the power mode OFF.
2) Remove the SRS fuse from the fuse relay box.
3) Disconnect the battery cable from the battery negative terminal.
Caution
- After turning OFF the ignition switch (power mode for models with passive entry and start system), do not disconnect the battery cable within 3 minutes.
- If the battery cable is disconnected within 3 minutes, the vehicle electronic control system may malfunction.
- If the battery cable is disconnected, perform the setting of the front door power window switch with AUTO UP/AUTO DOWN function after connecting the battery negative terminal.
- After disconnecting the battery cable, do not perform work for approximately 15 seconds.
4. Front sill plate removal
1) Remove the front sill plate from the floor.
Extend cab
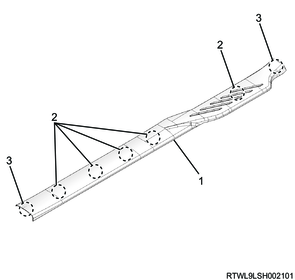
Legend
- Front sill plate
- Clip
- Claw section
5. Front door finisher removal
1) Remove the front door finisher from the body.
6. Rear end trim cover removal
1) Remove the rear end trim cover from the body panel.
Extend cab
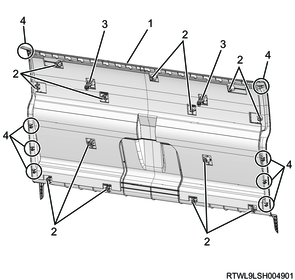
Legend
- Rear end trim cover
- Clip
- Hook
- Claw section
7. Rear pillar trim cover removal
1) Remove the seat belt lower anchor bolt from the floor panel.
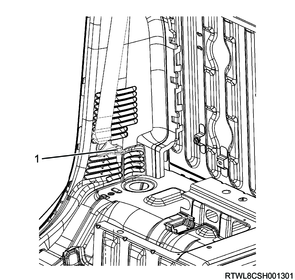
Legend
- Seat belt lower anchor bolt
2) Remove the rear pillar lower trim cover from the rear pillar.

Legend
- Claw section
- Rear pillar lower trim cover
- Clip
8. Door harness disconnect
1) Disconnect the door harness from the dash harness.
9. Side access panel removal
1) Remove the door check arm from the body.
2) Place a wood block for protection under the door, and support the side access panel with your hands.
3) Remove the side access panel from the vehicle.
Legend
- Wooden block