1. Component views
Rear drum brake
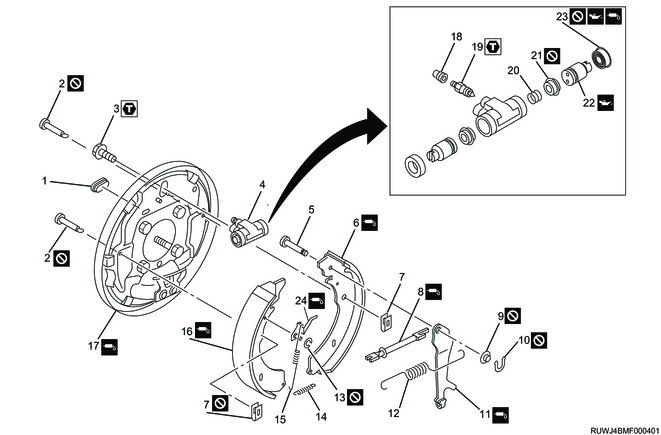
Part name
- Cover
- Shoe holder pin
- Wheel cylinder bolt
- Wheel cylinder
- Pin
- Rear brake shoe
- Shoe holding spring
- Adjuster
- Lever washer
- Retainer
- parking lever
- Upper spring
- Adjust lever ring
- Lower spring
- Adjust lever spring
- Front brake shoe
- Back plate with the bolt
- Cap
- Bleeder screw
- Return spring
- Piston cup
- Piston
- Boot
- Adjust lever
Tightening torque
3: 14 to 18 N・m { 1.4 to 1.8 kgf・m / 10 to 13 lb・ft }
19: 6 to 8 N・m { 0.6 to 0.8 kgf・m / 53 to 71 lb・in }
2. Disc wheel removal
1. Models with aluminum wheels
1) Move the vehicle to a flat surface.
2) Pull the parking brake lever.
3) Secure the vehicle using chock blocks.
4) Raise the vehicle.
Note
- Jack up the vehicle but not to an extent that the tire leaves the ground.
5) Remove the wheel cap from the disc wheel.
Note
- Insert a tool with flat tip such as a flathead screwdriver into the wheel cap groove to remove.
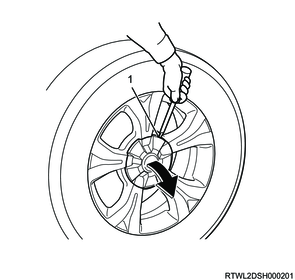
Legend
- Wheel cap groove
6) Loosen the wheel nuts.
Note
- Loosen without allowing the disc wheel to rattle.
Caution
- At this time, do not remove the wheel nuts.
7) Raise the vehicle.
Note
- Jack up the vehicle until the tire is completely off the ground.
- Support the frame using a chassis stand as necessary.
8) Remove the disc wheel from the vehicle.
2. Models with steel wheels
1) Move the vehicle to a flat surface.
2) Pull the parking brake lever.
3) Secure the vehicle using chock blocks.
4) Raise the vehicle.
Note
- Jack up the vehicle but not to an extent that the tire leaves the ground.
5) Remove the wheel cap from the disc wheel.
6) Loosen the wheel nuts.
Note
- Loosen without allowing the disc wheel to rattle.
Caution
- At this time, do not remove the wheel nuts.
7) Raise the vehicle.
Note
- Jack up the vehicle until the tire is completely off the ground.
- Support the frame using a chassis stand as necessary.
8) Remove the disc wheel and wheel cap from the vehicle.
3. Brake drum removal
1) Release the parking brake lever.
2) Remove the brake drum from the rear axle shaft.
4. Brake shoe removal
1) Remove the adjust lever spring from the adjust lever and brake shoe.
2) Remove the following parts from the brake shoe.
- Adjust lever ring
- Adjust lever
Caution
- Do not reuse the adjust lever ring.
Note
- Remove the shoe holding spring from the shoe holder pin.
- While holding the shoe holding spring by pushing it toward the brake shoe, remove it from the shoe holder pin by turning it.
Caution
- Do not reuse the shoe holding spring.
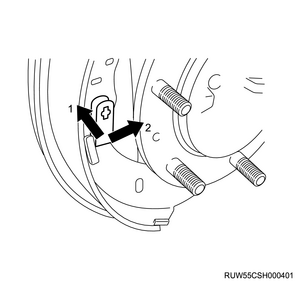
Legend
- Hold by pushing toward the brake shoe.
- Turn.
3) Remove the shoe holder pin from the brake shoe.
Caution
- Do not reuse the shoe holder pin.
4) Remove the lower spring from the brake shoe.
Note
- Remove the brake shoe and lower spring by sliding them toward the ground.
Legend
- Lower spring
5) Remove the adjuster and upper spring from the brake shoe.
6) Remove the upper spring from the adjuster.
7) Remove the brake shoe from the back plate.
8) Remove the following parts from the brake shoe.
- Retainer
- Lever washer
- Pin
- parking lever
Caution
- Do not reuse the retainer or lever washer.
5. Parking brake cable disconnect
1. Parking brake cable disconnection precautions
Caution
- Do not twist or bend the cable.
Operation will be insufficient if the cable is damaged.
2. Disconnection from brake
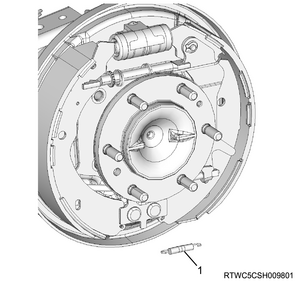
1) Disconnect the parking brake cable from the parking lever.
2) Disconnect the parking brake cable from the back plate.
Note
- Press the lock protrusion of the cable using a 12 mm hexagonal offset box wrench and disconnect the parking brake cable.

Legend
- 12 mm hexagonal offset box wrench