1. Stereo camera safety information
If replacing the stereo camera, it is necessary to write the vehicle information into the new stereo camera.
The scan tool used for the replacement procedure must be the same from start to finish. If the scan tool is changed midway, information cannot be written correctly.
Use the following procedure when replacing or programming the stereo camera.
| 1 |
Vehicle information upload |
| 2 |
Stereo camera replacement |
| 3 |
・Vehicle information download ・Stereo camera learning ・Vehicle identification number (VIN) programming ・DTC clearing ・ECU Lock |
| 1 |
Stereo camera replacement |
| 2 |
・Vehicle information programming ・Stereo camera learning ・Vehicle identification number (VIN) programming ・DTC clearing ・ECU Lock |
2. Stereo camera upload
1. Precautions
If the scan tool cannot communicate with the old stereo camera, do not perform the vehicle information upload.
2. Vehicle information upload
1) Connect the scan tool to the DLC.
2) Turn ON the ignition switch.
3) Select "Programming" on the scan tool.
- Diagnostics > Body > Stereo Camera > Programming
4) Select Upload Vehicle Configuration Data and upload the vehicle information by following the on-screen instructions.
5) After completing the upload, turn off the scan tool.
6) Turn OFF the ignition switch.
3. Preliminary and post procedures
1. Preliminary procedures
1) Open the engine hood.
2) Disconnect the battery cable from the battery negative terminal.
Caution
- After turning OFF the ignition switch (power mode for models with passive entry and start system), do not disconnect the battery cable within 3 minutes.
- If the battery cable is disconnected within 3 minutes, the vehicle electronic control system may malfunction.
- If the battery cable is disconnected, perform the setting of the front door power window switch with AUTO UP/AUTO DOWN function after connecting the battery negative terminal.
4. Stereo camera removal
Caution
- Perform work without touching the stereo camera lens.
- If the stereo camera lens is touched, replace the stereo camera.
- Do not subject the stereo camera to a strong impact.
- If the stereo camera is removed, cover it with plastic sheets, etc., to prevent damage.
1) Disengage the claw section and remove the stereo camera cover lid from the stereo camera cover.

Legend
- Claw section
- Stereo camera cover lid
2) Disengage the claw section and slide the stereo camera cover in the direction of the arrow.
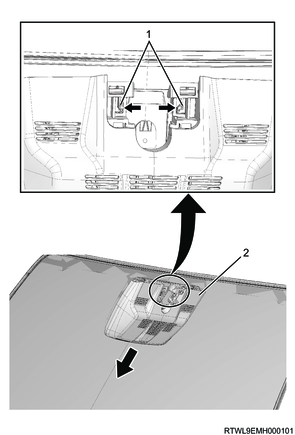
Legend
- Claw section
- Stereo camera cover
3) Remove the stereo camera cover from the front windshield glass.
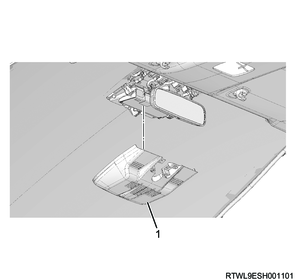
Legend
- Stereo camera cover
4) Disconnect the connector from the stereo camera.
5) Remove the stereo camera from the stereo camera bracket.
Caution
- Do not press the aluminum tape section.
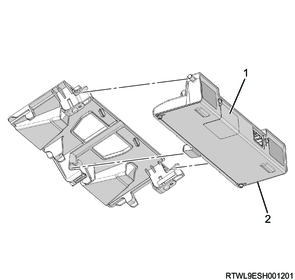
Legend
- Aluminum tape
- Stereo camera