1. Component views
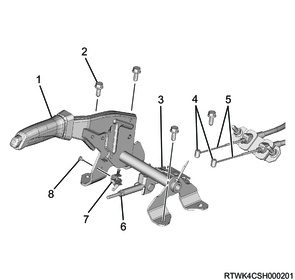
Parking brake lever (Base grade console specifications (RHD models (LHD models are opposite)))

Part name
- Bolt
- Parking brake lever
- Bolt
- Equalizer
- T-end
- Parking brake cable
- Adjust nut
- Parking brake switch
Tightening torque
1: 1.18 to 1.76 N⋅m {0.120 to 0.180 kgf⋅m / 10.4 to 15.6 lb⋅in}
3: 11.0 to 20.0 N⋅m {1.12 to 2.04 kgf⋅m / 8.11 to 14.8 lb⋅ft}
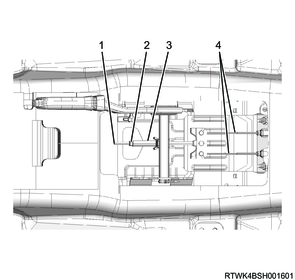
Parking brake lever (Except base grade console specifications (RHD models (LHD models are opposite)))
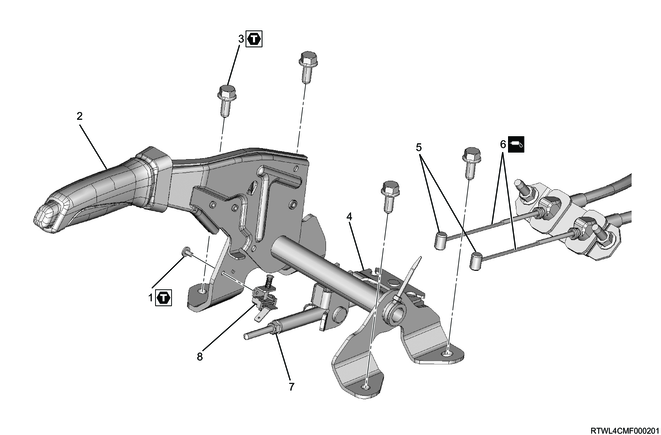
Part name
- Bolt
- Parking brake lever
- Bolt
- Equalizer
- T-end
- Parking brake cable
- Adjust nut
- Parking brake switch
Tightening torque
1: 1.18 to 1.76 N⋅m {0.120 to 0.180 kgf⋅m / 10.4 to 15.6 lb⋅in}
3: 11.0 to 20.0 N⋅m {1.12 to 2.04 kgf⋅m / 8.11 to 14.8 lb⋅ft}
2. Parking brake lever installation
1) Install the parking brake lever to the floor.
Tightening torque: 11.0 to 20.0 N⋅m {1.12 to 2.04 kgf⋅m / 8.11 to 14.8 lb⋅ft}
2) Tighten the adjust nut so that the T-end of the parking brake cable aligns with the equalizer.
3. Parking brake cable connect
1) Apply multi-purpose grease to the connection portion of the T-end of the parking brake cable and the equalizer.
2) Install the T-end of the parking brake cable to the equalizer of the front parking brake cable.
3) Install the floor side retainer to the floor.
Tightening torque: 19.7 to 29.6 N⋅m {2.01 to 3.02 kgf⋅m / 14.5 to 21.8 lb⋅ft}
4. Parking brake switch installation
1) Install the parking brake switch to the parking brake lever.
Tightening torque: 1.18 to 1.76 N⋅m {0.120 to 0.180 kgf⋅m / 10.4 to 15.6 lb⋅in}
Base grade console specifications (RHD models (LHD models are opposite))
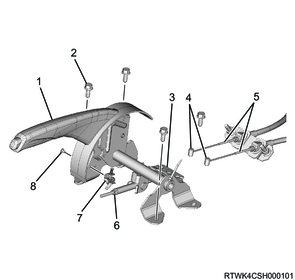
Legend
- Parking brake lever
- Bolt
- Equalizer
- T-end
- Parking brake cable
- Adjust nut
- Parking brake switch
- Screw
Except base grade console specifications (RHD models (LHD models are opposite))
Legend
- Parking brake lever
- Bolt
- Equalizer
- T-end
- Parking brake cable
- Adjust nut
- Parking brake switch
- Screw
5. Preliminary and post procedures
1. Post procedures
1) Connect the battery cable to the battery negative terminal.
2) Referring to the following, perform the setting of the front door power window switch with AUTO UP/AUTO DOWN function.
3) Close the engine hood.
6. Rear drum brake adjustment
1. Rear drum brake lining gap adjustment (Except after overhaul)
All brakes are automatic adjustment type. The lining gap is automatically adjusted by repeatedly depressing the brake pedal.
1) Repeatedly depress and release the brake pedal until the click of the auto adjuster is not heard.
2) When the clicking sound can no longer be heard, depress the brake pedal 10 times to make sure that there is no stroke variation.
2. Rear drum brake lining gap adjustment (After overhaul, bench seat specifications)
1) Release the parking brake lever by moving it to the position where it is completely released.
2) Loosen the adjust nut using a wrench.
3) Repeatedly depress and release the brake pedal until the click of the auto adjuster is not heard.
Note
- If the clearance between the brake drum and the lining is adjusted to 0.5 mm {0.020 in}, the number of times of depressing the brake pedal can be reduced.
4) When the clicking sound can no longer be heard, depress the brake pedal 10 times to make sure that there is no stroke variation.
5) Remove the cover from the back plate.
6) Measure the gap between the brake drum and brake shoe.
Standard: 0.25 to 0.40 mm { 0.0098 to 0.0157 in } Lining clearance
Note
- If it is outside the standard range, inspect the adjuster.
7) Turn the adjust nut so that the parking brake lever is pulled up 6 to 9 notches when the lever is pulled up with the force of 294 N {30 kg/66 lb}.
Caution
- Make sure the brake does not drag.
RHD models (LHD models are opposite)
Legend
- Equalizer
- Adjust nut
- Spacer
- Parking brake cable
3. Rear drum brake lining gap adjustment (After overhaul, center console specifications)
1) Release the parking brake lever by moving it to the position where it is completely released.
2) Loosen the adjust nut using a wrench.
3) Repeatedly depress and release the brake pedal until the click of the auto adjuster is not heard.
Note
- If the clearance between the brake drum and the lining is adjusted to 0.5 mm {0.020 in}, the number of times of depressing the brake pedal can be reduced.
4) When the clicking sound can no longer be heard, depress the brake pedal 10 times to make sure that there is no stroke variation.
5) Remove the cover from the back plate.
6) Measure the gap between the brake drum and brake shoe.
Standard: 0.25 to 0.40 mm { 0.0098 to 0.0157 in } Lining clearance
Note
- If it is outside the standard range, inspect the adjuster.
7) Turn the adjust nut so that the parking brake lever is pulled up 6 to 9 notches when the lever is pulled up with the force of 294 N {30 kg/66 lb}.
Caution
- Make sure the brake does not drag.
RHD models (LHD models are opposite)
Legend
- Equalizer
- Adjust nut
- Spacer
- Parking brake cable
7. Console box installation
1. Models with console boxes
Refer to "9.Body, Cab, Accessories 9L.Exterior, Interior Trim console box installation".