1. Component views
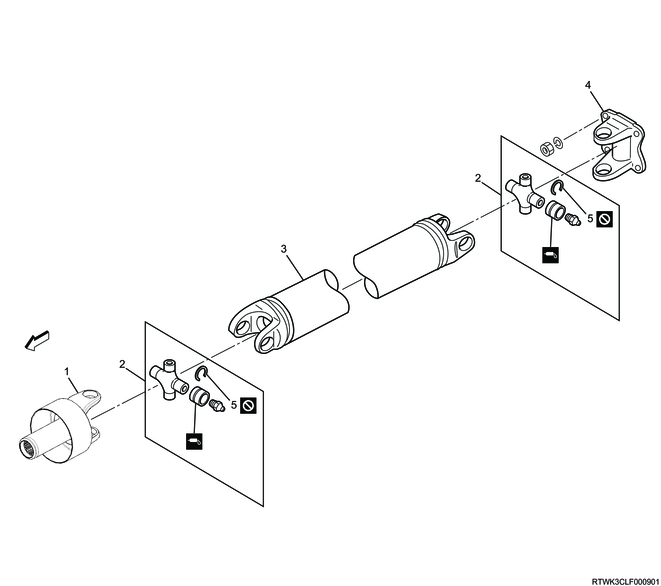
Rear propeller shaft (Two-piece type)

Part name
- Spline yoke
- journal assembly
- 1st tube assembly
- Center bearing
- Plain washer
- center yoke
- Lock nut
- 2nd tube assembly
- Flange yoke
- Snap ring
Rear propeller shaft (One-piece type)
Part name
- Spline yoke
- journal assembly
- Tube assembly
- Flange yoke
- Snap ring
2. Rear propeller shaft reassembly
1. Precautions when assembling the propeller shaft
Caution
- Always install according to the alignment marks applied during disassembly.

Caution
- Always install the propeller shaft body and spline yoke so that they face the same direction.
2. Propeller shaft assembly (Two-piece type)
1) Install the plain washer to the center yoke.
2) Install the 1st tube assembly and the center yoke to the center bearing.
Tightening torque: 118 N・m { 12.0 kgf・m / 87 lb・ft }
Caution
- Do not reuse the lock nuts.
3) Align with the 1st tube assembly groove, and firmly stake the lock nut outer surface.
4) Install the spider to the 1st and 2nd tube assemblies.
5) Apply molybdenum disulfide grease or BESCO L-2 grease to the inside of the needle bearing cap.
| Standard value |
| about 1.2 g { about 0.042 oz } |

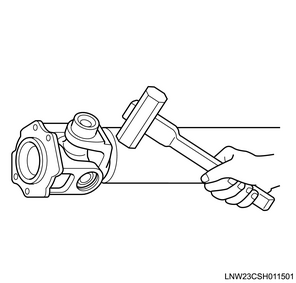
6) Install the needle roller bearing to the 1st and 2nd tube assemblies using a copper or wooden hammer, or press.
Note
- Press-fit the needle roller bearing to a depth that it is possible to install a snap ring.
- If the needle roller bearing is difficult to insert, align the angles of the yoke section and needle roller bearing before press-fitting again.
The needle roller bearing will be difficult to press-fit if the angles of the yoke section and needle roller bearing are not aligned.
Caution
- Do not hit the needle roller bearing excessively.
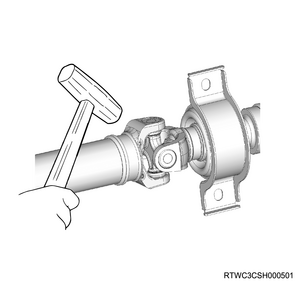
7) Install the snap ring to the spider.
Caution
- Do not reuse the snap ring.
Note
- Install snap rings of the appropriate thickness so that the amount of spider end float becomes the standard value.
- The procedure for size P17 is as follows. First install the thinnest snap ring and check the end float. If there is play, replace the snap ring with a thicker one.
| Standard value |
| 0.1 mm or less { 0.004 in or less } |
| Snap ring thickness |
Identification color |
| 1.50 mm { 0.059 in } |
Light blue |
| 1.53 mm { 0.060 in } |
White |
| 1.56 mm { 0.061 in } |
Pink |
| 1.59 mm { 0.063 in } |
Yellow |
| 1.62 mm { 0.064 in } |
Green |
| 1.65 mm { 0.065 in } |
Brown |
| 1.68 mm { 0.066 in } |
No identification color |
| Standard value |
| 0.1 mm or less { 0.004 in or less } |
| Snap ring thickness |
Identification color |
| 1.52 mm { 0.060 in } |
White |
| 1.59 mm { 0.063 in } |
No identification color |
| 1.66 mm { 0.065 in } |
Green |
Caution
- Make sure to use snap rings of the same thickness on both spider co-axial ends.
8) Install the center yoke and flange yoke to the 2nd tube assembly.
9) Install the spline yoke to the 1st tube assembly.
10) Install the needle roller bearing to the following parts using a copper or wooden hammer, or press.
- Spline yoke
- center yoke
- Flange yoke
Note
- Install the needle roller bearing to the spline yoke, flange yoke, and center yoke using the same procedures as the tube assembly.
3. Propeller shaft assembly (One-piece type)
1) Install the spider to the propeller shaft.
2) Install the flange yoke to the propeller shaft.
3) Apply molybdenum disulfide grease or BESCO L-2 grease to the inside of the needle bearing cap.
| Standard value |
| about 1.2 g { about 0.042 oz } |
4) Install the needle roller bearing to the propeller shaft using a copper or wooden hammer, or press.
Note
- Press-fit the needle roller bearing to a depth that it is possible to install a snap ring.
- If the needle roller bearing is difficult to insert, align the angles of the yoke section and needle roller bearing before press-fitting again.
The needle roller bearing will be difficult to press-fit if the angles of the yoke section and needle roller bearing are not aligned.
Caution
- Do not hit the needle roller bearing excessively.
5) Install the snap ring to the spider.
Caution
- Do not reuse the snap ring.
Note
- Install snap rings of the appropriate thickness so that the amount of spider end float becomes the standard value.
- First install the thinnest snap ring and check the end float. If there is play, replace the snap ring with a thicker one.
| Standard value |
| 0 mm or less { 0 in or less } |
| Snap ring thickness |
Identification color |
| 1.52 mm { 0.060 in } |
White |
| 1.59 mm { 0.063 in } |
No identification color |
| 1.66 mm { 0.065 in } |
Green |
Caution
- Make sure to use snap rings of the same thickness on both spider co-axial ends.
6) Install the grease fitting to the needle roller bearing.