1. Component views
DPD
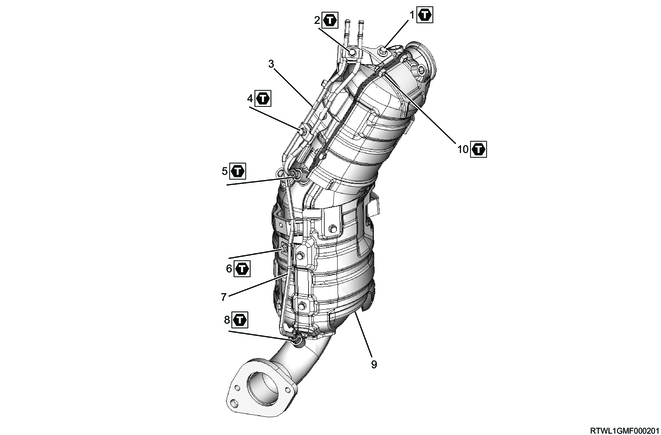
Part name
- Bolt
- Clip bolt
- Front side differential pressure pipe
- Clip bolt
- Sleeve nut
- Bolt
- Rear differential pressure pipe
- Sleeve nut
- DPD
- Bolt
Tightening torque
1: 25 N・m { 2.5 kgf・m / 18 lb・ft }
2: 10.0 N・m { 1.0 kgf・m / 89 lb・in }
4: 10.0 N・m { 1.0 kgf・m / 89 lb・in }
5: 34 N・m { 3.5 kgf・m / 25 lb・ft }
6: 10.0 N・m { 1.0 kgf・m / 89 lb・in }
8: 34 N・m { 3.5 kgf・m / 25 lb・ft }
10: 10.0 N・m { 1.0 kgf・m / 89 lb・in }
2. DPD installation
1) Install the heat protector to the DPD.
Tightening torque: 10.0 N・m { 1.0 kgf・m / 89 lb・in } M6 bolt
Tightening torque: 25 N・m { 2.5 kgf・m / 18 lb・ft } M8 bolt
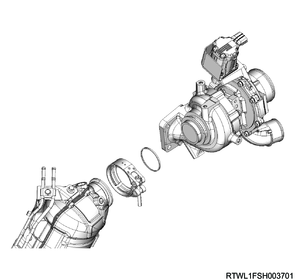
2) Apply anti-seize lubricant to the differential pressure pipe sleeve nut.
3) Install the differential pressure pipe to the DPD.
Tightening torque: 34 N・m { 3.5 kgf・m / 25 lb・ft }
4) Install the differential pressure pipe clips to the DPD.
Tightening torque: 10.0 N・m { 1.0 kgf・m / 89 lb・in }
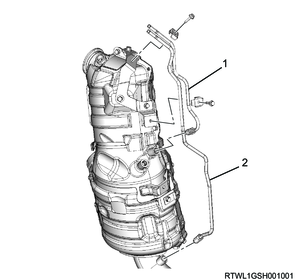
Legend
- Front side differential pressure pipe
- Rear differential pressure pipe
5) Clean the old anti-seize lubricant on the sleeve nut, and apply new anti-seize lubricant to the threaded portion of the exhaust gas temperature sensor sleeve nut.
Note
- If the exhaust gas temperature sensor is replaced with a new one, it is not necessary to apply new anti-seize lubricant.
Caution
- Apply Never-Seez High Temperature Stainless Grade 5-87411-039-0 by Bostik of USA as the anti-seize lubricant.
6) Install Exhaust gas temperature sensor 1 (front of DPD filter) to the DPD.
Tightening torque: 30 N・m { 3.1 kgf・m / 22 lb・ft }
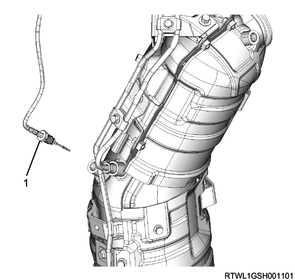
Legend
- Exhaust gas temperature sensor 1 (Front of DPD filter)
7) Clean the old anti-seize lubricant on the sleeve nut, and apply new anti-seize lubricant to the threaded portion of the exhaust gas temperature sensor sleeve nut.
Note
- If the exhaust gas temperature sensor is replaced with a new one, it is not necessary to apply new anti-seize lubricant.
Caution
- Apply Never-Seez High Temperature Stainless Grade 5-87411-039-0 by Bostik of USA as the anti-seize lubricant.
8) Install Exhaust gas temperature sensor 2 (front of oxidation catalyst) to the DPD.
Tightening torque: 30 N・m { 3.1 kgf・m / 22 lb・ft }
9) Clean the old anti-seize lubricant on the sleeve nut, and apply new anti-seize lubricant to the threaded portion of the heated oxygen sensor sleeve nut.
Note
- If the heated oxygen sensor is replaced with a new one, it is not necessary to apply new anti-seize lubricant.
Caution
- Apply Never-Seez High Temperature Stainless Grade 5-87411-039-0 by Bostik of USA as the anti-seize lubricant.
- Do not allow paint, lubricant, dust, etc., to adhere to the sensor.
- When replacing the heated oxygen sensor with a new one, immediately install it to the exhaust pipe after removing the sensor protection cap.
10) Install the heated oxygen sensor to the DPD.
Tightening torque: 50 N・m { 5.1 kgf・m / 37 lb・ft }
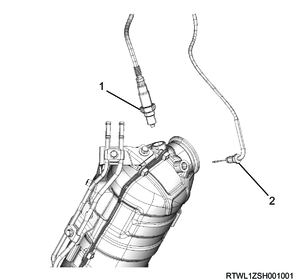
Legend
- Heated oxygen sensor
- Exhaust gas temperature sensor 2 (Front of oxidation catalyst)
11) Install the DPD to the vehicle.
Note
- Tighten the DPD mounting bolt after installing the turbocharger.
3. Turbocharger installation
4. DPD adjustment
1. Precautions
If the DPD is replaced, perform the following.
- Differential pressure sensor learning
- DPD regeneration data reset
2. Differential pressure sensor learning
1) Connect the scan tool to the DLC.
2) Turn ON the ignition switch.
Caution
- Do not start the engine.
3) Observe that the following items are less than or equal to the standard value on the scan tool.
- Engine Coolant Temperature (ECT) parameter
- Exhaust Gas Temperature (EGT) 1 parameter
Standard: 60 ℃ { 140 °F }
4) Select the scan tool item.
- Diagnostics > Engine > 4JJ3 > Special Function > Exhaust Differential Pressure Sensor Learning
5) Perform the exhaust differential pressure sensor learning by following the on-screen instructions.
Note
- It is necessary to wait for approximately 120 seconds for the exhaust differential pressure sensor learning.
6) The procedure is complete when the Exhaust Pressure Learning End Status parameter changes from Not Completed to Completed.
7) Turn OFF the ignition switch after the exhaust differential pressure sensor learning is complete.
3. DPD regeneration data reset
1) Turn ON the ignition switch.
2) Select the scan tool item.
- Diagnostics > Engine > 4JJ3 > Special Function > DPD Regeneration Data Reset
3) Perform the DPD regeneration data reset by following the on-screen instructions.
4) After completing the DPD regeneration data reset, turn OFF the ignition switch.