1. Disc wheel and tire inspection
1. Visual inspection
1) Inspect the disc wheel for the following.
- Wear
- Damage
- Other malfunctions
2. Disc wheel measurement
1) Measure the disc wheel wear.
| Wheel type |
Radial |
Lateral |
| 15 inch steel |
1.0 mm or less { 0.04 in or less } |
1.0 mm or less { 0.04 in or less } |
| 16 inch steel |
||
| 17 inch steel |
||
| 16 inch aluminum |
0.4 mm or less { 0.02 in or less } |
0.55 mm or less { 0.022 in or less } |
| 17 inch aluminum |
||
| 18 inch aluminum |
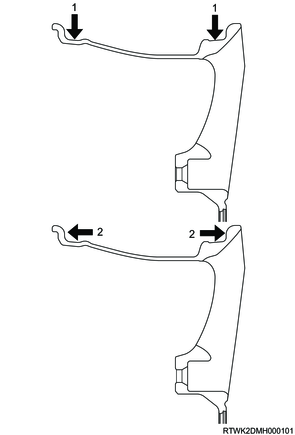
Legend
- Radial
- Lateral
Note
- When the measured value exceeds the limit, replace the wheel.
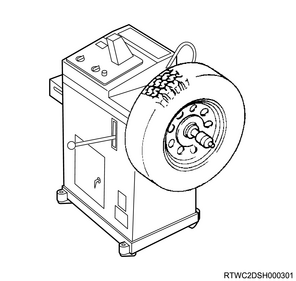
3. Balancing of the wheel and the tire
• On-vehicle balancing
The on-vehicle balancing method differs depending on the balancer.
Follow the handling instructions provided by the equipment manufacturer to balance.
• Off-vehicle balancing
An electric off-vehicle balancer generally has higher precision than an on-vehicle spin balancer.
It is also easier to use and can provide dynamic balancing.
Unlike on-vehicle spin balancing, it cannot correct drum and disk imbalance, but it compensates for this with its higher precision.
2. Disc wheel and tire vehicle inspection
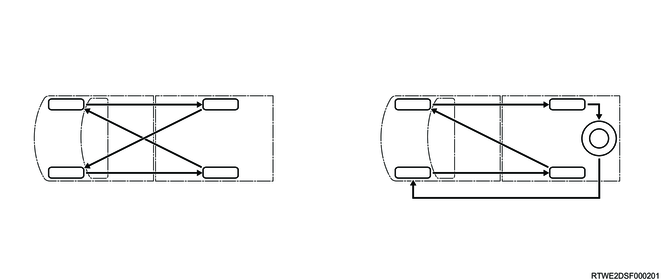
1. Tire rotation
Rotate the tires periodically to achieve even tire wear and extend tire life. Also, check the wheel alignment.
Rotate the tires in the following cases.
- The state of tire wear differs between the front and rear tires.
- Uneven wear is visible on all tire treads.
- The state of tire wear differs between the left and right front tires.
- The state of tire wear differs between the left and right rear tires.
- Feather-like wear on the rib portion or block portion of the front tire
Caution
- Do not rotate between the front and rear tires when the sizes of the tires for the front and rear are different.
This is dangerous because the tires, disc wheels, etc., can become easily damaged due to a load being applied that exceeds the allowable limit of the tires.
Note
- After rotating the tires, operate the meter to reset the maintenance period data.
Because wear varies depending on the installation position, rotate the tires periodically to achieve even tire wear and extend tire life.

If wear appears on the opposite tires, rotate the tires as follows.
2. Regarding tire wear

Legend
- Heavy cornering wear, lack of air pressure, lack of tire rotation
- Inaccurate wheel alignment, non-uniform tire installation
- Driving wheel abrupt acceleration, excessively high air pressure
There are many causes of abnormal wear and early wear. Causes include inappropriate tire air pressure, not rotating the tires, improper driving practices and poor wheel alignment. However, the main cause of early wear is inappropriate tire air pressure.
Early wear of the shoulders of radial tires is notable on the front tires. Therefore, check the wheel nut tightening torque after rotating the tires and adjust it to the specified tire air pressure.
1) Tread wear indicator
Tires have tread-wear indicators that indicate the tire replacement period. When the tire has reached its wear limit, this appears as a groove-less band on the tread. This indicator is a notice that it is time to replace the tire.
Limit: 1.6 mm { 0.06 in }
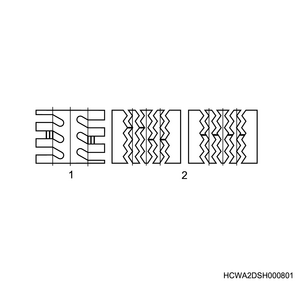
Legend
- Lug pattern
- Rib pattern
2) Examples of tire abnormal wear and the main causes
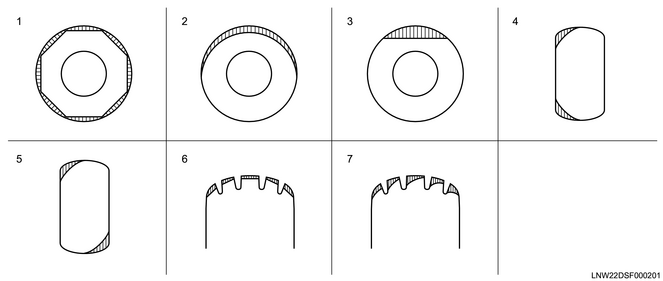
Legend
- Spot wear
- Tread wear only on one side
- Partial tread wear
- Shoulder wear
- Symmetrical wear of the shoulder
- Shoulder wear
- Feather-like wear only on one side
| State of wear |
Main causes and areas requiring inspection |
| Spot wear {Wear is generated with a bias to the shoulders, and in the worst cases, the tire can become polygon-shaped.} |
The tire wheel is not perfectly round, or is deformed. |
| The hub or knuckle is not perfectly round, or is deformed. |
|
| Play in the hub bearing or lower link ball joint is excessive. |
|
| Rotational parts are not balanced properly. |
|
| Tread wear only on one side |
Rotational parts are not balanced properly. |
| The tire or wheel is not perfectly round. |
|
| The hub or knuckle is not perfectly round, or is deformed. |
|
| Partial tread wear |
Once spot wear occurs due to sudden braking or sudden turning, it may develop into partial tread wear. |
| Shoulder wear {Normally, wear occurs on the outer shoulder portion.} |
Improper camber or toe-in |
| Shoulder wear is caused by repeated sudden cornering. |
|
| Symmetrical wear of the shoulder |
The tire or wheel is not perfectly round, or is deformed. |
| Play in the hub bearing or lower link ball joint is excessive. |
|
| Shoulder wear |
Insufficient air pressure |
| Feather-like wear only on one side |
Wear is caused by repeated sudden cornering. |
| Improper camber or toe-in |
Note
- The same wear patterns may occur because of worn suspension parts, improper alignment of the wheels or tires, and other suspension-related problems.
3. Inspection of waddling phenomenon of radial tires
The waddling phenomenon is the swaying of the front and back ends of the vehicle from left to right. The cause is that the tire's steel belt is not straight, or there is excessive lateral runout of the tires or wheels. This is particularly notable at low speeds, and the handling stability becomes extremely poor when driving at high speeds.
Perform a vehicle road test and inspect which tire has a problem.
1) Perform a test run.
2) Determine the source of the waddling.
3) Replace the disc wheel and the tire at the source of the waddling.
Caution
- If the source of the waddling cannot be identified, begin replacement from the rear tires.
4) Perform a test run.
Caution
- Perform the following procedure if there is no change during a test run.
- Replace the original tires one by one to track down the defective tire.
- Replace all 4 tires with normal tires, and then replace them with the original tires one by one to track down the defective tire.
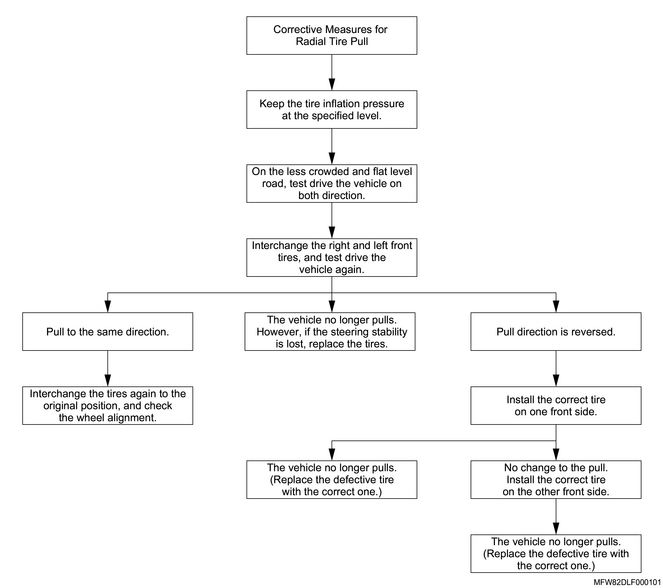
4. Inspection of pulling phenomenon of radial tires
Pulling is when the vehicle does not stay in a straight line even on a flat road in which no pressure is being applied to the steering wheel. The following are possible causes.
- Tire structure
- Uneven brake adjustment
- Improper wheel alignment
If the pulling phenomenon of radial tires is found, repair according to the radial tire pull repair chart.
Note
- The rear tires are never the cause of pulling.
Radial tire pull repair chart
5. Tire air pressure inspection
The air pressure increases approximately 15% when the tires are warmed up while driving.
Caution
- If a problem is found, inspect the tire air pressure immediately.
- Next, if a problem related to the wheel alignment cannot be found in the wheel alignment inspection, inspect the shock absorbers or tire balancing.
Tire air pressure significantly affects tire wear.
Inspection conditions for tire air pressure
- The tires are cool.
- 3 hours or more has passed since the vehicle was stopped.
- After driving within 1.6 km {1 mile}
The tire air pressure specification label is attached on the inside of the door opening.
Because a label may be described air pressures other than the size of tires installed., make sure to check the size of the tires that are to be installed.Because the label inside the door opening may show information for tires of size different that those installed, always check the size of the tires installed on the vehicle.

Legend
- Tire air pressure specification label