1. Component views
Rear door
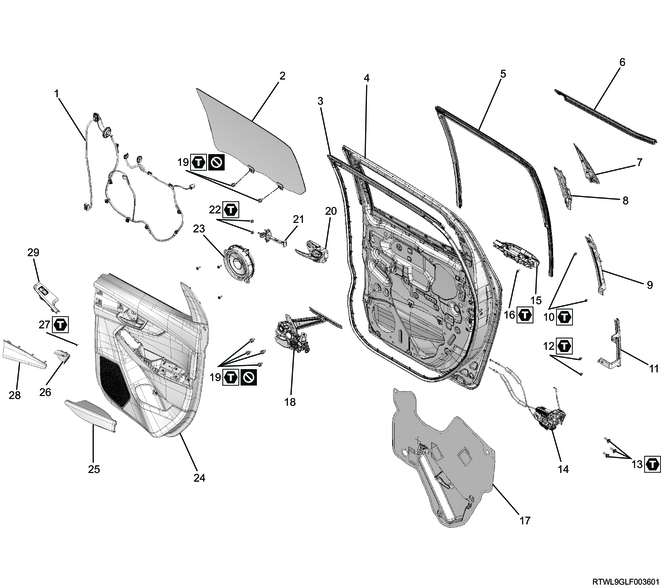
Part name
- Door harness
- Rear door glass
- Weather strip
- Rear door panel
- Glass-run
- Outer waist seal
- Rear door garnish
- Insulator upper cover
- Upper glass-run rear channel
- Bolt
- Lower glass-run rear channel
- Bolt
- Torx screw
- Rear door lock
- Outside handle
- Torx screw
- Waterproof sheet
- Rear door window regulator
- Bolt
- Inside lever
- Check arm
- Nut
- Speaker
- Rear door trim pad
- Armrest
- Cover
- Screw
- Garnish
- Power window switch
Tightening torque
10: 7.0 N・m { 0.7 kgf・m / 62 lb・in }
12: 7.0 N・m { 0.7 kgf・m / 62 lb・in }
13: 7.0 N・m { 0.7 kgf・m / 62 lb・in }
16: 6.0 N・m { 0.6 kgf・m / 53 lb・in }
19: 9.0 N・m { 0.9 kgf・m / 80 lb・in }
22: 7.0 N・m { 0.7 kgf・m / 62 lb・in }
27: 2.0 N・m { 0.2 kgf・m / 18 lb・in }
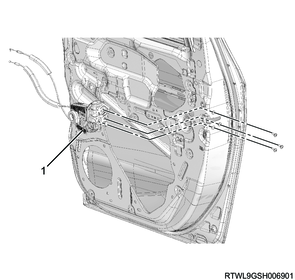
2. Door harness installation
1) Install the door harness to the rear door.
3. Weather strip installation
1) Install the weather strip to the rear door.
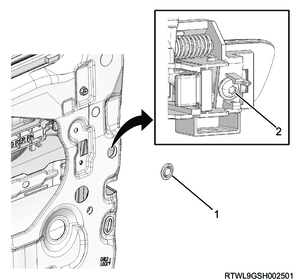
4. Rear door check arm installation
1) Install the rear door check arm to the rear door.
Caution
- Install with the surface marked RL facing upward for the left side and the surface marked RR facing upward for the right side.
Tightening torque: 7.0 N・m { 0.7 kgf・m / 62 lb・in }
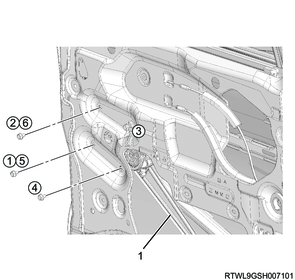
5. Outside handle installation
1) Install the outside handle bracket to the rear door.
2) Install the sheet to the rear door.
3) Install the outside handle to the rear door.
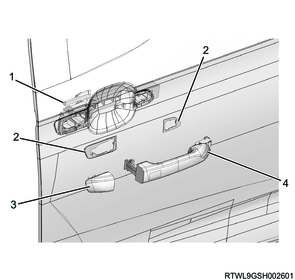
Legend
- Outside handle bracket
- Sheet
- Handle cap
- Outside handle
4) Install the handle cap to the rear door.
Tightening torque: 6.0 N・m { 0.6 kgf・m / 53 lb・in }
Legend
- Cover
- Screw
5) Install the cover to the rear door.
6. Rear door lock installation
1) Install the rear door lock to the rear door.
Tightening torque: 7.0 N・m { 0.7 kgf・m / 62 lb・in }
Legend
- Rear door lock
2) Connect the rod to the outside handle bracket.
3) Connect the connector to the door lock.
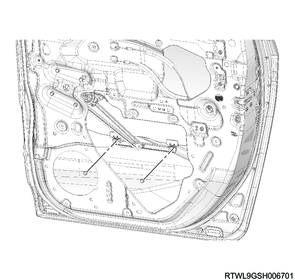
7. Rear door window regulator installation
1) Temporarily install a bolt to the rear door window regulator as a guide bolt to install the rear door window regulator to the rear door.

Legend
- Rear door window regulator
- Bolt
2) Tighten the bolts in the following order.
Caution
- Do not reuse the bolt.
Tightening torque: 9.0 N・m { 0.9 kgf・m / 80 lb・in }
Legend
- Rear door window regulator
3) Connect the connector to the power window motor.
8. Glass-run installation
1) Install the glass-run to the rear door.
9. Rear door glass installation
1) Install the rear door glass to the rear door.
Caution
- Do not reuse the bolt.
Tightening torque: 9.0 N・m { 0.9 kgf・m / 80 lb・in }
10. Glass-run rear channel installation
1) Install the upper glass-run rear channel to the rear door.
Tightening torque: 7.0 N・m { 0.7 kgf・m / 62 lb・in }

Legend
- Upper glass-run rear channel
2) Install the lower glass-run rear channel to the rear door.
Tightening torque: 7.0 N・m { 0.7 kgf・m / 62 lb・in }
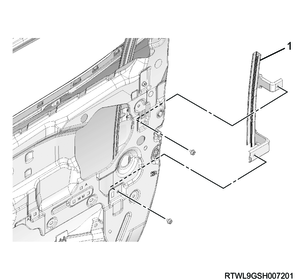
Legend
- Lower glass-run rear channel
11. Waterproof sheet installation
1) Install the water proof sheet to the rear door.
12. Rear door speaker installation
1) Install the rear door speaker to the rear door.
Tightening torque: 0.8 N・m { 0.08 kgf・m / 7.1 lb・in }

Legend
- Rear door speaker
- Screw
2) Connect the connector to the rear door speaker.

Legend
- Screw
- Rear door speaker
- Connector
- Harness clip
13. Bracket installation
1) Install the bracket to the rear door.
14. Outer waist seal installation
1) Install the outer waist seal to the rear door.
15. Inside lever installation
1) Install the inside lever to the rear door trim pad.
16. Insulator upper cover installation
1) Install the insulator upper cover to the rear door.
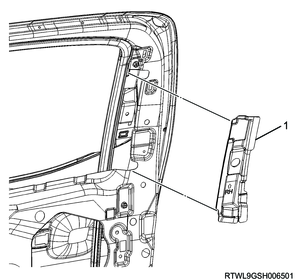
Legend
- Insulator upper cover
17. Rear door trim pad installation
1) Connect the door lock cable to the inside lever.
2) Install the rear door trim pad to the rear door.
Caution
- When installing, be careful not to let the door lock cover open because the door lock cable is connected to the inside lever.
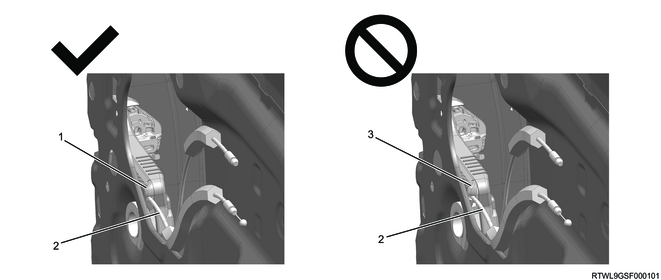
Legend
- Door lock (When the cover is closed)
- Door lock cable
- Door lock (When the cover is opened)
3) Tighten the screws, and install the cover and garnish.
Tightening torque: 2.0 N・m { 0.2 kgf・m / 18 lb・in }
4) Install the rear door upper cover to the rear door.
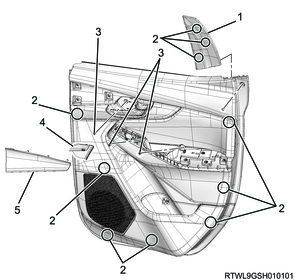
Legend
- Rear door upper cover
- Clip position
- Screw
- Cover
- Garnish
18. Rear door power window switch installation
1) Connect the connector to the rear door power window switch.
2) Install the rear door power window switch to the rear door trim pad.
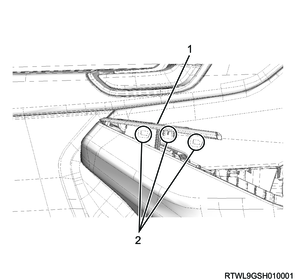
Legend
- Rear door power window switch
- Claw section
3) Install the armrest to the rear door trim pad.
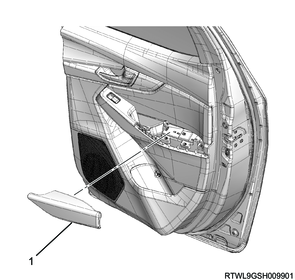
Legend
- Armrest