1. Audio and navigation system safety information
1. Models equipped with display units
When replacing the audio center unit, make sure to write vehicle information into the new audio center unit.
When replacing the audio center unit, upload the old audio center unit data to a scan tool before removing.
The scan tool used for the replacement procedure must be the same from start to finish. If the scan tool is changed midway, information cannot be written correctly.
2. Audio and navigation system setting
1. Vehicle information download
Perform the vehicle information download only when communication with the old audio center unit can be established,
Caution
- Make sure to check the vehicle specification before performing the download.
1) Connect the scan tool to the DLC.
2) Turn ON the ignition switch.
3) Select "Download Vehicle Configuration Data" on the scan tool.
- Diagnostics > Information > CENTER UNIT(NAVI) > Programming > Download Vehicle Configuration Data
4) Download the vehicle data to the audio center unit by following the on-screen instructions.
5) Turn OFF the ignition switch for 30 seconds.
2. Vehicle information programming
Perform the vehicle information programming only when communication with the old audio center unit cannot be established
1) Connect the scan tool to the DLC.
2) Turn ON the ignition switch.
3) Select "Programming Vehicle Configuration Data" on the scan tool.
- Diagnostics > Information > CENTER UNIT(NAVI) > Programming > Programming Vehicle Configuration Data
4) Program the vehicle data by following the on-screen instructions.
Caution
- After referring to and checking the selected setting values in the following list, perform programming.
| Setting Item |
Setting Value |
Note |
| Brand |
ISUZU |
Select a vehicle manufacturer. |
| MAZDA |
||
| Chevrolet |
||
| Cab Type |
Other |
Select the rear body type. |
| Cab chassis |
||
| Flat Deck |
||
| Vehicle Type |
Crew cab |
Select a vehicle type. |
| Extend cab |
||
| Regular cab |
||
| Speaker Type |
4 Speakers |
Select the number of speaker to be installed to the vehicle. |
| 6 Speakers |
||
| 8 Speakers |
||
| Package for Language |
Thailand |
Select the package for language. If "Other" is selected, the language is set to English(UK). When using other languages, program it, and then change the language on the audio setting screen. |
| Australia(English) |
||
| Other |
||
| Radio AM/FM Frequency |
NO. 1 (ASIA/AFRICA) |
Asia/Africa |
| NO. 2 (M. EAST) |
Middle East |
|
| NO. 3 (EU) |
Europe |
|
| NO. 4 (C. & S. AMERICA) |
Latin America |
|
| NO. 5 (PACIFIC) |
Pacific area |
|
| AECS(e-CALL / ERA-GLONASS) |
Without AECS(e-CALL / ERA-GLONASS) |
For models with E-CALL / ERA-GLONASS, select "With AECS(e-CALL / ERA-GLONASS)". |
| With AECS(e-CALL / ERA-GLONASS) |
||
| DVD Region code |
Region code: 2 |
Austria, Bahrain, Belgium, Bosnia and Herzegovina, Botswana, Bulgaria, Croatia, Cyprus, Czech Republic, Denmark, Estonia, Eswatini, Finland, France, Germany, Greece, Hungary, Iceland, Iraq, Ireland, Israel, Italy, Jordan, Kuwait, Laos, Latvia, Lesotho, Lithuania, Luxembourg, Malta, Montenegro, Namibia, Netherlands, Norway, Oman, Palestine, Poland, Portugal, Qatar, Romania, Saudi Arabia, Serbia, Slovakia, Slovenia, South Africa, Spain, Sweden, Switzerland, The former Yugoslav Republic of Macedonia, United Arab Emirates, United Kingdom, Yemen |
| Region code: 3 |
Cambodia, Indonesia, Lao People's Democratic Republic, Malaysia, Myanmar, Philippines, Thailand, Viet Nam |
|
| Region code: 4 |
Antigua and Barbuda, Argentina, Aruba, Australia, Bahamas, Barbados, Belize, Bolivia, British Virgin Islands, Chile, Colombia, Cook Islands, Costa Rica, Curacao, Dominica, Dominican Republic, Ecuador, El Salvador, Fiji, Grenada, Guatemala, Haiti, Honduras, Jamaica, Kiribati, Marshall Islands, New Caledonia, New Zealand, Nicaragua, Panama, Papua New Guinea, Paraguay, Peru, Saint Lucia, Saint Martin, Saint Vincent and the Grenadines, Samoa, Solomon Islands, Suriname, Tahiti, Trinidad and Tobago, Uruguay, Vanuatu, Virgin Islands of the United States |
|
| Region code: 5 |
Algeria, Angola, Bangladesh, Benin, Burkina Faso, Burundi, Cameroon, Cape Verde, Central African Republic, Chad, Comoros, Congo (Republic of the), Cote d'Ivoire, Democratic Republic of the Congo, Djibouti, Equatorial Guinea, Eritrea, Ethiopia, Gabon, Gambia, Ghana, Guinea, Guinea-Bissau, Kenya, Liberia, Madagascar, Malawi, Mali, Mauritius, Mozambique, Nepal, Niger, Nigeria, Republic of Seychelles, Russian Federation, Rwanda, Sao Tome and Principe, Senegal, Sierra Leone, Somalia, Sri Lanka, Togo, Tunisia, Uganda, United of Republic of Tanzania, Zambia, Zimbabwe |
|
| RDS/DAB Type |
Not used |
Except for Europe, South Africa, Australia/New Zealand |
| EU |
Europe |
|
| South Africa |
South Africa |
|
| Australia |
Australia/New Zealand |
|
| Time Zone |
ASIA |
Select a time zone. |
| PACIFIC |
||
| EU |
||
| M. EAST |
||
| C. & S. AMERICA |
||
| AFRICA |
||
| WiFi Function |
OFF |
If turning ON the Wifi function, make sure that "Miracast" is selected on the audio Wifi setting screen. |
| ON |
||
| WiFi BAND/Power setting |
NO. 1 |
Republic of Palau, Central African Republic (CAR), Somalia, Niger |
| NO. 2 |
Burkina Faso, Uganda, Curacao, Nicaragua |
|
| NO. 3 |
Trinidad and Tobago, Ecuador |
|
| NO. 4 |
El Salvador, Chile |
|
| NO. 5 |
Republic of Iraq, Oman, Republic of the Congo, Aruba |
|
| NO. 6 |
Bolivia, Yemen, Laos, Malaysia, Honduras |
|
| NO. 7 |
Saint Lucia, Ghana |
|
| NO. 8 |
Union of Comoros |
|
| NO. 9 |
Costa Rica, Panama, Dominican Republic, Philippines, Cape Verde |
|
| NO. 10 |
Argentina |
|
| NO. 17 |
Australia, Myanmar, Democratic Republic of the Congo, Seychelles, Eswatini, Belize, Cambodia, New Zealand, Fiji, Tahiti, Guinea, Guinea Bissau, Mali, Cameroon, Equatorial Guinea, Chad, Eritrea, Djibouti, Burundi, Mozambique, Namibia, Botswana, Barbados, Jamaica, Colombia, Peru, Sierra Leone, Benin, Angola, Tanzania, South Africa, Lesotho, Uruguay, Paraguay |
|
| NO. 18 |
Grenada, West Samoa |
|
| NO. 19 |
Antigua and Barbuda, Bahamas, Saint Vincent, Haiti, Senegal, Ethiopia, Marshall Islands |
|
| NO. 22 |
Iceland, Ireland, United Kingdom, Estonia, Sweden, Denmark, Norway, Finland, Latvia, Lithuania, Austria, Netherlands, Switzerland, Germany, France, Belgium, Luxembourg, Slovakia, Czech Republic, Hungary, Bulgaria, Poland, Romania, Italy, Greece, Croatia, Spain, Slovenia, Serbia, Bosnia & Herzegovina, Portugal, Malta, Montenegro, Cyprus |
|
| NO. 23 |
Thailand, New Caledonia, Gambia, Kenya, Zambia, Republic of Kiribati, Vanuatu, Cook Islands, Sao Tome and Principe, Guatemala, Liberia, Malawi, Vietnam, Bangladesh, Papua New Guinea |
|
| NO. 24 |
Bahrain, Sri Lanka, Tunisia, Madagascar, Zimbabwe, Saudi Arabia, Macedonia, Nigeria, Ivory Coast (Cote d'Ivoire), Gabon, Algeria, Solomon Islands, Suriname, Kuwait, Jordan, Togo, Israel, Mauritius, Rwanda, Qatar, Virgin Islands, Commonwealth of Dominica, Palestine |
|
| NO. 25 |
Russia |
|
| NO. 29 |
Saint Martin |
|
| NO. 38 |
Nepal, Indonesia |
|
| WiFi DFS setting |
ON |
Caution
- If you set the "Wifi Band / Power setting" incorrectly, you may be punished by violating the law.
Be sure to check the setting value of "Wifi Band / Power setting".
5) Turn OFF the ignition switch for 30 seconds.
3. Rearview camera setting
1. Back eye camera guide line adjustment
1) Turn the ignition switch to ACC.
2) While pressing the VOL+ button on the display unit, turn ON from OFF the taillight switch 3 times repeatedly.
3) The service menu screen will be displayed.
Note
- If the display is not changed, start over from the beginning.
4) Select "Function Check/Setting".
5) Select "Camera Guide Line Setting".
6) Referring to the following, perform the guide line adjustment.
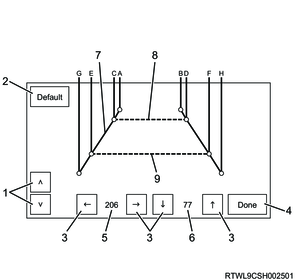
Legend
- Point selector button
- Initialization button
- Right, left, up, down movement buttons
- Completion button
- Coordinate value of the selected point (horizontal)
- Coordinate value of the selected point (vertical)
- Vehicle width line
- 2.0 m {6.6 ft} line
- 0.5 m {1.6 ft} line
| Name |
Description |
|
| 1 |
Point selector button |
An adjustment point is changed. |
| 2 |
Initialization button |
The guide line position is returned to the initial setting. |
| 3 |
Right, left, up, down movement buttons |
The selected point is moved horizontally or vertically. A horizontal or vertical movement can also be operated by directly touching the touch panel. |
| 4 |
Completion button |
The setting is reflected and the adjustment is finished. |
| 5 |
Coordinate value of the selected point (horizontal) |
The horizontal coordinate value of the selected point is displayed. |
| 6 |
Coordinate value of the selected point (vertical) |
The vertical coordinate value of the selected point is displayed. |
| 7 |
Vehicle width line |
Vehicle width tracks when moving back straightly from the current position are shown. They are indicated with yellow lines. |
| 8 |
2.0 m {6.6 ft} line |
2.0 m (6.6 ft) from the vehicle rear end is shown. It is indicated with a green broken line. |
| 9 |
0.5 m {1.6 ft} line |
0.5 m {1.6 ft} from the vehicle rear end is shown. It is indicated with a red broken line. |
Note
- For the vehicle whose guide line is not displayed in the initial state, the guide line will be displayed when adjusting the back eye camera guide line and turning ON the camera guide line in the display unit setting.
4. Audio and navigation system update
To update map data on the unit, visit the iAuto website, enter the AuthCode and download the map data.
To update maps, see the following sections in order: "Exporting the AuthCode"> "Downloading map data"> "Updating map data".
1. Exporting the AuthCode.
You can export the AuthCode required for downloading map data to a USB flash drive.
1) Connect a USB flash drive to the USB terminal.
2) Touch "Home" > "Setting" > "Main"tab > "System".
3) Touch "About".
4) Touch "System Information".
5) Touch "Export to USB" and export the AuthCode to the USB flash drive.
2. Downloading map data
1) On a computer that is connected to the Internet, navigate to "https://mazda.aus.iauto.com".
2) Connect the USB flash drive containing the exported AuthCode to the computer.
3) Click on "Import AuthCode" and select the AuthCode file from the USB flash drive.
4) Touch "Search button".
5) Click on the file for download.
6) Check the dialogue and click on "Continue".
- The "SEALINFO.KEY" and "UPDATE. BIN" files will be downloaded.
7) Download the "SEALINFO.KEY" and "UPDATE.BIN" files to the USB flash drive.
3. Updating map data
1) Connect the USB flash drive containing the downloaded update data to the USB terminal.
- Once the USB flash drive has been located, the update icon will appear in the status bar.
2) Drag the status bar downwards to display the Information screen.
3) Touch the update information.
4) Touch "OK".
- When the update is complete, the message "Update finished. System will restart." will appear, and the unit will restart.