1. Crankshaft inspection
1. Cleaning
1) Clean the following parts.
- Crankshaft journal
- Crankshaft lower bearing
- Crankshaft upper bearing
- Crank pin
2. Visual inspection
1) Inspect the crankshaft journal and crank pin for the following.
- Wear
- Damage
- Clogged oil port
2) Inspect the crankshaft lower bearing for the following.
- Wear
- Damage
Note
- Replace the bearing as a set if an abnormal condition is found.
3) Inspect the crankshaft upper bearing for the following.
- Wear
- Damage
Note
- Replace the bearing as a set if an abnormal condition is found.
4) Clean the crankshaft with organic solvent.
Caution
- Thoroughly clean the crankshaft to completely remove any oil from the journal and crank pin.
5) Prepare a 5 to 10% inspection solution of copper (II) ammonium chloride dihydrate dissolved in distilled water.
Warning
- Do not allow the solution to come in contact with your eyes, hands, clothes, etc.
- If the solution has gotten in your eyes, immediately wash with a large amount of fresh water and seek medical treatment.
6) Apply the solution to the journal and crank pin using an oil can.
Caution
- Keep the inspection surface completely level so that the solution stays on the surface.
- Do not allow the solution to come near the oil port.
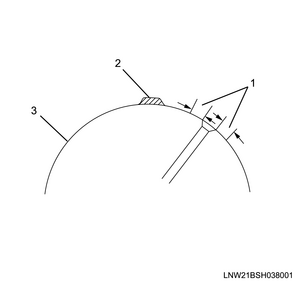
Legend
- Drip prohibited area
- Test liquid drop section
- Pin or journal moving surface
7) Wait for 30 to 40 seconds before inspecting to see if the color has changed.
Note
- If the color doesn't change after 30 to 40 seconds have elapsed, a tufftride layer is still present and the crankshaft can be reused.
- If the inspection solution changed to a copper color, replace the crankshaft.
Caution
- Clean it off them with a cloth and wash with water or steam upon completion, because the solution is highly corrosive.
- Do not allow the inspection solution to come in contact with your eyes, hands, clothes, etc. If the inspection solution has gotten in your eyes, immediately wash with a large amount of fresh water and seek medical treatment.
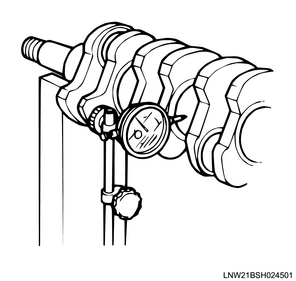
3. Crankshaft runout measurement
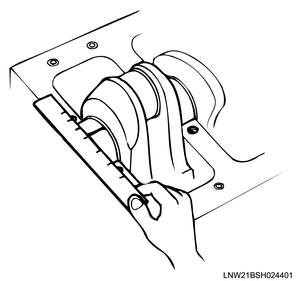
1) While slowly turning the crankshaft, measure the runout at the crankshaft center using a dial gauge.
Note
- If the measured value exceeds the limit, replace the crankshaft.
Standard: 0.05 mm or less { 0.0020 in or less }
4. Crankshaft journal and crank pin measurement
1) Referring to the diagram, measure the 4 crankshaft journal locations using a micrometer.
Standard: 69.917 to 69.932 mm { 2.7526 to 2.7532 in } Journal section
2) Referring to the diagram, measure the 4 crankshaft crank pin locations using a micrometer.
Standard: 52.915 to 52.930 mm { 2.0833 to 2.0839 in } Pin section
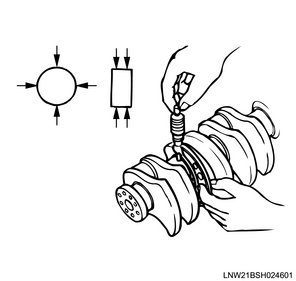
Caution
- Do not repair the crankshaft as it has been tufftrided (soft nitriding) to increase its strength.
- Because the journal sections and crank pins have undergone soft nitriding (tufftriding) treatment, do not repair by grinding.
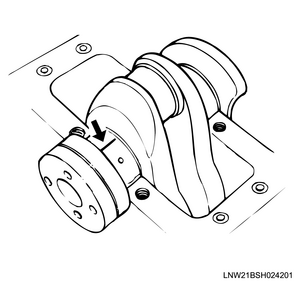
5. Oil clearance measurement
1) Install the crankshaft upper bearing to the cylinder block.
2) Install the crankshaft to the cylinder block.
Note
- Rotate the crankshaft approximately 30° to stabilize the bearing.
Caution
- Level the crankshaft to install.
3) Referring to the diagram, place PLASTIGAUGE on the crankshaft journal.
4) Install the crankshaft lower bearing to the bearing cap.
5) Install the bearing caps to the cylinder block in the order shown in the diagram.
Note
- Install so that the bearing cap front mark faces the front of the engine.
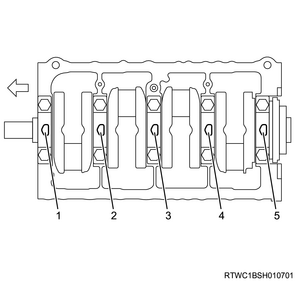
Legend
- No. 1
- No. 2
- No. 3
- No. 4
- No. 5
6) Apply engine oil to the threaded portions and seating surfaces of the bearing cap bolts.
7) Temporarily tighten the crankshaft and bearing cap in the order shown in the diagram.
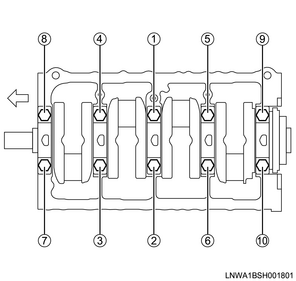
8) Carefully tighten the bearing cap bolts to the cylinder block in the order shown in the diagram.
Caution
- Carefully place the bearing cap on the cylinder block.
- Do not rotate the crankshaft after tightening the bearing caps.
Tightening torque: 167 N・m { 17.0 kgf・m / 123 lb・ft }
9) Remove the bearing cap from the cylinder block.
Caution
- Remove carefully.
10) Measure the widest point of the flattened PLASTIGAUGE, and inspect the oil clearance of the crankshaft journal section.
11) Measure the maximum width portion of the PLASTIGAUGEs crushed by the tightening of the bearing caps.
Note
- Replace all of the crankshaft bearings or the crankshaft if the measured value is outside the standard range.
Standard: 0.030 to 0.054 mm { 0.0012 to 0.0021 in }
12) Remove all PLASTIGAUGE from the following parts.
- Crankshaft lower bearing
- Crankshaft journal