1. Component views
Disc wheel and tire
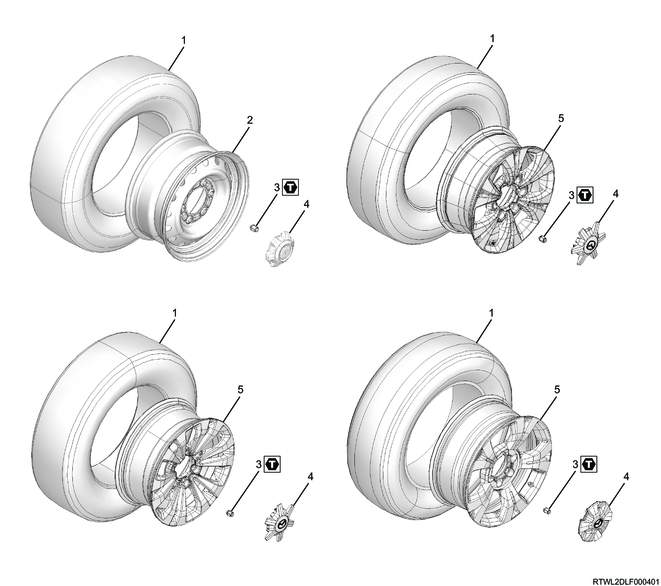
Part name
- Tire
- Steel wheel
- Wheel nut
- Wheel cap
- Aluminum wheel
Tightening torque
3: 120 N⋅m {12 kgf⋅m / 87 lb⋅ft}
2. Disc wheel removal
1. Models with aluminum wheels
1) Move the vehicle to a flat surface.
2) Pull the parking brake lever.
3) Secure the vehicle using chock blocks.
4) Raise the vehicle.
Note
- Jack up the vehicle but not to an extent that the tire leaves the ground.
5) Remove the wheel cap from the disc wheel.
Note
- Insert a tool with flat tip such as a flathead screwdriver into the wheel cap groove to remove.
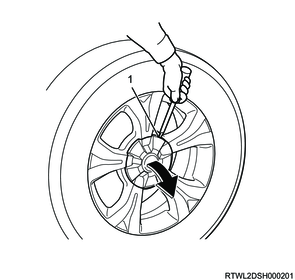
Legend
- Wheel cap groove
6) Loosen the wheel nuts.
Note
- Loosen without allowing the disc wheel to rattle.
Caution
- At this time, do not remove the wheel nuts.
7) Raise the vehicle.
Note
- Jack up the vehicle until the tire is completely off the ground.
- Support the frame using a chassis stand as necessary.
8) Remove the disc wheel from the vehicle.
2. Models with steel wheels
1) Move the vehicle to a flat surface.
2) Pull the parking brake lever.
3) Secure the vehicle using chock blocks.
4) Raise the vehicle.
Note
- Jack up the vehicle but not to an extent that the tire leaves the ground.
5) Remove the wheel cap from the disc wheel.
6) Loosen the wheel nuts.
Note
- Loosen without allowing the disc wheel to rattle.
Caution
- At this time, do not remove the wheel nuts.
7) Raise the vehicle.
Note
- Jack up the vehicle until the tire is completely off the ground.
- Support the frame using a chassis stand as necessary.
8) Remove the disc wheel and wheel cap from the vehicle.
3. Tire removal
1. Precautions for replacing tires
Caution
- When replacing the tire, make sure to use tires of the same size.
- Do not mix different types of tires, such as radial tires with bias tires, except for emergencies.
- Remove the tires by following the handling instructions provided by each tire changer manufacturer.
- Do not replace tires using only a hand tool or tire lever.
The tire bead or wheel rim may be damaged.
2. Tire removal (Models without tire air pressure sensors)
1) Remove the valve cap and valve core from the valve to release air from the tire.
2) Using a tire bead breaker, break the tire bead to the inside of the wheel rim.
3) Remove the tire bead from the wheel rim using the tire changer.
4) Remove the tire from the disc wheel.
5) Remove the valve from the disc wheel.
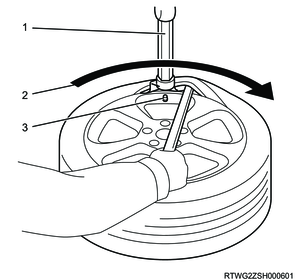
3. Tire removal (Models with tire air pressure sensors)
1) Remove the valve cap and valve core from the valve to release air from the tire.
2) Using a tire bead breaker, break the tire bead to the inside of the wheel rim at the position shown in the diagram.

Legend
- Valve
Dimensions
a: 90°
Note
- Break the outer and inner tire beads at the same position to the inside of the wheel rim.
- Separate the valve from the tire bead breaker.
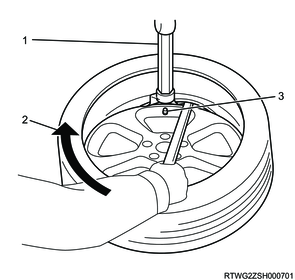
3) Remove the upper tire bead from the wheel rim using the tire changer.
Note
- Set the valve directly below the tire changer attachment.
Legend
- Attachment
- Wheel rim rotation direction
- Valve
4) Remove the lower tire bead from the wheel rim using the tire changer.
Note
- Set the valve directly below the tire changer attachment.
Legend
- Attachment
- Wheel rim rotation direction
- Valve
5) Remove the tire from the disc wheel.
6) Remove the tire air pressure sensor from the valve using a T10 Torx screwdriver.
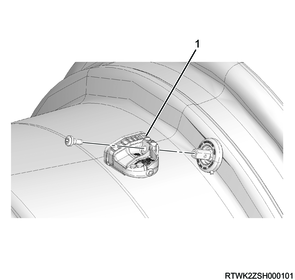
Legend
- Tire air pressure sensor
7) Cut around the circumference of the valve using a knife.
Note
- It makes it easy to remove the valve from the disc wheel.

8) Remove the valve from the disc wheel using a suitable tool.
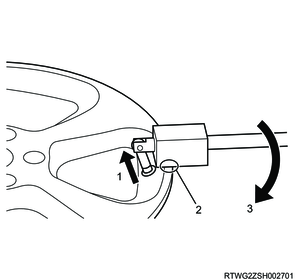
Legend
- Valve removal direction
- Place a suitable tool against the wheel rim.
- Suitable tool force application direction
9) Record the 8-digit tire air pressure sensor ID marked on the removed tire air pressure sensor.
Note
- The recorded 8-digit tire air pressure sensor ID is required for performing the TPMS control unit setting after installing the tire air pressure sensor.
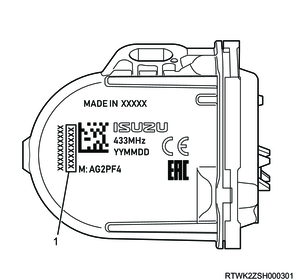
Legend
- 8-digit tire air pressure sensor ID