|
ac5wzw00005711
FUEL FILTER REMOVAL/INSTALLATION [SKYACTIV-D 2.2]
id0114z7800000
Fuel Filter Component Removal/Installation
1. Disconnect the negative battery cable. (See NEGATIVE BATTERY CABLE DISCONNECTION/CONNECTION [SKYACTIV-D 2.2].)
2. Perform the “Fuel Line Safety Procedure” referring to the “BEFORE SERVICE PRECAUTION”. (See BEFORE SERVICE PRECAUTION [SKYACTIV-D 2.2].)
3. Remove the engine cover. (See ENGINE COVER REMOVAL/INSTALLATION [SKYACTIV-D 2.2].)
4. Remove the battery. (See BATTERY REMOVAL/INSTALLATION [SKYACTIV-D 2.2].)
5. Remove in the order shown in the figure.
L.H.D.
ac5wzw00005711
|
|
1
|
Sedimentor switch connector
|
|
2
|
Fuel warmer connector (with fuel warmer)
|
|
3
|
Fuel main hose No.1
|
|
4
|
Fuel main hose No.2
|
|
5
|
Fuel filter
|
|
6
|
Drain plug
(See Drain plug installation note.)
|
|
7
|
Sedimentor switch
|
|
8
|
Fuel warmer (with fuel warmer)
|
R.H.D.
ac5wzw00005710
|
|
1
|
Sedimentor switch connector
|
|
2
|
Fuel filter installation nut
|
|
3
|
Fuel filter bracket installation nut
|
|
4
|
Fuel main hose No.1
|
|
5
|
Fuel main hose No.2
|
|
6
|
Fuel filter bracket
|
|
7
|
Fuel filter
|
|
8
|
Drain plug
(See Drain plug installation note.)
|
|
9
|
Sedimentor switch
|
6. Install in the reverse order of removal.
7. Perform the fuel hose installation procedure and fuel line air bleeding referring to the “AFTER SERVICE PRECAUTION”. (See AFTER SERVICE PRECAUTION [SKYACTIV-D 2.2].)
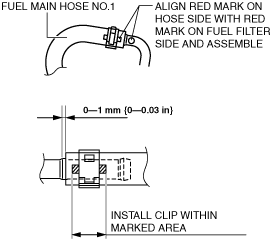
Fuel main hose No.1 installation note
1. Install fuel main hose No.1 as shown in the figure.
ac5wzw00005784
|
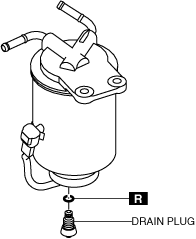
Drain Plug Removal/Installation
1. Remove the fuel filter. (See Fuel Filter Component Removal/Installation.)
2. Remove the drain plug.
L.H.D.
ac5uuw00009842
|
R.H.D.
ac5wzw00012810
|
3. Install in the reverse order of removal. (See Drain plug installation note.)
Drain plug installation note
1. Tighten the drain plug enough to the fuel filter by hand.
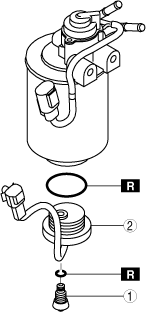
Sedimentor Switch Removal/Installation
1. Remove the fuel filter. (See Fuel Filter Component Removal/Installation.)
2. Remove in the order indicated in the figure.
L.H.D.
ac5uuw00009843
|
R.H.D.
ac5wzw00012808
|
|
1
|
Drain plug
(See Drain plug installation note.)
|
|
2
|
Sedimentor switch
|
3. Install in the reverse order of removal.
Sedimentor switch installation note
1. Tighten the sedimentor switch enough to the fuel filter by hand.
Drain plug installation note
1. Tighten the drain plug enough to the fuel filter by hand.
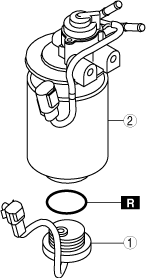
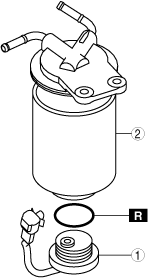
Fuel Filter Removal/Installation
1. Remove the fuel filter. (See Fuel Filter Component Removal/Installation.)
2. Disassemble in the order indicated in the table.
L.H.D.
am6zzw00018035
|
R.H.D.
am6zzw00018036
|
|
1
|
Sedimentor switch
|
|
2
|
Fuel filter
|
3. Assemble in the reverse order of removal.
Fuel filter installation note
1. Apply a small amount of fuel to the fuel filter O-ring. Tighten the fuel filter approx. 3/4 by hand.
Sedimentor switch installation note
1. Tighten the sedimentor switch enough to the fuel filter by hand.
Fuel Warmer Removal/Installation
1. Remove the fuel filter. (See Fuel Filter Component Removal/Installation.)
2. Remove the fuel warmer.
ac5uuw00009845
|
3. Install in the reverse order of removal.