|
ac5wzw00001815
AIRFLOW MODE MAIN LINK REMOVAL/INSTALLATION
id071100801800
Full-auto Air Conditioner
1. The airflow mode main link is installed to the airflow mode actuator. When removing the airflow mode main link, refer to the airflow mode actuator removal/installation. (See AIRFLOW MODE ACTUATOR REMOVAL/INSTALLATION [FULL-AUTO AIR CONDITIONER].)
Manual Air Conditioner
1. Disconnect the negative battery cable. (See NEGATIVE BATTERY CABLE DISCONNECTION/CONNECTION [SKYACTIV-G 2.0, SKYACTIV-G 2.5].)(See NEGATIVE BATTERY CABLE DISCONNECTION/CONNECTION [SKYACTIV-G 2.0, SKYACTIV-G 2.5 (WITHOUT i-stop)].)(See NEGATIVE BATTERY CABLE DISCONNECTION/CONNECTION [SKYACTIV-D 2.2].)
2. Remove the glove compartment. (See GLOVE COMPARTMENT REMOVAL/INSTALLATION.)
3. Detach the hook (1), then remove the airflow mode rod (2). (L.H.D.)
ac5wzw00001815
|
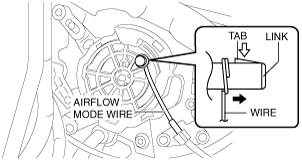
4. Remove the airflow mode wire. (R.H.D.)
ac5wzw00001816
|
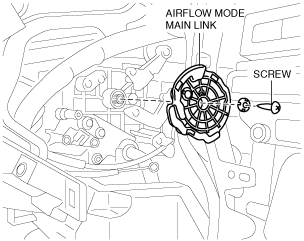
5. Remove the screw, then airflow mode main link.
ac5wzw00001817
|
6. Install in the reverse order of removal. (See Airflow Mode Main Link Installation Note.)
Airflow Mode Main Link Installation Note
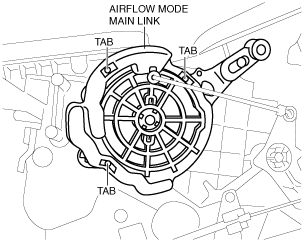
1. Align the airflow mode main link hole with the airflow mode sub link projection as shown in the figure.
ac5wzw00001818
|
2. Press the airflow mode main link lightly to the A/C unit, then set the projections of each airflow mode sub link into the grooves of the airflow mode main link.
ac5wzw00001819
|
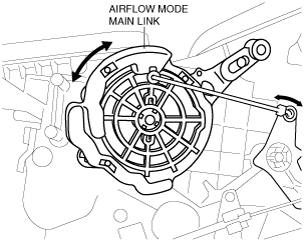
3. Rotate airflow mode main link and verify that each mode is accessed properly.