DTC: 28:Er01 [AUDIO]


id0902f6452300

Note
•  “iPod” is a registered trademark of Apple Inc. in the United States and other countries.

Audio unit (with color LCD)

Description

Poor connection with auxiliary jack/USB port, or read error

Detection condition
•  When USB device/iPod connected, connection error detected
•  When USB device/iPod connected, audio unit internal malfunction detected
•  When USB device connected, read error detected
Fail-safe function
Possible cause
•  USB device/iPod malfunction
•  Incompatible USB device (format) used
•  Audio unit connector or terminal malfunction
•  Auxiliary jack/USB port connector or terminal malfunction
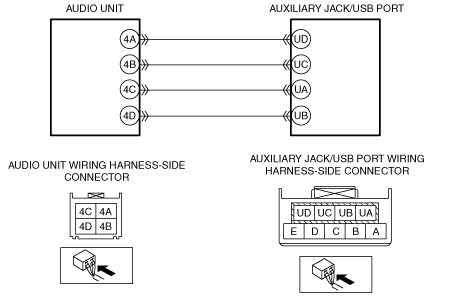
•  Open circuit in wiring harness between the following terminals:
―  Audio unit terminal 4A and auxiliary jack/USB port terminal UD
―  Audio unit terminal 4B and auxiliary jack/USB port terminal UC
―  Audio unit terminal 4C and auxiliary jack/USB port terminal UA
―  Audio unit terminal 4D and auxiliary jack/USB port terminal UB
•  Short to ground in wiring harness between the following terminals:
―  Audio unit terminal 4A and auxiliary jack/USB port terminal UD
―  Audio unit terminal 4B and auxiliary jack/USB port terminal UC
―  Audio unit terminal 4C and auxiliary jack/USB port terminal UA
―  Audio unit terminal 4D and auxiliary jack/USB port terminal UB
•  Auxiliary jack/USB port malfunction
•  Audio unit malfunction

Diagnostic Procedure

Step

Inspection

Action

1
INSPECT USB DEVICE/iPod
•  Connect the USB device/iPod to a same-model vehicle (model/unit).
•  Is the USB device/iPod connection detected/unit plays back.
Yes
Go to the next step.
No
System is normal. (USB device/iPod malfunction or incompatible USB device.)
Go to Step 7.
2
INSPECT AUDIO UNIT CONNECTOR CONDITION
•  Switch the ignition off (LOCK).
•  Disconnect the audio unit connector.
•  Inspect the connector engagement and connection condition and inspect the terminals for damage, deformation, corrosion, or disconnection.
•  Is there any malfunctioning part?
Yes
Repair or replace the connector, then go to Step 7.
No
Go to the next step.
3
INSPECT AUXILIARY JACK/USB PORT CONNECTOR CONDITION
•  Disconnect the auxiliary jack/USB port connector.
•  Inspect the connector engagement and connection condition and inspect the terminals for damage, deformation, corrosion, or disconnection.
•  Is there any malfunctioning part?
Yes
Repair or replace the connector, then go to Step 7.
No
Go to the next step.
4
INSPECT WIRING HARNESS FOR OPEN CIRCUIT BETWEEN AUDIO UNIT AND AUXILIARY JACK/USB PORT
•  Verify that the connectors for the audio unit and the auxiliary jack/USB port are not disconnected.
•  Inspect for continuity between the following terminals (vehicle wiring harness).
―  Audio unit terminal 4A and auxiliary jack/USB port terminal UD
―  Audio unit terminal 4B and auxiliary jack/USB port terminal UC
―  Audio unit terminal 4C and auxiliary jack/USB port terminal UA
―  Audio unit terminal 4D and auxiliary jack/USB port terminal UB
•  Is there continuity?
Yes
Go to the next step.
No
Repair or replace the wiring harness, then go to Step 7.
5
INSPECT WIRING HARNESS FOR SHORT TO GROUND BETWEEN AUDIO UNIT AND AUXILIARY JACK/USB PORT
•  Inspect for continuity between the following wiring harness terminals (vehicle wiring harness side) and body ground.
―  Auxiliary jack/USB port terminal UD
―  Auxiliary jack/USB port terminal UC
―  Auxiliary jack/USB port terminal UA
―  Auxiliary jack/USB port terminal UB
•  Is there continuity?
Yes
Repair or replace the wiring harness, then go to Step 7.
No
Go to the next step.
6
INSPECT AUXILIARY JACK/USB PORT
•  Inspect the auxiliary jack/USB port.
•  Is there any malfunctioning part?
Yes
Replace the auxiliary jack/USB port, then go to Step 7.
No
Go to the next step.
7
VERIFY THAT REPAIRS HAVE BEEN COMPLETED
•  Reconnect all the disconnected connectors.
•  Clear the audio unit DTCs.
•  Perform the audio unit DTC inspection.
•  Is the same DTC displayed?
Yes
Return to Step 1 and inspect for other possible causes.
If the malfunction recurs, replace the audio unit, then go to the next step.
No
Go to the next step.
8
VERIFY IF OTHER DTCs DISPLAYED
•  Are any other DTCs displayed?
Yes
Repair the malfunctioning part according to the applicable DTC troubleshooting.
No
DTC troubleshooting completed.


Audio unit (without color LCD)

Description

Poor connection with auxiliary jack/USB port, or read error

Detection condition
•  When USB device/iPod connected, connection error detected
•  When USB device/iPod connected, audio unit internal malfunction detected
•  When USB device connected, read error detected
Fail-safe function
Possible cause
•  USB device/iPod malfunction
•  Incompatible USB device (format) used
•  Audio unit connector or terminal malfunction
•  Auxiliary jack/USB port connector or terminal malfunction
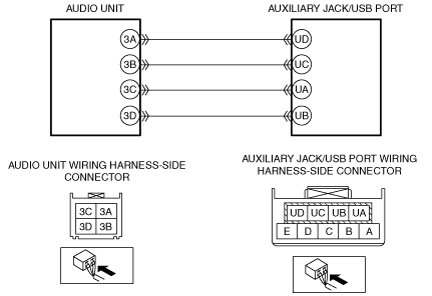
•  Open circuit in wiring harness between the following terminals:
―  Audio unit terminal 3A and auxiliary jack/USB port terminal UD
―  Audio unit terminal 3B and auxiliary jack/USB port terminal UC
―  Audio unit terminal 3C and auxiliary jack/USB port terminal UA
―  Audio unit terminal 3D and auxiliary jack/USB port terminal UB
•  Short to ground in wiring harness between the following terminals:
―  Audio unit terminal 3A and auxiliary jack/USB port terminal UD
―  Audio unit terminal 3B and auxiliary jack/USB port terminal UC
―  Audio unit terminal 3C and auxiliary jack/USB port terminal UA
―  Audio unit terminal 3D and auxiliary jack/USB port terminal UB
•  Auxiliary jack/USB port malfunction
•  Audio unit malfunction

Diagnostic Procedure

Step

Inspection

Action

1
INSPECT USB DEVICE/iPod
•  Connect the USB device/iPod to another vehicle (model/unit).
•  Is the USB device/iPod connection detected/unit plays back.
Yes
Go to the next step.
No
System is normal. (USB device/iPod malfunction or incompatible USB device.)
Go to Step 7.
2
INSPECT AUXILIARY JACK/USB PORT CONNECTOR CONDITION
•  Disconnect the auxiliary jack/USB port connector.
•  Inspect the connector engagement and connection condition and inspect the terminals for damage, deformation, corrosion, or disconnection.
•  Is there any malfunctioning part?
Yes
Repair or replace the connector, then go to Step 7.
No
Go to the next step.
3
INSPECT AUXILIARY JACK/USB PORT
•  Inspect the auxiliary jack/USB port.
•  Is there any malfunctioning part?
Yes
Replace the auxiliary jack/USB port, then go to Step 7.
No
Go to the next step.
4
INSPECT AUDIO UNIT CONNECTOR CONDITION
•  Switch the ignition off (LOCK).
•  Disconnect the audio unit connector.
•  Inspect the connector engagement and connection condition and inspect the terminals for damage, deformation, corrosion, or disconnection.
•  Is there any malfunctioning part?
Yes
Repair or replace the connector, then go to Step 7.
No
Go to the next step.
5
INSPECT WIRING HARNESS FOR OPEN CIRCUIT BETWEEN AUDIO UNIT AND AUXILIARY JACK/USB PORT
•   Verify that the connectors for the audio unit and the auxiliary jack/USB port are disconnected.
•  Inspect for continuity between the following terminals (vehicle wiring harness).
―  Audio unit terminal 3A and auxiliary jack/USB port terminal UD
―  Audio unit terminal 3B and auxiliary jack/USB port terminal UC
―  Audio unit terminal 3C and auxiliary jack/USB port terminal UA
―  Audio unit terminal 3D and auxiliary jack/USB port terminal UB
•  Is there continuity?
Yes
Go to the next step.
No
Repair or replace the wiring harness, then go to Step 7.
6
INSPECT WIRING HARNESS FOR SHORT TO GROUND BETWEEN AUDIO UNIT AND AUXILIARY JACK/USB PORT
•  Inspect for continuity between the following wiring harness terminals (vehicle wiring harness side) and body ground.
―  Auxiliary jack/USB port terminal UD
―  Auxiliary jack/USB port terminal UC
―  Auxiliary jack/USB port terminal UA
―  Auxiliary jack/USB port terminal UB
•  Is there continuity?
Yes
Repair or replace the wiring harness, then go to Step 7.
No
Go to the next step.
7
VERIFY THAT REPAIRS HAVE BEEN COMPLETED
•  Reconnect all the disconnected connectors.
•  Clear the audio unit DTCs.
•  Perform the audio unit DTC inspection.
•  Is the same DTC displayed?
Yes
Return to Step 1 and inspect for other possible causes.
If the malfunction recurs, replace the audio unit, then go to the next step.
No
Go to the next step.
8
VERIFY IF OTHER DTCs DISPLAYED
•  Are any other DTCs displayed?
Yes
Repair the malfunctioning part according to the applicable DTC troubleshooting.
No
DTC troubleshooting completed.