 |
ac5uuw00000818
HEADLIGHT CLEANER ACTUATOR REMOVAL/INSTALLATION
id091900803000
1. Disconnect the negative battery cable. (See NEGATIVE BATTERY CABLE DISCONNECTION/CONNECTION [SKYACTIV-G 2.0, SKYACTIV-G 2.5].) (See NEGATIVE BATTERY CABLE DISCONNECTION/CONNECTION [SKYACTIV-G 2.0, SKYACTIV-G 2.5 (WITHOUT i-stop)].) (See NEGATIVE BATTERY CABLE DISCONNECTION/CONNECTION [SKYACTIV-D 2.2].)
2. Partially peel back the front over fender. (See FRONT OVER FENDER REMOVAL/INSTALLATION.)
3. Set the mudguard (RH) aside. (See MUDGUARD REMOVAL/INSTALLATION.)
4. Remove the front bumper. (See FRONT BUMPER REMOVAL/INSTALLATION.)
5. Remove the headlight cleaner cover. (See HEADLIGHT CLEANER COVER REMOVAL/INSTALLATION.)
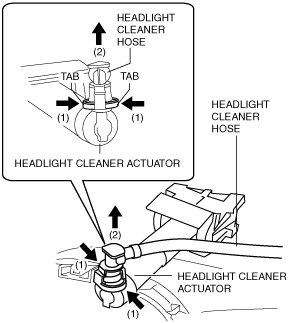
6. While pressing tabs in the direction of the arrows (1) shown in the figure, pull up the headlight cleaner hose in the direction of the arrow (2) to remove it from the headlight cleaner actuator.
ac5uuw00000818
|
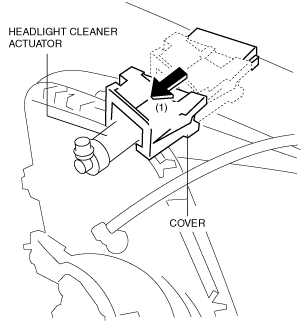
7. Avoid the projection by pushing the bracket in the direction of arrow (1) shown in the figure.
ac5uuw00000819
|
8. Move the bracket in the direction of the arrow (2) to remove it from the headlight cleaner actuator.
9. Remove the cover in the direction of the arrow (1) shown in the figure.
ac5uuw00000820
|
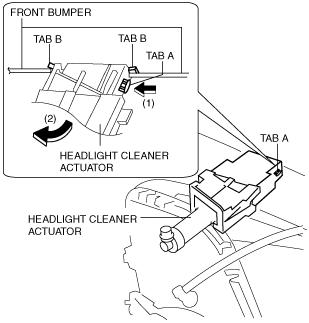
10. Press tab A of the headlight cleaner actuator in the direction of the arrow (1) shown in the figure and remove the headlight actuator from the front bumper in the direction of the arrow (2) while detaching the engagement of tabs B.
ac5uuw00000821
|
11. Install in the reverse order of removal.