|
ac5jjw00000124
AUDIO AMPLIFIER REMOVAL/INSTALLATION
id092000801100
L.H.D.
1. Disconnect the negative battery cable. (See NEGATIVE BATTERY CABLE DISCONNECTION/CONNECTION [SKYACTIV-G 2.0, SKYACTIV-G 2.5].) (See NEGATIVE BATTERY CABLE DISCONNECTION/CONNECTION [SKYACTIV-G 2.0, SKYACTIV-G 2.5 (WITHOUT i-stop)].) (See NEGATIVE BATTERY CABLE DISCONNECTION/CONNECTION [SKYACTIV-D 2.2].)
2. Remove the following parts:
3. Remove the bolts.
ac5jjw00000124
|
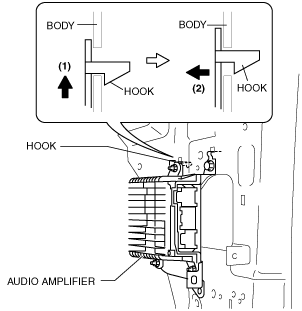
4. Lift up the audio amplifier in the direction of the arrow (1) shown in the figure, pull it in the direction of the arrow (2) shown in the figure, and pull out the audio amplifier hook from the body.
ac5wzw00001477
|
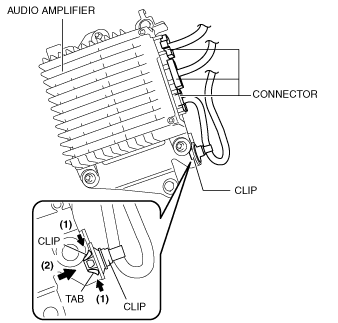
5. Disconnect the connectors.
ac5wzw00001478
|
6. While pressing the clip tabs in the direction of the arrows (1) shown in the figure, press the clip in the direction of the arrow (2) to detach the clip tabs from the audio amplifier.
7. Detach the clip.
8. Remove the audio amplifier.
9. Install in the reverse order of removal.
R.H.D.
1. Disconnect the negative battery cable. (See NEGATIVE BATTERY CABLE DISCONNECTION/CONNECTION [SKYACTIV-G 2.0, SKYACTIV-G 2.5].) (See NEGATIVE BATTERY CABLE DISCONNECTION/CONNECTION [SKYACTIV-G 2.0, SKYACTIV-G 2.5 (WITHOUT i-stop)].) (See NEGATIVE BATTERY CABLE DISCONNECTION/CONNECTION [SKYACTIV-D 2.2].)
2. Remove the front scuff plate (RH). (See FRONT SCUFF PLATE REMOVAL/INSTALLATION.)
3. Remove the front side trim (RH). (See FRONT SIDE TRIM REMOVAL/INSTALLATION.)
4. Remove the bolts.
ac5jjw00000887
|
5. Lift up the audio amplifier in the direction of the arrow (1) shown in the figure, pull it in the direction of the arrow (2) shown in the figure, and pull out the audio amplifier hook from the body.
ac5wzw00001477
|
6. Disconnect the connectors.
ac5wzw00001478
|
7. While pressing the clip tabs in the direction of the arrows (1) shown in the figure, press the clip in the direction of the arrow (2) to detach the clip tabs from the audio amplifier.
8. Detach the clip.
9. Remove the audio amplifier.
10. Install in the reverse order of removal.