 |
ac5uuw00006967
AFTER SERVICE PRECAUTION [WITH CYLINDER DEACTIVATION (SKYACTIV-G 2.0, SKYACTIV-G 2.5)]
id0114m2801900
Fuel Leakage Inspection
Using M-MDS
1. Connect the M-MDS to the DLC-2.
2. Switch the ignition ON (engine off).
3. Using the simulation function “FP”, start the fuel pump. (See OBD ON-BOARD SYSTEM READINESS TEST [PCM (WITH CYLINDER DEACTIVATION (SKYACTIV-G 2.0, SKYACTIV-G 2.5))].)
4. Verify that there is no fuel leakage from the serviced parts.
5. In the case of fuel leakage, replace the following components and then recheck using the fuel leakage checking procedure.
Without using M-MDS
1. Turn the steering wheel to the right to a position allowing removal of the relay box (LH).
2. Disconnect the negative battery terminal. (See NEGATIVE BATTERY TERMINAL DISCONNECTION/CONNECTION.)
3. Remove the fuel-filler cap to release the pressure inside the fuel tank.
4. Remove the fasteners.
ac5uuw00006967
|
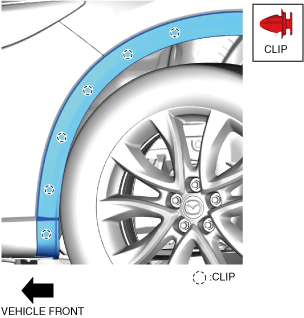
5. Remove the clips shown in the figure and detach the front over fender (LH) from the front bumper.
ac5uuw00006968
|
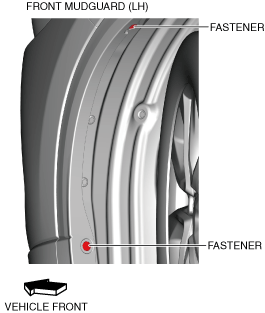
6. Remove the fasteners.
ac5uuw00006969
|
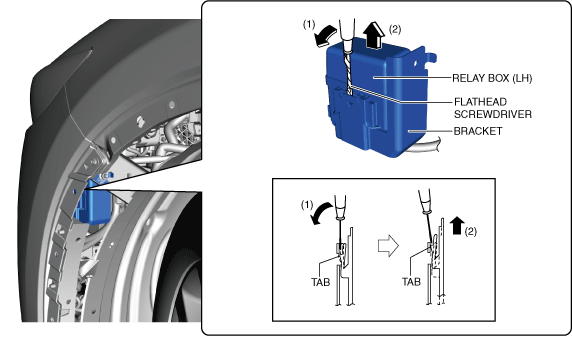
7. Partially peel back the front mud guard (LH) to a position allowing removal of the relay box (LH).
8. Insert a tape-wrapped flathead screwdriver into the position shown in the figure.
ac5wzw00010479
|
9. Move the tape-wrapped flathead screwdriver in the direction of arrow (1) shown in the figure and lift the relay box (LH) in the direction of arrow (2) to detach the tab of the relay box (LH) from the bracket.
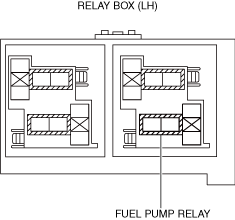
10. Remove the fuel pump relay.
ac5uuw00006971
|
11. Using a jumper wire, short fuel pump relay terminals C and D in the relay box (LH).
ac5uuw00006972
|
12. Connect the negative battery terminal and operate the fuel pump. (See NEGATIVE BATTERY TERMINAL DISCONNECTION/CONNECTION.)
13. Verify that there is no fuel leakage from the serviced parts.
14. In the case of fuel leakage, replace the following components and then recheck using the fuel leakage checking procedure.