DOSING CONTROL UNIT REMOVAL/INSTALLATION [SKYACTIV-D 2.2]
id0140z7824500
1. Disconnect the negative battery terminal. (See NEGATIVE BATTERY TERMINAL DISCONNECTION/CONNECTION.)
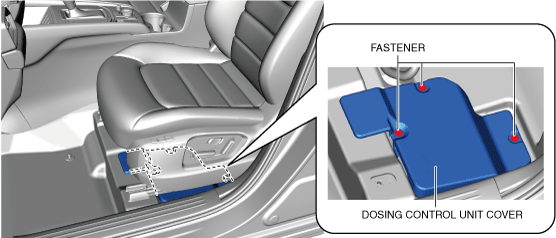
2. Remove the fasteners.
3. Remove the dosing control unit cover.
4. Disconnect the dosing control unit connectors.
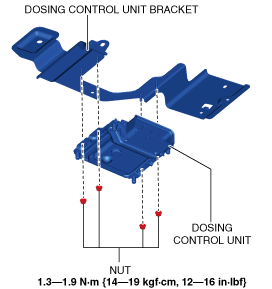
5. Remove the bolts.
6. Remove the dosing control unit assembly from the body.
7. Remove the nuts.
8. Remove the dosing control unit.
9. Install in the reverse order of removal.
10. If the Dosing Control Unit is replaced, perform the following procedure.
- (1) Perform Dosing Control Unit initialization procedure. (See DOSING CONTROL UNIT INITIALIZATION [SKYACTIV-D 2.2].)
-
- (2) Perform compulsory diesel particulate filter regeneration. (See COMPULSORY DIESEL PARTICULATE FILTER REGENERATION [SKYACTIV-D 2.2].)
-
- (3) Connect the M-MDS to the DLC-2.
-
- (4) After the vehicle is identified, select the following items from the initial screen of the M-MDS.
-
- 1) Select the “Powertrain”.
-
- 2) Select the “SCRCU”.
-
- 3) Select the “SCR function”.
-
- 4) Select the “SCR Dosing valve dry actuation test”.
-
-
The test result
-
The number of valve test : 10
The number of successful : 8 or more
- 5) Select the “Reset for urea tank level”.
-
- 6) Select the “SCR First Filling”.
-
- 7) Select the “SCR Pressure Preparation”.
-
- 8) Select the “SCR Emptying”.
-
- 9) Select the “SCR Dosing Quaritity Test from tester”.
-
-
Inputed values
-
dosing quantity (g) : 10 g
dosing mass flow (mg/s) : 30 mg/s
-
The test result
-
dosing quantity (g) : 9—11 g
dosing mass flow (mg/s) : 26—34 mg/s
- 10) Verify that the SCR warning light in the instrument cluster is not turned on.
-