 |
ac5wzw00005117
BATTERY CONDITION INITIALIZATION SETTING (i-stop SETTING) [SKYACTIV-G 2.0, SKYACTIV-G 2.5]
id0117i0801000
PCM PART NUMBER (SUFFIX): After ****-18881E (European (L.H.D. U.K.) specs.) and After ****-18881D (Except for European (L.H.D. U.K.) specs.)
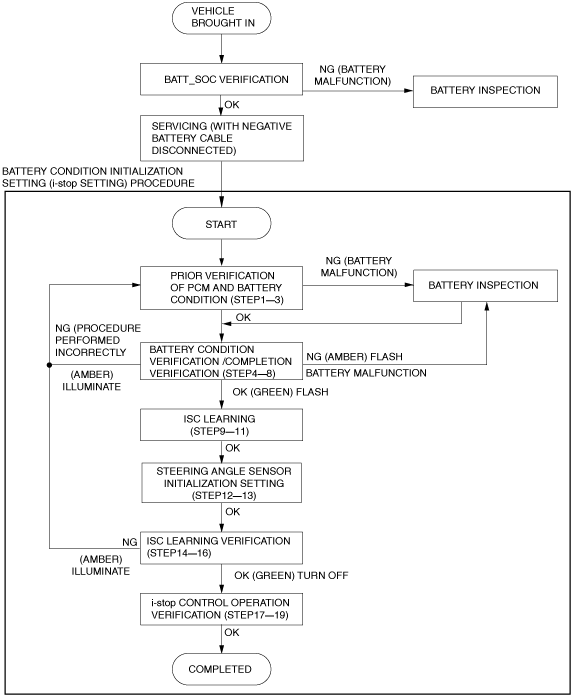
Battery Condition Initial setting (i-stop setting) flow
ac5wzw00005117
|
|
Purpose |
Step |
Procedure |
Caution/Note |
|---|---|---|---|
|
Prior verification of PCM and battery condition
|
1
|
Verify the value (BATT_SOC) measured before disconnecting the negative battery cable.
When BATT_SOC value is 75% or more
• Go to the next step.
When BATT_SOC value is not verified or the value is less than 75%.
• Perform battery inspection. (See BATTERY INSPECTION [SKYACTIV-G 2.0, SKYACTIV-G 2.5].)
|
—
|
|
2
|
Verify that 5 min or more have elapsed since the negative battery cable was disconnected.
|
|
|
|
3
|
Disconnect the current sensor connector. If the current sensor connector has already been disconnected, go to the next step.
|
—
|
|
|
Battery condition verification /completion verification
|
4
|
Connect the negative battery cable and wait for 10 s or more.
|
|
|
5
|
Connect the current sensor connector.
|
—
|
|
|
6
|
Switch the ignition ON (engine off) and wait for 15 s or more (within 1 min.).
|
—
|
|
|
7
|
VERIFY i-stop INDICATOR LIGHT (GREEN) AND i-stop WARNING LIGHT (AMBER) FLASHING CONDITION
• Press the i-stop OFF switch for 10 s and verify the flashing condition of the i-stop indicator light (green) and i-stop warning light (amber).
When i-stop indicator light (green) flashes
When i-stop warning light (amber) flashes
When i-stop warning light (amber) illuminates
|
|
|
|
8
|
Switch the ignition off.
|
—
|
|
|
ISC learning
|
9
|
Close the bonnet.
|
|
|
10
|
Start the engine.
|
||
|
11
|
Warm up the engine completely with no electrical load.
|
||
|
Steering angle sensor initialization setting
|
12
|
Turn the steering wheel lock-to-lock.
|
|
|
13
|
Switch the ignition off.
|
||
|
ISC learning verification
|
14
|
Perform the following procedure within 25 s.
1. Switch the ignition ON (engine off) and within 5 s, long-press the i-stop OFF switch for 3 s or more. (The i-stop warning light (amber) illuminates.)
2. Start the engine.
3. Long-press the i-stop OFF switch one time.
4. Verify that the i-stop warning light (amber) stop illuminating and the i-stop indicator light (green) starts flashing.
|
|
|
15
|
Maintain the idle status (no electrical load) until the i-stop indicator light (green) turns off.
|
—
|
|
|
16
|
After the i-stop indicator light (green) turns off, switch the ignition off.
|
—
|
|
|
i-stop control operation verification
|
17
|
Start the engine and verify that the i-stop indicator light (green) is turned off.
|
—
|
|
18
|
Verify the i-stop control operation using the following procedure.
1. Vehicle is traveling at a speed of 4 km/h or more. (EC/Russia specs.)
1. While the vehicle is traveling at a speed of 4 km/h or more, verify that the i-stop indicator light (green) illuminates. (Except EC/Russia specs.)
2. Stop the vehicle and verify that the engine stops via the i-stop control and then restarts.
|
—
|
|
|
19
|
Switch the ignition off.
|
—
|
PCM PART NUMBER (SUFFIX): ****-18881 —****-18881D (European (L.H.D. U.K.) specs.) and ****-18881 —****-18881C (Except for European (L.H.D. U.K.) specs.)
|
Purpose |
Step |
Procedure |
Caution/Note |
|---|---|---|---|
|
Prior verification of PCM and battery condition
|
1
|
Verify the value (BATT_SOC) measured before disconnecting the negative battery cable.
When BATT_SOC value is 75% or more
• Go to the next step (basic operation for battery condition setting).
When BATT_SOC value is not verified or the value is less than 75%.
• Perform battery electrolyte gravity inspection. (See Battery Electrolyte Gravity Inspection.)
|
|
|
Basic operation for battery condition setting
|
2
|
Open the hood, disconnect the negative battery cable, and wait for 1 min. or more. If the negative battery cable has been already disconnected, verify that 1 min. or more has elapsed.
|
|
|
3
|
Disconnect the current sensor connector. If the current sensor connector has already been disconnected, go to the next step.
|
|
|
|
Operation for battery stabilization
|
4
|
Connect the negative battery cable.
|
—
|
|
5
|
Perform the following procedure according to the elapsed time after disconnecting the battery or whether battery recharging was performed or not.
When the elapsed time is less than 1 hour, or the battery recharging was performed
1. Turn on the headlights with the ignition switched off, and wait for 30 s (within 1 min).
2. Turn off the headlights and wait for 5 min or more.
When the elapsed time is 1 hour or more, or the battery recharging was not performed
1. Connect the negative battery cable and wait for 10 s or more.
|
|
|
|
6
|
Connect the current sensor connector.
|
—
|
|
|
7
|
With the ignition switched off, verify the battery voltage.
Battery voltage is 12.5 V to 12.7 V
• With the battery voltage (BATT_V) in the 12.5 to 12.7 range, connect the negative battery cable.
Battery voltage is other than 12.5 to 12.7 V
• Perform the following procedure.
Battery voltage is other than 12.5 to 12.7 V and BATT_SOC value is 75% or less
BATT_SOC value is 75% or more and battery voltage is less than 12.5 V
BATT_SOC value is 75% or more and battery voltage is 12.7 V or more
|
—
|
|
|
Battery condition setting verification
|
8
|
Switch the ignition ON.
|
—
|
|
9
|
VERIFY i-stop INDICATOR LIGHT (GREEN) AND i-stop WARNING LIGHT (AMBER) ILLUMINATION/FLASHING CONDITION
• Press the i-stop OFF switch for 10 s or more and verify the illumination/flashing condition of the i-stop indicator light (green) and i-stop warning light (amber).
When i-stop indicator light (green) flashes
When i-stop warning light (amber) flashes
When i-stop warning light (amber) illuminates
|
|
|
|
10
|
Switch the ignition off.
|
—
|
|
|
ISC learning
|
11
|
Start the engine.
|
|
|
12
|
Warm up the engine completely with no electrical load.
|
||
|
Steering angle sensor initialization setting
|
13
|
Close the bonnet.
|
|
|
14
|
Turn the steering wheel lock-to-lock.
|
||
|
15
|
Switch the ignition off.
|
||
|
ISC learning verification
|
16
|
Perform the following procedure within 25 s.
1. Switch the ignition ON (engine off) and within 5 s, long-press the i-stop OFF switch for 3 s or more. (The i-stop warning light (amber) illuminates.)
2. Start the engine.
3. Long-press the i-stop OFF switch.
4. Verify that the i-stop warning light (amber) stop illuminating and the i-stop indicator light (green) starts flashing.
|
|
|
17
|
Maintain the idle status (no electrical load) until the i-stop indicator light (green) turns off.
|
—
|
|
|
18
|
After the i-stop indicator light (green) turns off, switch the ignition off.
|
—
|
|
|
i-stop control operation verification
|
19
|
Start the engine and verify that the i-stop indicator light (green) is turned off.
|
—
|
|
20
|
Verify the i-stop control operation using the following procedure.
1. Vehicle is traveling at a speed of 4 km/h or more. (EC/Russia specs.)
1. While the vehicle is traveling at a speed of 4 km/h or more, verify that the i-stop indicator light (green) illuminates. (Except EC/Russia specs.)
2. Stop the vehicle and verify that the engine stops via the i-stop control and then restarts.
|
—
|
|
|
21
|
Switch the ignition off.
|
—
|
Battery Electrolyte Gravity Inspection
1. Using an hydrometer, verify that the electrolyte gravity of each battery cell is 1.17 or more, and perform the following procedure.
Recharge time for BATT_SOC value (%)
|
“BATT_SOC” value (%)
|
75
|
70
|
65
|
60
|
55
|
50
|
|
Recharge time (min)
|
72
|
90
|
108
|
126
|
144
|
162
|
2. Repeat the procedure from Step 1 (Prior verification of PCM and battery condition).
Battery Voltage Inspection
1. Switch the ignition off.
2. Inspect the battery voltage using a circuit tester.
Recharge time for BATT_SOC value (%)
|
“BATT_SOC” value (%)
|
75
|
70
|
65
|
60
|
55
|
50
|
|
Recharge time (min)
|
72
|
90
|
108
|
126
|
144
|
162
|
3. Repeat the procedure from Step 1 (Prior verification of PCM and battery condition).