 |
ac5uuw00003629
SHIFT PANEL REMOVAL/INSTALLATION
id091700898400
ATX
1. Disconnect the negative battery cable. (See NEGATIVE BATTERY CABLE DISCONNECTION/CONNECTION [SKYACTIV-G 2.0, SKYACTIV-G 2.5].) (See NEGATIVE BATTERY CABLE DISCONNECTION/CONNECTION [SKYACTIV-G 2.0, SKYACTIV-G 2.5 (WITHOUT i-stop)].) (See NEGATIVE BATTERY CABLE DISCONNECTION/CONNECTION [SKYACTIV-D 2.2].)
2. Remove the upper panel. (See UPPER PANEL REMOVAL/INSTALLATION.)
3. Remove the selector lever knob. (See AUTOMATIC TRANSAXLE SHIFT MECHANISM REMOVAL/INSTALLATION.)
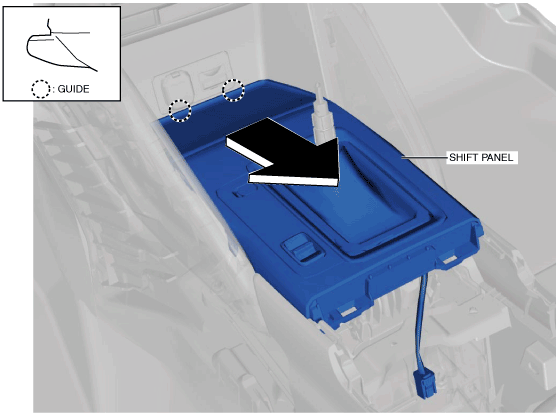
4. Disconnect the connector.
ac5uuw00003629
|
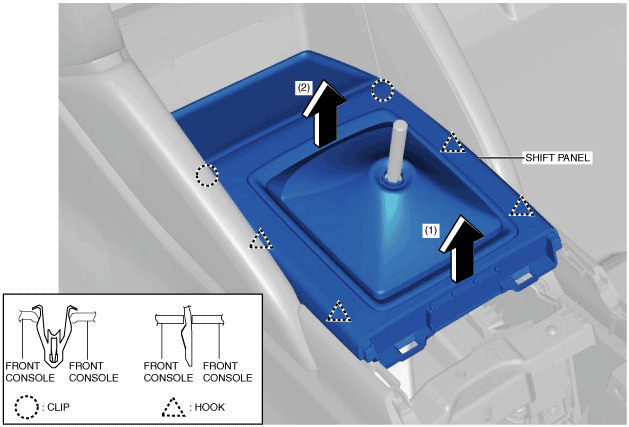
5. Move the shift panel in the order of arrows (1) and (2) shown in the figure, and detach the clips and hooks from the front console.
6. Move the shift panel in the direction of the arrow shown in the figure and remove it while detaching the guides.
ac5uuw00003630
|
7. When removing the console mat, detach the hooks from the shift panel.
ac5uuw00004715
|
8. Install in the reverse order of removal.
MTX
1. Disconnect the negative battery cable. (See NEGATIVE BATTERY CABLE DISCONNECTION/CONNECTION [SKYACTIV-G 2.0, SKYACTIV-G 2.5].) (See NEGATIVE BATTERY CABLE DISCONNECTION/CONNECTION [SKYACTIV-G 2.0, SKYACTIV-G 2.5 (WITHOUT i-stop)].) (See NEGATIVE BATTERY CABLE DISCONNECTION/CONNECTION [SKYACTIV-D 2.2].)
2. Remove the upper panel. (See UPPER PANEL REMOVAL/INSTALLATION.)
3. Remove the shift lever knob. (See MANUAL TRANSAXLE SHIFT MECHANISM REMOVAL/INSTALLATION [C66M-R, C66MX-R].) (See MANUAL TRANSAXLE SHIFT MECHANISM REMOVAL/INSTALLATION [D66M-R, D66MX-R].)
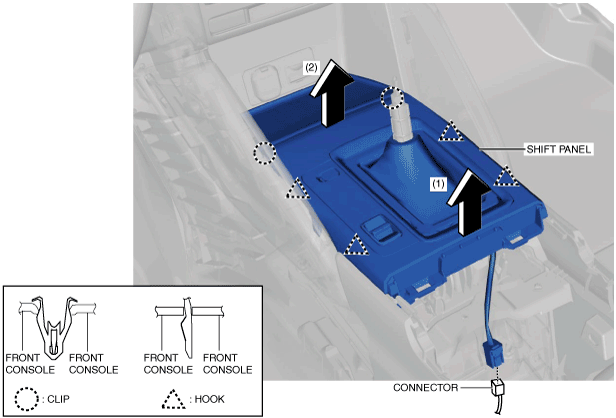
4. Move the shift panel in the order of arrows (1) and (2) shown in the figure, and detach the clips and hooks from the front console.
ac5uuw00003632
|
5. Move the shift panel in the direction of the arrow shown in the figure and remove it while detaching the guides.
ac5uuw00003633
|
6. When removing the console mat, detach the hooks from the shift panel.
ac5uuw00003634
|
7. Install in the reverse order of removal.