 |
MAZDA ERA-GLONASS CONTROL MODULE REMOVAL/INSTALLATION
id092200666000
1. When replacing the Mazda ERA-GLONASS control module, perform the forrowing procedure.
2. Disconnect the negative battery cable. (See NEGATIVE BATTERY CABLE DISCONNECTION/CONNECTION [SKYACTIV-G 2.0, SKYACTIV-G 2.5].) (See NEGATIVE BATTERY CABLE DISCONNECTION/CONNECTION [SKYACTIV-G 2.0, SKYACTIV-G 2.5 (WITHOUT i-stop)].) (See NEGATIVE BATTERY CABLE DISCONNECTION/CONNECTION [SKYACTIV-D 2.2].)
3. Remove the glove compartment. (See GLOVE COMPARTMENT REMOVAL/INSTALLATION.)
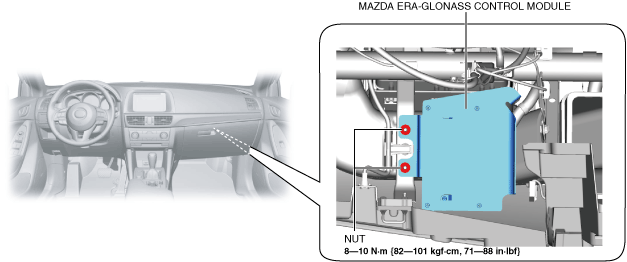
4. Remove the nuts.
ac5wzw00011887
|
5. Disconnect the connectors.
ac5wzw00011888
|
6. Remove the wiring harness clip.
7. Remove the screws.
ac5wzw00011889
|
8. Remove the Mazda ERA-GLONASS control module from the bracket.
9. Install in the reverse order of removal.
10. When replacing the Mazda ERA-GLONASS control module, perform the procedure according to the directions on the M-MDS screen.
11. When the Mazda ERA-GLONASS control module is replaced, perform the Mazda ERA-GLONASS control module finalization procedure.(See MAZDA ERA-GLONASS CONTROL MODULE FINALIZATION PROCEDURE.)