 |
acxuuw00002231
RECEIVER/DRIER REMOVAL/INSTALLATION [FULL-AUTO AIR CONDITIONER]
id0711a1801400
1. Disconnect the negative battery cable.
2. Discharge the refrigerant from the system. (See REFRIGERANT RECOVERY.) (See REFRIGERANT CHARGING.)
3. Remove the front bumper. (See FRONT BUMPER REMOVAL/INSTALLATION.)
4. Remove the nuts, and set the oil cooler out of the way. (See OIL COOLER REMOVAL/INSTALLATION [L3 Turbo].)
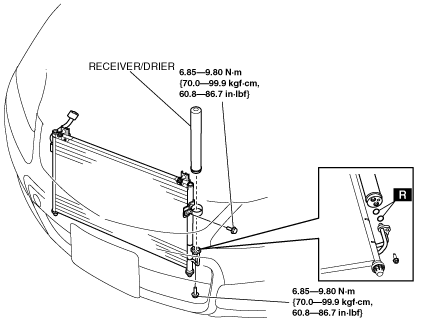
5. Remove the receiver/drier. Do not allow compressor oil to spill. (See Receiver/Drier Removal Note.)
acxuuw00002231
|
6. Install in the reverse order of removal. (See Receiver/Drier Installation Note.)
7. Perform the refrigerant system performance test. (See REFRIGERANT SYSTEM PERFORMANCE TEST.)
Receiver/Drier Removal Note
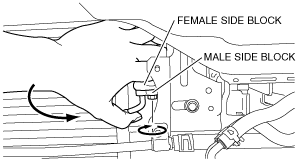
1. Disconnect the block joint type pipes by grasping female side of the block with hand and holding firmly, then tighten the connection bolt.
acxuuw00000789
|
Receiver/Drier Installation Note
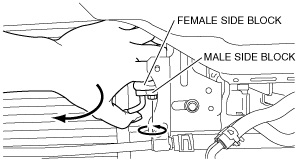
1. Tighten the bolt of joint by hand.
acxuuw00000790
|
2. Tighten the joint to the specified torque.
3. Connect the block joint type pipe by grasping the female side of the block with hand holding firmly, then tighten the connection bolt.