 |
acxuuw00001849
DIAGNOSTIC ASSIST FUNCTION [AUDIO]
id0902f6804500
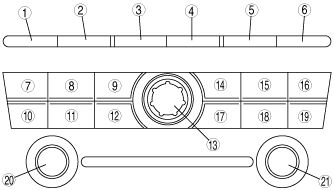
Structural View
Buttons
European (L.H.D. U.K.), General (R.H.D.) specs.
acxuuw00001849
|
|
1
|
CLOCK button
|
|
2
|
INFO button
|
|
3
|
FM 1/2 button
|
|
4
|
AM button
|
|
5
|
CD button
|
|
6
|
MEDIA button
|
|
7
|
TRACK/SEEK/APC button (up)
|
|
8
|
TA button
|
|
9
|
PTY button
|
|
10
|
TRACK/SEEK/APC button (down)
|
|
11
|
PROG button
|
|
12
|
AF button
|
|
13
|
POWER/VOLUME button
|
|
14
|
Preset button “1”/RPT button
|
|
15
|
Preset button “2”/RDM button
|
|
16
|
Preset button “3”/DISC/Folder button (up)
|
|
17
|
Preset button “4”/Reverse button
|
|
18
|
Preset button “5”/Fast-forward button
|
|
19
|
Preset button “6”/DISC/Folder button (down)
|
|
20
|
TUNE/AUTO-M button
|
|
21
|
AUDIO CONT button
|
Australian specs.
acxuuw00001849
|
|
1
|
CLOCK button
|
|
2
|
INFO button
|
|
3
|
FM 1/2 button
|
|
4
|
AM button
|
|
5
|
CD button
|
|
6
|
MEDIA button
|
|
7
|
Preset button “1”/DISC button (up)
|
|
8
|
Preset button “2”
|
|
9
|
Preset button “3”
|
|
10
|
Preset button “4”/DISC button (down)
|
|
11
|
Preset button “5”/ Reverse button
|
|
12
|
Preset button “6”/ Fast-forward button
|
|
13
|
POWER/VOLUME button
|
|
14
|
RPT button
|
|
15
|
SCAN button
|
|
16
|
TRACK/SEEK/APC button (up)
|
|
17
|
RDM button
|
|
18
|
PROG button
|
|
19
|
TRACK/SEEK/APC button (down)
|
|
20
|
AUDIO CONT button
|
|
21
|
TUNE/AUTO-M button
|
Button Inspection
1. With the audio power on, press the POWER button and simultaneously press the CLOCK button for approx. 1 s.
2. Inspect according to the following table:
|
INSPECTION |
DISPLAY |
ACTION |
|
|---|---|---|---|
|
• Start the button inspection mode.
• Press all buttons.
|
—
|
The buzzer sounds.
|
The button is normal.
|
|
The buzzer does not sound.
|
Replace the base unit.
|
||
3. Turn the audio off or the ignition switch to the LOCK position to stop the diagnostic assist function.
Speaker Inspection
1. With the audio power on, press the POWER button and simultaneously press the AUTO-M button for approx. 1 s.
2. Inspect according to the following table:
|
INSPECTION |
DISPLAY |
ACTION |
|
|---|---|---|---|
|
• Start the speaker inspection mode.
With Bose®
• Do all the speakers output sound?
Without Bose®
• Does each speaker output sound in the following order?
|
—
|
Yes
|
Speakers, and wiring harness between the base unit and speakers are normal.
|
|
No
|
• Inspect the following parts.
|
||
3. Turn the audio off or the ignition switch to the LOCK position to stop the diagnostic assist function.
Radio Reception Condition Inspection
1. With the audio power on, press the POWER button and simultaneously press the PRESET 2 button for approx. 1 s.
2. Inspect according to the following table:
|
INSPECTION |
DISPLAY |
ACTION |
|---|---|---|
|
Start the radio reception condition inspection mode.
|
 |
Antenna, antenna feeder and base unit are normal.
|
 |
Change the frequency (radio station) and inspect again.
|
|
 |
Inspect the antenna and antenna feeder.
|
3. Turn the audio off or the ignition switch to the LOCK position to stop the diagnostic assist function.
Antenna control condition inspection
1. With the audio power on and at radio mode, press the POWER button and simultaneously press the AM button for approx. 1 s.
2. Inspect the antenna control condition according to the following table:
|
INSPECTION |
DISPLAY |
ACTION |
|
|---|---|---|---|
|
Start antenna control condition inspection mode.
|
 |
Sound quality is good.
|
System is okay.
|
|
Sound quality is poor.
|
Inspect following parts.
• Center roof antenna
• Antenna feeder
|
||
 |
Replace base unit.
|
||
3. Turn the audio off or the ignition switch to the LOCK position to stop the diagnostic assist function.