HEADLIGHT AIMING
id091800800400
-
Note
-
• When the vehicle attitude angle changes with the ignition switched off and the ignition is switched ON under this condition, the optical axis may be temporarily deviated. The optical axis deviation is corrected by driving the vehicle approx. 2 km {1 mile} to 9 km {6 mile}.
• If the following servicing is done, perform the headlight aiming adjustment.
-
― Front combination light replacement
― Suspension replacement and removal/installation, servicing requiring vehicle height to be changed
• If servicing was done which changes the vehicle height, perform the headlight auto leveling system initialization first to record the vehicle height under the unloaded condition to the auto leveling control module/AFS control module/adaptive LED headlights control module, then perform headlight aiming. (See
HEADLIGHT AUTO LEVELING SYSTEM INITIALIZATION.)
• When using an aiming tester to input the inclination angle (tilt angle) of the optical axis, input 1.0% for the inclination angle.
1. Empty the vehicle except for the spare tire, jack and vehicle tools.
2. Adjust the tire pressure to the specification. (See WHEEL AND TIRE SPECIFICATION.)
3. Move the vehicle to level ground.
4. Verify the headlight auto leveling system operation.
-
• Sit on the rear seat to verify that the leveling operates.
-
― If it operates, go to the next step.
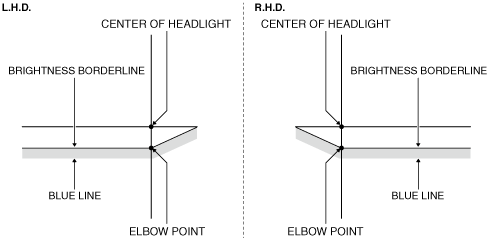
5. Make an adjustment-use screen as shown in the figure using double-weight, white paper.
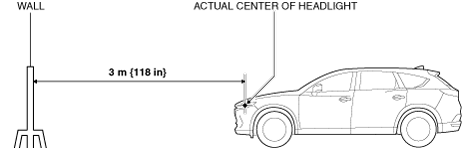
6. Line up the vehicle with the wall so that the distance to the headlights is 3 m {118 in} from the wall.
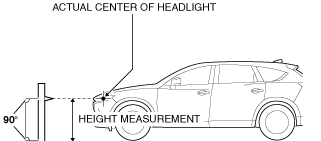
7. Measure the height at the center point of the headlight.
-
Note
-
• Measure the height at the center point of the headlight in which the aiming is being adjusted because the vehicle height differs depending on vehicle conditions.
8. Align the center of the headlight to be adjusted with the center of the headlight on the adjustment screen.
9. Set a partition in front of the headlight which is not being adjusted to block the light.
10. Start the engine and charge the battery.
11. Turn on the headlight low beams.
-
Note
-
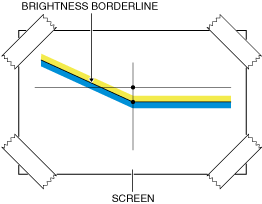
• If the headlight low beams are turned on, the light as shown in the figure is emitted to the adjustment screen.
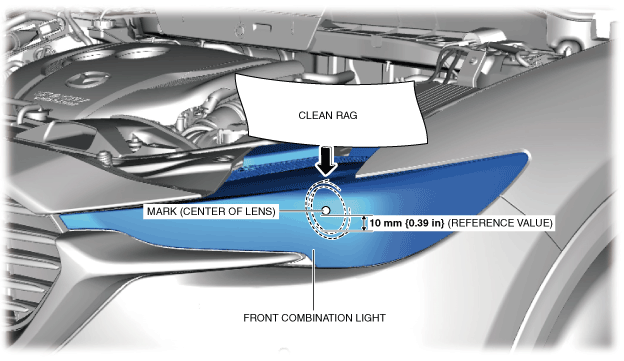
12. Cover the upper part of the headlight with a clean rag so that the brightness borderline becomes transparent.
-
Note
-
• If the headlight is covered with a clean rag from the upper part of the headlight in the direction of the arrow shown in the figure, the yellow line disappears and the brightness borderline becomes transparent.
13. Verify that the actual elbow point of the headlight is at the elbow point position indicated by the adjustment-use screen.
-
-
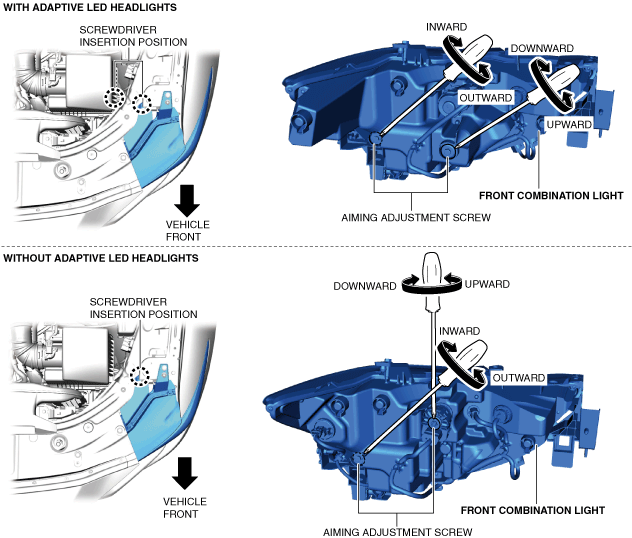
― If it is not at the position indicated on the adjustment screen after performing the initial setting, perform the following adjustment.
-
• Adjust the headlight by turning the aiming adjustment screw.