 |
REAR COIL SPRING REMOVAL/INSTALLATION
id021400800700
1. Remove the wheel and tire. (See WHEEL AND TIRE REMOVAL/INSTALLATION.)
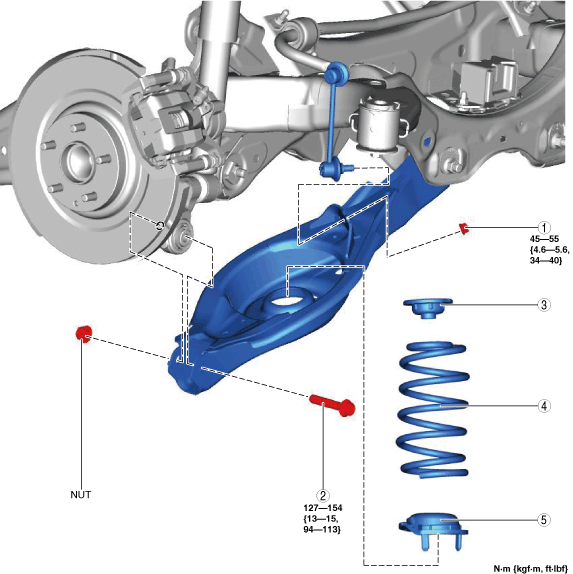
2. Remove in the order shown in the figure.
3. Install in the reverse order of removal. (See Suspension Links Installation Note.)
4. If the rear coil spring is replaced, inspect the wheel alignment and adjust it if necessary. (See REAR WHEEL ALIGNMENT.)
ac8wzw00001995
|
|
1
|
Rear stabilizer control link lower side nut
|
|
2
|
Rear lower arm outer bolt
|
|
3
|
Upper spring seat rubber
|
|
4
|
Rear coil spring
|
|
5
|
Lower spring seat rubber
|
Rear Coil Spring Removal Note
1. Support the lower arm using a jack.
ac8wzw00001996
|
2. Remove the rear lower arm outer bolt.
3. Lower the jack slowly and remove the rear coil spring.
Suspension Links Installation Note
1. When installing the joint sections with rubber bushings, perform the following steps.
Rear Coil Spring Installation Note
1. Set the jack on the underside of the rear lower arm and gradually jack it up.
ac8wzw00001996
|
2. Install the rear coil spring as shown in the figure.
ac8wzw00001997
|
3. Align the upper end of the rear coil spring with the upper spring seat rubber.
4. Align the lower end of the rear coil spring with the stepped part of lower spring seat rubber.
5. Install the rear lower arm outer bolt.