LIFTGATE HINGE REMOVAL/INSTALLATION
id091100521300
1. Disconnect the negative battery cable.
2. Disconnect the PLG arm. (Liftgate side) (Vehicles with PLG)
3. Remove the following parts:
- (1) Trunk box (See TRUNK BOX REMOVAL/INSTALLATION.)
- (2) Seat side box (See SEAT SIDE BOX REMOVAL/INSTALLATION.)
- (3) Trunk end trim (See TRUNK END TRIM REMOVAL/INSTALLATION.)
- (4) Third-row seat (See THIRD-ROW SEAT REMOVAL/INSTALLATION.)
- (5) Rear scuff plate inner (See REAR SCUFF PLATE REMOVAL/INSTALLATION.)
- (6) Third-row seat belt lower anchor installation bolt (See THIRD-ROW SEAT BELT REMOVAL/INSTALLATION.)
- (7) Trunk side trim (See TRUNK SIDE TRIM REMOVAL/INSTALLATION.)
- (8) Roof side trim (See ROOF SIDE TRIM REMOVAL/INSTALLATION.)
- (9) Second-row seat belt upper anchor installation bolt (See SECOND-ROW SEAT BELT REMOVAL/INSTALLATION.)
- (10) C-pillar trim (See C-PILLAR TRIM REMOVAL/INSTALLATION.)
- (11) Third-row seat belt upper anchor installation bolt (See THIRD-ROW SEAT BELT REMOVAL/INSTALLATION.)
- (12) D-pillar trim (See D-PILLAR TRIM REMOVAL/INSTALLATION.)
- (13) Liftgate upper trim (See LIFTGATE UPPER TRIM REMOVAL/INSTALLATION.)
- (14) Liftgate side trim (See LIFTGATE SIDE TRIM REMOVAL/INSTALLATION.)
- (15) Liftgate lower trim (See LIFTGATE LOWER TRIM REMOVAL/INSTALLATION.)
- (16) Liftgate (See LIFTGATE REMOVAL/INSTALLATION.)
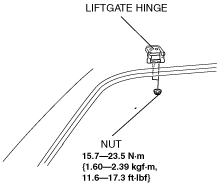
4. Remove the nut while partially peeling back the headliner.
-
Note
-
• Be careful not to leave a fold-seam.
5. Remove the liftgate hinge.
6. Install in the reverse order of removal.
7. Adjust the liftgate. (See LIFTGATE ADJUSTMENT.)