 |
ac9wzw00001653
QUARTER WINDOW GLASS INSTALLATION
id091200002600
1. Remove sealant along the perimeter of the glass using a razor or scraper. (when reusing the glass)
2. Clean and degrease the ceramic part along the perimeter of the glass.
3. Inspect the glass for cracks. If it is cracked, chamfer it using sandpaper.
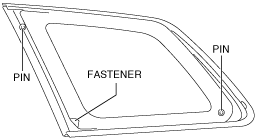
4. If the glass is reused, attach the pins and fastener to the glass as shown in the figure.
Align with the alignment marks marked before removing the glass.
ac9wzw00001653
|
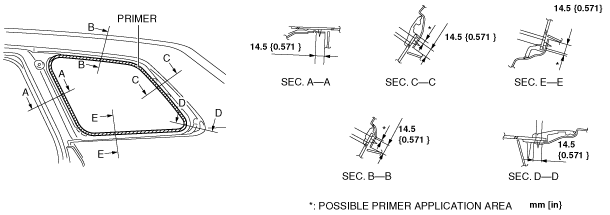
5. Apply glass primer along the hollowed marks in the ceramic coating on the new glass, along the sealant tracks on the reused glass, then allow it to dry for approx. 30 min.
ac9wzw00001654
|
6. Cut away the old sealant using a razor or scraper so that 1—2 mm {0.04—0.07 in} thickness of sealant remains along the perimeter of the frame.
7. If the sealant has come off completely in any one place, apply some primer after degreasing, and allow it approx. 30 min to dry. Then apply 2 mm {0.08 in}thickness of new sealant.
8. Clean and degrease the bonding surface along the perimeter of the body.
9. Apply body primer on the body as shown in the figure, then allow it to dry for approx. 30 min.
ac9wzw00001655
|
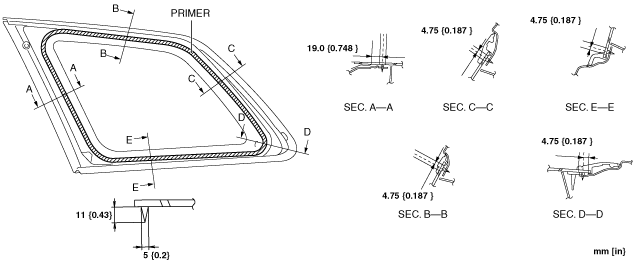
10. After the primer has dried, apply 11 mm {0.43 in}in thickness, 5 mm {0.2 in}in width of sealant using a sealant gun. Where it is not applied properly, correctly apply it using a spatula.
ac9wzw00001656
|
11. Align the window side fastener with the bead on the body and adhere.
ac9wzw00001657
|
12. Press the quarter window glass until the quarter window glass fastener and stud pin are locked, and then install the quarter window glass.
13. Install the following parts:
14. Allow the sealant to harden completely.