|
ac9uuw00001271
COMBINED SENSOR REMOVAL/INSTALLATION
id041800817100
1. Remove the second-row seat (RH). (See SECOND-ROW SEAT REMOVAL/INSTALLATION.)
2. Remove the edge cover. (See LONG SLIDER REMOVAL/INSTALLATION.)
3. Remove the long slider cover. (See LONG SLIDER REMOVAL/INSTALLATION.)
4. Separate the floor carpet at the area shown in the figure.
ac9uuw00001271
|
5. Partially peel back the floor carpet from where it is separated as shown in the figure.
ac9uuw00001272
|
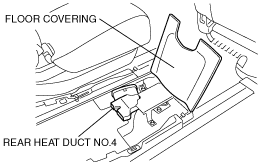
6. Remove the rear heat duct No.4.
7. Remove in the order indicated in the table.
8. Install in the reverse order of removal.
9. After installation, perform the DSC/RSC sensor initialization procedure. (See DSC/RSC SENSOR INITIALIZATION PROCEDURE.)
ac9wzw00000151
|
|
1
|
Combined sensor cover
|
|
2
|
Combined sensor connector
|
|
3
|
Combined sensor
|
|
4
|
Combined sensor bracket
|