FRONT SEAT BELT REMOVAL/INSTALLATION


id081100800600

Warning
•  Handling the front seat belt (pre-tensioner seat belt) improperly can accidentally deploy the pre-tensioner seat belt, which may seriously injure you. Read the service warnings and cautions before handling the front seat belt (pre-tensioner seat belt). (See AIR BAG SYSTEM SERVICE WARNINGS.) (See AIR BAG SYSTEM SERVICE CAUTIONS.)
•  Side air bag sensor No.1 is attached to the lower part of the B-pillar. When working around the B-pillar, disconnect the negative battery cable or work carefully, avoiding excessive impact to the lower part of the B-pillar.
Caution
•  The ELR (emergency locking retractor) has a spring that will unwind if the retractor cover is removed. The spring cannot be rewound by hand. If this occurs, the ELR will not work properly. Therefore, do not disassemble the retractor.

1.  Turn the ignition switch to the LOCK position.

2.  Disconnect the negative battery cable and wait for 1 min or more.

3.  Remove the front scuff plate inner. (See FRONT SCUFF PLATE REMOVAL/INSTALLATION.)

4.  Remove the rear scuff plate inner. (See REAR SCUFF PLATE REMOVAL/INSTALLATION.)

5.  Remove the cover.

ac9wzw00000434

6.  Remove the bolt A.

7.  Remove the B-pillar lower trim. (See B-PILLAR LOWER TRIM REMOVAL/INSTALLATION.)

8.  Remove the adjuster anchor cover.

9.  Remove the bolt B and bolt C, then remove the front seat belt.

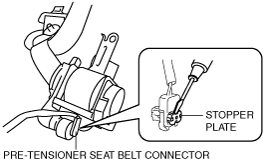
10.  Using a screwdriver, pry out the pre-tensioner seat belt connector’s stopper plate.

ac9wzw00000435

11.  Disconnect the pre-tensioner seat belt connector.

12.  Install in the reverse order of removal.

13.  Turn the ignition switch to the ON position.

14.  Verify that the air bag system warning light illuminates for approx. 6 s and goes out.

•  If the air bag system warning light does not operate, refer to the on-board diagnostic system (air bag system) and perform inspection of the system. (See FLOWCHART.)