 |
ac9uuw00000663
SUNROOF UNIT DISASSEMBLY/ASSEMBLY
id091500800800
1. Disassemble in the order indicated in the table.
2. Assemble in the reverse order of disassembly.
ac9uuw00000663
|
|
1
|
Screw A
|
|
2
|
Drip rail
|
|
3
|
Sunshade stopper Drip Guide
|
|
4
|
Screw B
|
|
5
|
Screw C
|
|
6
|
Recess
|
|
7
|
Sunshade
|
|
8
|
Deflector
|
|
9
|
Screw D
|
|
10
|
Sunroof motor
(See Sunroof Motor Assembly Note.)
|
|
11
|
Rear drip
(See Rear Drip Assembly Note.)
|
|
12
|
Guide stopper
|
|
13
|
Guide
(See Guide Disassembly Note.)
(See Guide Assembly Note.)
|
|
14
|
Decoration link
|
|
15
|
Frame
|
Sunroof Motor Assembly Note
1. The initialization mode starts after approx. 13 s from when the tilt up switch has been pressed and held. The glass stops after it has moved approx. 30 mm {1.2 in} towards the closed position.
2. When the tilt up switch is pressed again, the glass continues to move approx. 30 mm {1.2 in} and stops.
3. Repeat this procedure several times so that the glass moves to the fully closed, full tilt (normal operation position), and full tilt (mechanical stopper position) positions.
4. After the glass is moved to the full tilt position (mechanical stopper position), it returns to the tilt down direction slightly and the initialization is completed.
Rear Drip Assembly Note
1. Apply a 6.0—8.0 mm {0.24—0.31 in}wide line of butyl seal to the area shown in the figure.
acxuuw00001196
|
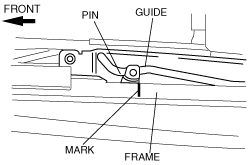
Guide Disassembly Note
1. Place an alignment mark on the guide pin and flame.
acxuuw00001197
|
2. Slide the guide to the rear of the sunroof frame, and remove the guide and decoration link as a single unit.
acxuuw00001198
|
Guide Assembly Note
1. Move the pin to the position shown in the figure.
acxuuw00001199
|
Decoration Link Assembly Note
1. Set the guide pin to the decoration link.
acxuuw00001200
|