|
ac9uuw00001926
FRONT STABILIZER REMOVAL/INSTALLATION [L.H.D.]
id0213008004b1
1. Drain the power steering fluid. (See POWER STEERING FLUID INSPECTION.)
2. Remove the front under cover A and front under cover B. (See FRONT UNDER COVER REMOVAL/INSTALLATION.)
3. Disconnect the front auto leveling sensor connector. (Vehicle with headlight auto leveling system) (See FRONT AUTO LEVELING SENSOR REMOVAL/INSTALLATION.)
4. Remove the middle pipe. (See EXHAUST SYSTEM REMOVAL/INSTALLATION [MZI-3.7].)
5. Remove the transverse member. (See TRANSVERSE MEMBER REMOVAL/INSTALLATION.)
6. Remove the intermediate shaft installation bolt, and disconnect the steering shaft. (See STEERING WHEEL AND COLUMN REMOVAL/INSTALLATION.)
7. Remove the front crossmember component. (See FRONT CROSSMEMBER REMOVAL/INSTALLATION [L.H.D.].)
8. Remove in the order indicated in the table.
9. Install in the reverse order of removal.
10. Inspect for front wheel alignment, and adjust it as necessary. (See FRONT WHEEL ALIGNMENT.)
ac9uuw00001926
|
|
1
|
Front stabilizer component
|
|
2
|
Front stabilizer control link
|
|
3
|
Stabilizer bracket
|
|
4
|
Stabilizer bushing
|
|
5
|
Front stabilizer
|
Front Stabilizer Installation Note
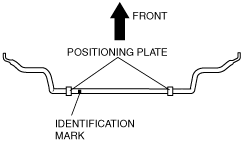
1. Install the stabilizer bar so that the identification mark is on the left side of the vehicle.
ac9uuw00002069
|
Stabilizer Bushing Installation Note
1. Align the outer side of the positioning plate with the stabilizer bushing.
am8rrw00001822
|
Stabilizer Bracket Installation Note
1. Install the stabilizer bracket so that the arrow is pointed to the front.
ampjjw00000547
|