|
ac9uuw00003617
SEAT WARMER UNIT INSPECTION
id091300801400
Seat Cushion
Wiring diagram
ac9uuw00003617
|
Symptom trouble shooting index
|
No. |
Troubleshooting item |
Description |
|---|---|---|
|
1
|
Seat warmer function is inoperative (See Inspection procedure (No.1 Seat warmer function is inoperative).)
|
Seat warmer does not warm seat even though seat warmer switch is on
|
|
2
|
Seat warmer always operations (See Inspection procedure (No.2 Seat warmer always operations).)
|
Seat warmer warms seat even though seat warmer switch is off
|
|
3
|
Temperature of the seat warmer cannot be adjusted (See Inspection procedure (No.3 Temperature of seat warmer cannot be adjusted).)
|
• Seat warmer does not adjust temperature even though seat warmer LO/HI switch is switched between low and high
• Seat warmer temperature continues to rise
|
Inspection procedure (No.1 Seat warmer function is inoperative)
|
No.1 |
Seat warmer function is inoperative |
|---|---|
|
DETECTION
|
Seat warmer does not warm seat even though seat warmer switch is on
|
|
POSSIBLE CAUSE
|
The power supply is not supplied to filament of seat warmer
• Open circuit or short to ground in seat warmer unit power supply circuit:
• S.WARM 15 A fuse malfunction
• Open circuit in wiring harness between the following terminal:
Seat warmer control not operation
• Open circuit in wiring harness between the following terminal:
Seat warmer unit control cannot control filament on
• Seat warmer control LH malfunction
• Seat warmer control RH malfunction
• Thermostat (Built-in seat warmer unit LH) malfunction
• Thermostat (Built-in seat warmer unit RH) malfunction
Seat warmer filament does not generate heat
• Seat warmer unit (front seat cushion) malfunction
• Seat warmer unit (front seat back) malfunction
Seat warmer unit cannot receive operation signal from front climate control unit
• Seat warmer control LH malfunction
• Seat warmer control RH malfunction
• Open circuit or short circuit in wiring harness between the following terminal:
Front climate control unit cannot receive operation signal from seat warmer unit
• Front climate control unit malfunction
• Seat warmer switch (Built-in front climate control) malfunction
|
Diagnostic procedure
|
STEP |
INSPECTION |
ACTION |
|
|---|---|---|---|
|
1
|
DETERMINE MALFUNCTIONING SYSTEM
• Are the seat warmers on both sides not operating?
|
Yes
|
Go to the next step.
|
|
No
|
Go to step 8.
|
||
|
2
|
INSPECT THE SEAT WARMER POWER SUPPLY FUSE
• Inspect the S.WARM 15 A fuse.
• Is the fuse normal?
|
Yes
|
Go to the next step.
|
|
No
|
• If the fuse is deterioration:
• If the fuse is melt
Repair the short to ground in wiring harness between the following terminals:
|
||
|
3*
|
DETERMINE IF CAUSE OF MALFUNCTION IS CONTROLLER POWER SUPPLY WIRING HARNESS FOR SEAT WARMER OR OTHER CAUSE
• Switch the ignition to off.
• Disconnect the seat warmer unit RH.
• Switch the ignition to on.
• Measure the voltage at the following terminal (wiring harness-side):
• Is the voltage B+?
|
Yes
|
Go to step 6.
|
|
No
|
Go to the next step.
|
||
|
4*
|
VERIFY IF MALFUNCTION CAUSE IS SHORT CIRCUIT IN SEAT WARMER POWER SUPPLY WIRING HARNESS
• Seat warmer unit RH connector is disconnected.
• Switch the ignition to off.
• Disconnect the seat warmer unit LH connector and BCM connector.
• Verify continuity between seat warmer unit wiring harness-side connector terminal 1E and ground.
• Is there continuity?
|
Yes
|
Repair for a short to ground in the wiring harness.
|
|
No
|
Go to the next step.
|
||
|
5*
|
VERIFY IF MALFUNCTION CAUSE IS OPEN CIRCUIT IN SEAT WARMER POWER SUPPLY WITING HARNESS
• Seat warmer unit RH, Seat warmer unit LH and BCM connector are disconnected.
• Verify the continuity at the following terminal (wiring harness-side):
• Is there continuity?
|
Yes
|
• Inspect the BCM 1N and 5L terminal.
• Repair the connector or terminals.
|
|
No
|
Repair the wiring harness for open circuit.
|
||
|
6*
|
DETERMINE IF MALFUNCTION CAUSE IS SIGNAL GROUND WIRING HARNESS OF SEAT WARMER OR MALFUNCTION IN FRONT CLIMATE CONTROL UNIT
• Seat warmer unit RH and Seat warmer unit LH connector are disconnected.
• Switch the ignition to on.
• Measure the voltage at the following terminal (wiring harness-side):
• Is there voltage 1.0V or less?
|
Yes
|
Replace the front climate control unit. (See FRONT CLIMATE CONTROL UNIT REMOVAL/INSTALLATION.)
|
|
No
|
Go to the next step.
|
||
|
7*
|
DETERMINE IF MALFUNCTION CAUSE IS SIGNAL GROUND WIRING HARNESS OF SEAT WARMER OR MALFUNCTION IN FRONT CLIMATE CONTROL UNIT
• Seat warmer unit RH and Seat warmer unit LH connector are disconnected.
• Switch the ignition to off.
• Disconnect the front climate control unit connector.
• Inspect for continuity between the following terminals (wiring harness-side):
• Is there continuity?
|
Yes
|
Replace the front climate control unit. (See FRONT CLIMATE CONTROL UNIT REMOVAL/INSTALLATION.)
|
|
No
|
Repair the wiring harness for open circuit.
|
||
|
8
|
DETERMINE MALFUNCTIONING SYSTEM
• Is the seat warmer (front seat back) only not operating?
|
Yes
|
Go to the next step.
|
|
No
|
Go to step 10.
|
||
|
9*
|
VERIFY IF MALFUNCTION CAUSE IS SEAT BACK OR SEAT CUSHION
• Inspect the seat warmer (front seat back). (See Seat Back.)
• Is the seat warmer (front seat back) normal?
|
Yes
|
Replace the seat warmer unit (front seat cushion)
• Vehicles with occupancy sensor
• Vehicles without occupancy sensor
|
|
No
|
Replace the seat warmer unit (front seat back). (See Seat Back.)
|
||
|
10*
|
VERIFY IF MALFUNCTION CAUSE IS OPEN CIRCUIT IN SEAT WARMER POWER SUPPLY WIRING HARNESS
• Switch the ignition to off.
• Disconnect the seat warmer unit connector on the side that is not operating.
• Measure the voltage at the following terminal (wiring harness-side):
• Is the voltage B+?
|
Yes
|
Go to the next step.
|
|
No
|
• Repair the open circuit in wiring harness between the following terminals:
|
||
|
11*
|
VERIFY IF MALFUNCTION CAUSE IS SHORT TO GROUND IN SEAT WARMER
• Disconnect the seat warmer unit connector on the side that is not operating.
• Verify continuity between seat warmer unit on the side that is not operating wiring harness-side connector terminal 1B and ground.
• Is there continuity?
|
Yes
|
• Drive-side seat warmer does not operate.
• Passenger-side seat warmer does not operate.
|
|
No
|
• Inspect the open circuit following.
• Inspect the GND connector terminals for poor connection.
• Repair the malfunction.
|
||
|
12*
|
VERIFY IF MALFUNCTION CAUSE IS OPEN CIRCUIT IN SEAT WARMER CONTROL POWER SUPPLY WIRING HARNESS
• Seat warmer unit LH connector is disconnected.
• Switch the ignition to on.
• Measure the voltage at the following terminal (wiring harness-side):
• Is the voltage B+?
|
Yes
|
Go to step 14.
|
|
No
|
• Repair the open circuit at the following wiring harness.
|
||
|
13*
|
VERIFY IF MALFANCTION CAUSE IS OPEN CIRCUIT IN SIGNAL GROUND WIRING HARNESS OF SEAT WARMER UNIT RH
• Seat warmer unit RH connector is disconnected.
• Switch the ignition to on.
• Measure the voltage at the following terminal (wiring harness-side):
• Is there voltage 1.0V or less?
|
Yes
|
Go to the next step.
|
|
No
|
• Repair the open circuit at the following wiring harness.
|
||
|
14*
|
VERIFY IF MALFUNCTION CAUSE IS CONTROL SIGNAL SYSTEM OF SEAT WARMER OR MALFUNCTION IN SEAT WARMER UNIT
• Seat warmer unit connector on the side that is not operating.
• Switch the ignition to on.
• Turn the seat warmer switch to LO or HI.
• Measure the voltage at the following terminal (wiring harness-side):
• Is the voltage normal?
|
Yes
|
Go to the next step.
|
|
No
|
Replace the seat warmer unit (front seat cushion)
• Vehicles with occupancy sensor
• Vehicles without occupancy sensor
|
||
|
15*
|
VERIFY IF MALFUNCTION CAUSE IS OPEN CIRCUIT IN WIRING HARNESS OF SEAT WARMER CONTROL SIGNAL
• seat warmer unit connector on the side that is not operating is disconnected.
• Switch the ignition to on.
• Disconnect the seat warmer unit connector on the side that is operating and front climate control unit connector.
• Verify the continuity at the following terminal (wiring harness-side):
• Is there continuity?
|
Yes
|
Go to the next step.
|
|
No
|
Repair the open circuit in wiring harness.
|
||
|
16*
|
VERIFY IF MALFUNCTION CAUSE IS SHORT CIRCUIT IN WIRING HARNESS OF SEAT WARMER CONTROL SIGNAL
• Seat warmer units on both sides and front climate control unit connector are disconnected.
• Switch the ignition to on.
• Measure the voltage at the following terminal (wiring harness-side):
• Is the voltage B+?
|
Yes
|
Repair for a power supply in the wiring harness.
|
|
No
|
Replace the front climate control unit. (See FRONT CLIMATE CONTROL UNIT REMOVAL/INSTALLATION.)
|
||
Inspection procedure (No.2 Seat warmer always operations)
|
No.2 |
Seat warmer always operations |
|---|---|
|
DETECTION
|
Seat warmer warms seat even though seat warmer switch is off
|
|
POSSIBLE CAUSE
|
Front climate control unit sends operation signal constantly
• Front climate control unit malfunction
• Seat warmer switch (Built-in front climate control unit) malfunction
Seat warmer unit falsely detects that operation signal is ON
• Seat warmer unit control LH malfunction
• Seat warmer unit control RH malfunction
• Open circuit in wiring harness between the following terminal:
Seat warmer unit is in constant ON control status
• Seat warmer unit control LH malfunction
• Seat warmer unit control RH malfunction
• Open circuit in the seat warmer unit LH Internal circuit
• Open circuit in the seat warmer unit RH Internal circuit
• Short to ground in the seat warmer (front seat back) LH Internal circuit
• Short to ground in the seat warmer (front seat back) RH Internal circuit
|
Diagnostic procedure
|
STEP |
INSPECTION |
ACTION |
|
|---|---|---|---|
|
1*
|
DETERMINE IF MALFUNCTION CAUSE IS OPERATION SIGNAL OF SEAT WARMER OR MALFUNCTION IN SEAT WARMER UNIT
• Switch the ignition to off.
• Disconnect the seat warmer unit connector on the side that is not operating.
• Switch the ignition to on.
• Turn the seat warmer switch to OFF.
• Measure the voltage at the following terminal (wiring harness-side):
• Is the voltage B+?
|
Yes
|
Go to step 4.
|
|
No
|
Go to the next step.
|
||
|
2*
|
VERIFY IF MALFUNCTION CAUSE IS SHORT CIRCUIT IN WIRING HARNESS OF SEAT WARMER OPERATION SIGNAL
• Seat warmer unit connector on the side that is not operating is disconnecting.
• Switch the ignition to off.
• Disconnect the front climate control unit connector.
• Verify continuity between seat warmer unit on the side that is not operating wiring harness-side connector terminal 1C and ground.
• Is there continuity?
|
Yes
|
Repair for a short to ground in the wiring harness.
|
|
No
|
Go to the next step.
|
||
|
3*
|
VERIFY IF MALFUNCTION CAUSE IS SHORT CIRCUIT FROM OPERATION SIGNAL WIRING HARNESS OF SEAT WARMER TO OTHER WIRING HARNESS OR MALFUNCTION IN FRONT CLIMATE CONTROL UNIT
• Seat warmer unit connector on the side that is not operating and front climate control unit connector is disconnected.
• Switch the ignition to on.
• Measure the voltage at the following terminal (wiring harness-side):
• Is there any voltage?
|
Yes
|
Repair for a short to ground in the wiring harness and other wiring harnesses.
|
|
No
|
Replace the front climate control unit. (See FRONT CLIMATE CONTROL UNIT REMOVAL/INSTALLATION.)
|
||
|
4*
|
VERIFY IF MALFUNCTION CAUSE IS SHORT TO GROUND IN INTERNAL CIRCUIT OF SEAT WARMER UNIT (FRONT SEAT BACK) HARNESS OR MALFUNCTION IN SEAT WARMER UNIT (FRONT SEAT CUSHION)
• Seat warmer unit connector on the side that is not operating is disconnected.
• Switch the ignition to off.
• Disconnect the seat warmer unit (front seat back) connector on the side that is not operating. (See SEAT WARMER UNIT REMOVAL/INSTALLATION.)
• Verify the continuity at the following terminal (wiring harness-side):
• Is there continuity?
|
Yes
|
Replace the seat warmer unit (front seat back). (See Seat Back.)
|
|
No
|
Replace the seat warmer unit (front seat cushion)
• Vehicles with occupancy sensor
• Vehicles without occupancy sensor
|
||
Inspection procedure (No.3 Temperature of seat warmer cannot be adjusted)
|
No.3 |
Temperature of seat warmer cannot be adjusted |
|---|---|
|
DETECTION
|
• Seat warmer does not adjust temperature even though seat warmer LO/HI switch is switched between low and high
• Seat warmer temperature continues to rise
|
|
POSSIBLE CAUSE
|
Front climate control unit sends false signal
• Front climate control unit malfunction (Short to ground in the front climate control unit Internal circuit)
Seat warmer unit falsely detects operation signal
• Seat warmer unit LH control malfunction
• Seat warmer unit RH control malfunction
• Short to ground in wiring harness between the following terminal:
Seat warmer unit control cannot control filament
• Seat warmer unit LH control malfunction
• Seat warmer unit RH control malfunction
• Thermostat (Built-in seat warmer LH unit) malfunction
• Thermostat (Built-in seat warmer RH unit) malfunction
• Short to ground in the seat warmer unit LH Internal circuit
• Short to ground in the seat warmer unit RH Internal circuit
• Short to ground in the seat warmer (front seat back) LH Internal circuit
• Short to ground in the seat warmer (front seat back) RH Internal circuit
|
Diagnostic procedure
|
STEP |
INSPECTION |
ACTION |
|
|---|---|---|---|
|
1*
|
DETERMINE IF MALFUNCTION CAUSE IS OPERATION SIGNAL OF SEAT WARMER OR MALFUNCTION IN SEAT WARMER UNIT
• Switch the ignition to off.
• Disconnect the seat warmer unit connector on the side that is not operating.
• Switch the ignition to on.
• Turn the seat warmer switch to OFF.
• Measure the voltage at the following terminal (wiring harness-side):
• Is the voltage normal?
|
Yes
|
Go to step 4.
|
|
No
|
Go to the next step.
|
||
|
2*
|
VERIFY IF MALFUNCTION CAUSE IS SHORT CIRCUIT IN WIRING HARNESS OF SEAT WARMER OPERATION SIGNAL
• Seat warmer unit connector on the side that is not operating is disconnected.
• Switch the ignition to off
• Disconnect the front climate control unit connector.
• Verify the continuity at the following terminal (wiring harness-side):
• Is there continuity?
|
Yes
|
Repair for a short to ground in the wiring harness.
|
|
No
|
Go to the next step.
|
||
|
3*
|
VERIFY IF MALFUNCTION CAUSE IS SHORT CIRCUIT FROM OPERATION SIGNAL WIRING HARNESS OF SEAT WARMER TO OTHER WIRING HARNESS OR MALFUNCTION IN FRONT CLIMATE CONTROL UNIT
• Seat warmer unit connector on the side that is not operating and front climate control unit connector is disconnected.
• Switch the ignition to on.
• Measure the voltage at the following terminal (wiring harness-side):
• Is there any voltage?
|
Yes
|
Repair for a short to ground in the wiring harness and other wiring harnesses.
|
|
No
|
Replace the front climate control unit. (See FRONT CLIMATE CONTROL UNIT REMOVAL/INSTALLATION.)
|
||
|
4*
|
VERIFY IF MALFUNCTION CAUSE IS SHORT TO GROUND IN INTERNAL CIRCUIT OF SEAT WARMER (FRONT SEAT BACK) HARNESS OR MALFUNCTION IN SEAT WARMER UNIT (FRONT SEAT CUSHION)
• Seat warmer unit connector on the side that is not operating is disconnected.
• Switch the ignition to off.
• Disconnect the seat warmer unit (front seat back) connector on the side that is not operating. (See SEAT WARMER UNIT REMOVAL/INSTALLATION.)
• Verify the continuity at the following terminal (wiring harness-side):
• Is there continuity?
|
Yes
|
Replace the seat warmer unit (front seat back). (See Seat Back.)
|
|
No
|
Replace the seat warmer unit (front seat cushion)
• Vehicles with occupancy sensor
• Vehicles without occupancy sensor
|
||
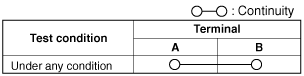
Seat Back
1. Remove the front seat. (See FRONT SEAT REMOVAL/INSTALLATION.)
2. Remove the seat back trim.
3. Verify that the continuity between terminals A and B is as indicated in the table.
acxuuw00000910
|
acxuuw00000911
|