D-PILLAR TRIM REMOVAL/INSTALLATION
id091700802300
1. Remove the following parts:
- (1) Trunk box (See TRUNK BOX REMOVAL/INSTALLATION.)
- (2) Seat side box (See SEAT SIDE BOX REMOVAL/INSTALLATION.)
- (3) Trunk end trim (See TRUNK END TRIM REMOVAL/INSTALLATION.)
- (4) Third-row seat (See THIRD-ROW SEAT REMOVAL/INSTALLATION.)
- (5) Third-row seat belt lower anchor installation bolt (See THIRD-ROW SEAT BELT REMOVAL/INSTALLATION.)
- (6) Rear scuff plate inner (See REAR SCUFF PLATE REMOVAL/INSTALLATION.)
- (7) Trunk side trim (See TRUNK SIDE TRIM REMOVAL/INSTALLATION.)
- (8) Roof side trim (See ROOF SIDE TRIM REMOVAL/INSTALLATION.)
- (9) Third-row seat belt upper anchor installation bolt (See THIRD-ROW SEAT BELT REMOVAL/INSTALLATION.)
2. Remove the PLG arm band. (Vehicles with PLG)
3. Partially peel back the seaming welt.
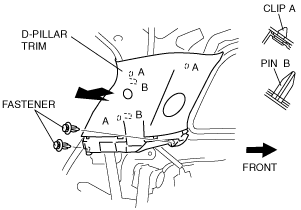
4. Remove the fasteners.
5. Detach clips A and pins B by pulling them in the direction of the arrow.
6. Remove the D-pillar trim.
7. Install in the reverse order of removal.